Affiliate Disclosure: This article may contain affiliate links. If you purchase a product through one of these links, Survival Place Blog may earn a commission at no additional cost to you. We only recommend products that can serve a practical preparedness purpose.
Introduction
Most people think of wilderness shelter as a tent, a lean-to, or a pile of branches.
In a real emergency, shelter is much more than that.
An emergency outdoor shelter can protect you from exposure while giving you time to assess the situation, conserve energy, and decide what to do next.
It is about getting out of the weather, protecting your body from heat loss or excessive heat, staying dry, conserving energy, and buying yourself time until you can safely continue or help arrives.
You may have planned a two-hour day hike and suddenly find yourself facing darkness, heavy rain, an injured hiking partner, an unexpected temperature drop, or a navigation problem.
That changes the situation.
The shelter you need for a comfortable weekend backpacking trip may be completely different from the shelter you need when you have three hours of daylight left and realize you’re not going to make it back to the trailhead.
The goal isn’t to build the most impressive shelter.
The goal is to create enough protection to keep the situation from becoming worse.
The National Park Service considers emergency shelter one of the Ten Essentials and recommends carrying equipment such as a tent, tarp, bivy, or emergency space blanket. It also emphasizes adjusting your equipment and preparations to the activity, environment, and expected conditions.
The First Rule: Use What You Already Have
Before cutting branches or collecting leaves, look at the equipment you brought with you.
If you have a tent, use it.
If you have a tarp, use it.
If you have an emergency bivy, use it.
A compact emergency bivy can provide immediate protection from wind, rain, and exposure without requiring a lengthy shelter build.
If all you have is an emergency blanket and a rain jacket, use those resources to create immediate protection rather than spending hours trying to construct a complicated shelter from natural materials.
Emergency shelter construction is a backup skill, not an excuse to leave your emergency shelter at home.
A lightweight tarp, bivy, or emergency blanket can often provide useful protection much faster than a shelter constructed entirely from natural materials.
Your Shelter Should Match the Situation
There is no single shelter that is best for every emergency.
The right choice depends on:
- Weather
- Temperature
- Wind
- Rain or snow
- Terrain
- Available materials
- Daylight remaining
- Your physical condition
- Your shelter equipment
- How long you may need to remain there
- Whether someone is injured
- How difficult it will be for rescuers to reach you
A shelter that works well in a dry forest may be a poor choice during heavy rain.
A natural debris shelter may make sense when you have no equipment, but it may be a terrible use of energy when you already have a tarp in your backpack.
A snow shelter can provide significant protection in the right environment, but it requires appropriate conditions, knowledge, ventilation, and enough time to construct safely.
The further you travel, the longer you stay, and the harder it is to reach outside help, the more important your emergency shelter system becomes.
Day Hike vs. Multi-Day Backpacking Trip
One of the biggest mistakes people make is packing the same way for every outdoor trip.
Your medical kit, food, water, navigation equipment, clothing, and shelter should reflect where you’re going and how long you’ll be there.
Short Day Hike
A short hike close to roads and populated areas may not require the same shelter system as a remote backcountry trip.
Even so, unexpected delays can happen.
A practical emergency setup might include:
- Emergency blanket or bivy
- Rain shell
- Extra layer
- Headlamp
- Basic first-aid supplies
- Water and treatment capability
- Navigation backup
- Fire starter
- Emergency food
Overnight or Weekend Backpacking Trip
A longer trip into the backcountry increases the consequences of equipment failure, injury, bad weather, or getting lost.
Your shelter system may include:
- Tent or tarp
- Sleeping bag or quilt
- Sleeping pad
- Emergency bivy
- Ground protection
- Extra clothing
- Cordage
- Weather protection
- Navigation equipment
- Fire-starting equipment
Remote or Extended Backcountry Trip
When you’re several miles from the nearest road or emergency access, redundancy becomes more important.
A shelter system should be capable of handling an unexpected night — and potentially longer — without assuming that rescue will arrive immediately.
Choosing a Safe Shelter Location
A good shelter in a bad location is still a bad shelter.
Before building anything, look around.
You want protection from the elements without putting yourself directly underneath another hazard.
Look for:
- Stable ground
- Good drainage
- Some protection from prevailing wind
- Protection from precipitation
- A location away from obvious hazards
- Reasonable access to water without camping directly beside it
- A location where you can remain visible if rescue becomes necessary
Avoid:
- Dry or dead trees that could fall
- Large dead branches overhead
- Areas showing signs of recent flooding
- Drainage channels
- Unstable slopes
- Rockfall areas
- Avalanche terrain when applicable
- Exposed ridgelines during severe weather
- Areas immediately beside rivers or streams that could rise
Don’t automatically choose the closest water source.
A creek may look convenient, but water levels can change rapidly during heavy rain.
Likewise, the biggest tree in the area isn’t automatically the safest place to shelter.
For additional backcountry safety considerations, review the National Park Service’s wilderness safety guidance before heading into remote areas.
Your goal is to find the safest reasonable location, not simply the most convenient one.
The Shelter Decision: What Do You Actually Need?
Before building anything, ask five questions:
1. What is the weather doing?
Rain, wind, snow, heat, and cold all change the shelter problem.
2. How much daylight do I have?
A complicated shelter that takes two hours to build may be a poor choice if darkness arrives in 45 minutes.
3. What equipment do I have?
A tarp changes the equation dramatically.
So does an emergency bivy, sleeping bag, or tent.
4. How much energy do I have?
If you’re exhausted, injured, cold, or wet, conserve energy.
5. How long might I be here?
A shelter for an hour-long weather delay doesn’t have to be the same as a shelter for an unexpected overnight stay.
Choose the simplest shelter that adequately protects you.
Shelter Option 1: Tarp Shelter
For many prepared hikers, a tarp is one of the most versatile emergency shelter options.
A tarp can be configured in different ways depending on the weather and available anchor points.
It can provide:
- Rain protection
- Wind protection
- Shade
- A dry work area
- Protection for equipment
- A barrier against wet ground
The biggest advantage is speed.
You aren’t starting from zero.
With suitable cordage and a few anchor points, a tarp can become functional shelter much faster than constructing an entire shelter from natural materials.
A lightweight emergency tarp shelter can serve as a versatile backup for unexpected weather and overnight situations.
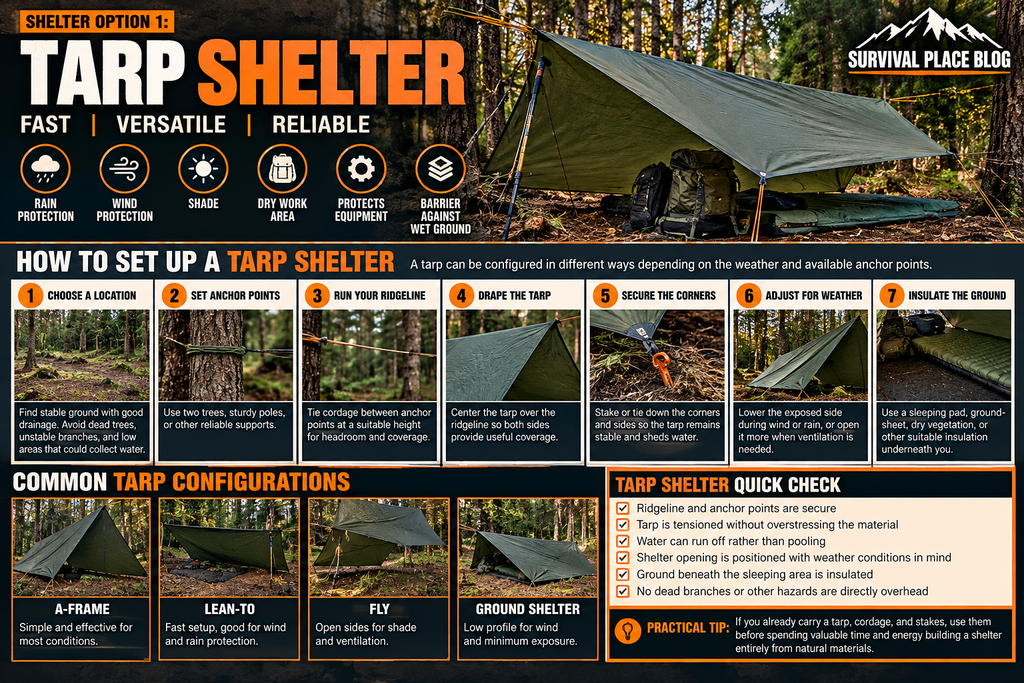
Basic tarp shelter setup and common configurations for emergency outdoor shelter.How to Set Up a Tarp Shelter
A tarp is most useful when you can get it deployed quickly and securely before the weather deteriorates.
Basic setup:
- Choose a safe location. Look for stable ground with good drainage and avoid dead trees, unstable branches, low areas that could collect water, and other obvious hazards.
- Identify your anchor points. Two trees, sturdy poles, or other reliable supports can provide the basic structure.
- Run your ridgeline. Tie cordage between two secure anchor points and position it so the tarp will provide enough headroom and coverage.
- Drape the tarp over the ridgeline. Center the tarp so both sides provide useful coverage.
- Secure the corners and sides. Stake or tie them down so the tarp remains stable and sheds water rather than collecting it.
- Adjust for the weather. Lower the exposed side during wind or rain, or open the shelter more when ventilation and airflow are more important.
- Insulate the ground. A tarp overhead does little to prevent heat loss through the ground. Use a sleeping pad, groundsheet, dry vegetation, or other suitable insulation underneath you.
Tarp Shelter Quick Check
□ Ridgeline and anchor points are secure
□ Tarp is tensioned without overstressing the material
□ Water can run off rather than pooling
□ Shelter opening is positioned with weather conditions in mind
□ Ground beneath the sleeping area is insulated
□ No dead branches or other hazards are directly overhead
Practical tip: If you already carry a tarp, cordage, and stakes, use them before spending valuable time and energy building a shelter entirely from natural materials.
Shelter Option 2: Emergency Bivy
An emergency bivy is designed to provide rapid protection with very little setup.
It is particularly useful when:
- You’re caught after dark
- Weather deteriorates unexpectedly
- You are injured
- You need immediate protection
- You don’t have time or energy for complicated construction
A bivy doesn’t necessarily provide the living space of a tent, but an emergency situation isn’t a camping trip.
Fast protection can be more valuable than comfort.
If you’re carrying one, use it.
Don’t save it because you think the situation isn’t “bad enough.”
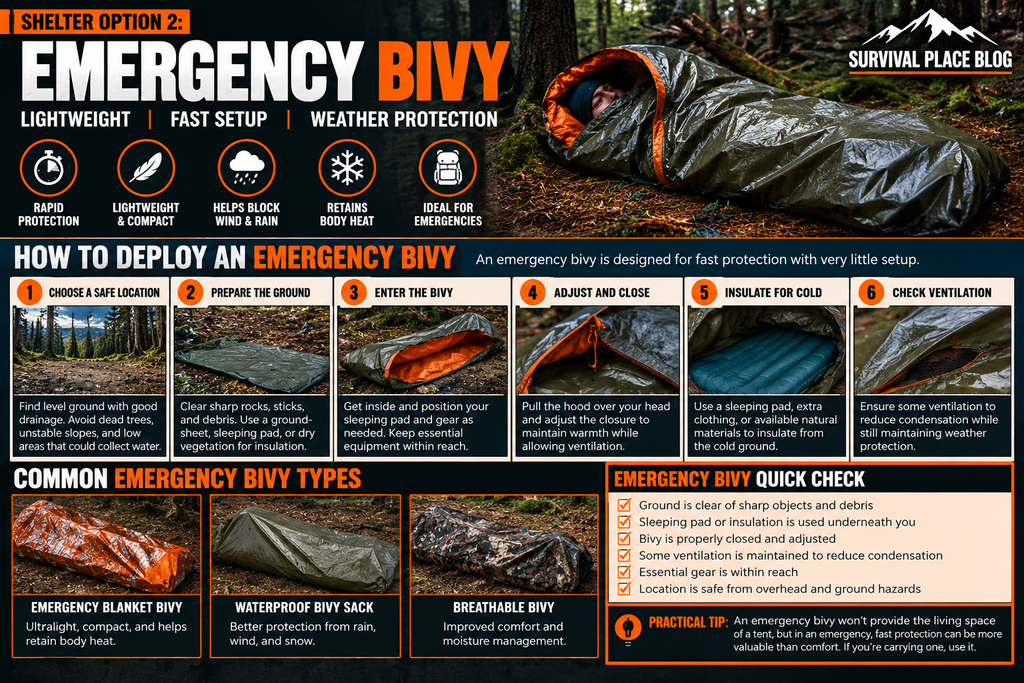
How to Deploy an Emergency Bivy
An emergency bivy is designed for speed, so the goal is to get protected from exposure without wasting energy on unnecessary setup.
- Choose a safe location. Find the most protected reasonable spot available, away from dead branches, unstable slopes, drainage channels, and other obvious hazards.
- Prepare the ground. Clear away sharp rocks, sticks, and debris. If you have a sleeping pad, groundsheet, or other insulation, place it underneath the bivy.
- Get inside and organize your gear. Position your sleeping insulation and keep essential equipment within reach.
- Adjust the bivy around you. Close or secure the opening as designed to improve protection from wind and precipitation while maintaining appropriate ventilation.
- Insulate against the cold ground. The bivy helps protect you from the elements, but it does not eliminate heat loss into the ground. Add insulation underneath you whenever possible.
- Check ventilation. Avoid completely sealing yourself inside an emergency bivy. Follow the manufacturer’s instructions and maintain appropriate airflow to help manage condensation while retaining weather protection.
Emergency Bivy Quick Check
□ Ground is clear of sharp objects and debris
□ Sleeping pad or other insulation is underneath you
□ Bivy is properly adjusted and secured
□ Appropriate ventilation is maintained
□ Essential gear is within reach
□ Location is protected from obvious overhead and ground hazards
Practical tip: An emergency bivy isn’t a replacement for a full tent, but in an unexpected overnight emergency, fast protection can matter more than comfort.
Shelter Option 3: Emergency Blanket
An emergency blanket is small enough to carry almost anywhere and can become part of a larger shelter system.
It can provide:
- A wind barrier
- Rain protection when properly configured
- Reflective visibility for rescuers
- A barrier between you and the ground
- Additional insulation when used appropriately
Its biggest limitation is durability and coverage.
An emergency blanket isn’t a replacement for a real shelter system on a serious backcountry trip.
But when a person unexpectedly becomes stranded, small and lightweight is far better than nothing.
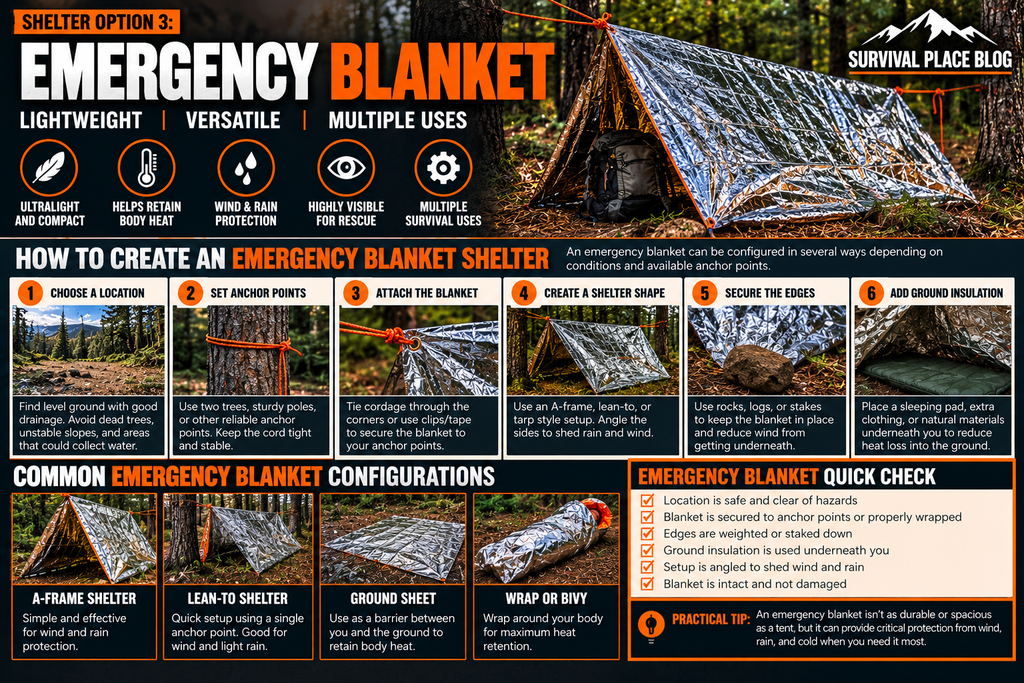
How to Deploy an Emergency Blanket
An emergency blanket is meant for rapid protection, so the goal is to get inside and protected from exposure without spending unnecessary time or energy on construction.
- Choose a safe location. Find the most protected reasonable spot available. Avoid dead branches, unstable slopes, drainage channels, and other obvious hazards.
- Prepare the ground. Clear away sharp rocks, sticks, and debris. If you have a sleeping pad, groundsheet, bivvy or other insulation, place it underneath the blanket.
- Deploy the blanket. Open the blanket and position it so the opening can be accessed easily. Follow the manufacturer’s instructions for the specific blanket you’re carrying.
- Get inside and organize your gear. Keep essential equipment within reach and arrange your sleeping insulation so you aren’t lying directly against cold ground.
- Adjust the opening for conditions. Secure the blanket as needed to reduce exposure to wind and precipitation while maintaining appropriate ventilation.
- Add insulation underneath. If conditions are cold, add suitable insulation beneath the blanket. Protecting yourself from ground contact can make a significant difference in an overnight emergency.
- Check the setup. Make sure the blanket isn’t sitting in a location where water can collect and that there are no obvious overhead or surrounding hazards.
Emergency Blanket Quick Check
□ Location is safe and reasonably protected
□ Ground is clear of sharp objects and debris
□ Insulation is underneath the blanket
□ Blanket is properly deployed
□ Opening is adjusted for weather conditions
□ Appropriate ventilation is maintained
□ Essential gear is within reach
Practical tip: Don’t wait until you’re already severely cold or exhausted to deploy an emergency blanket. If conditions are deteriorating and you may be staying out longer than expected, getting protected early can conserve valuable energy.
Shelter Option 4: Lean-To
The lean-to remains one of the classic improvised wilderness shelters.
It works particularly well where suitable trees and straight branches are available.
The basic concept is simple:
Create a sloping framework and cover it with material that helps block wind and precipitation.
However, building a lean-to correctly takes time, materials, and energy.
If you already have a tarp or bivy, use those first.
If you’ve decided a lean-to fits your situation, our detailed guide How to Build a Lean-To Shelter for Wilderness Survival walks through the construction process step by step.
Absolutely. For Shelter Option 4: Lean-To, put the written construction instructions directly underneath the graphic, just like we did with the tarp and bivy.
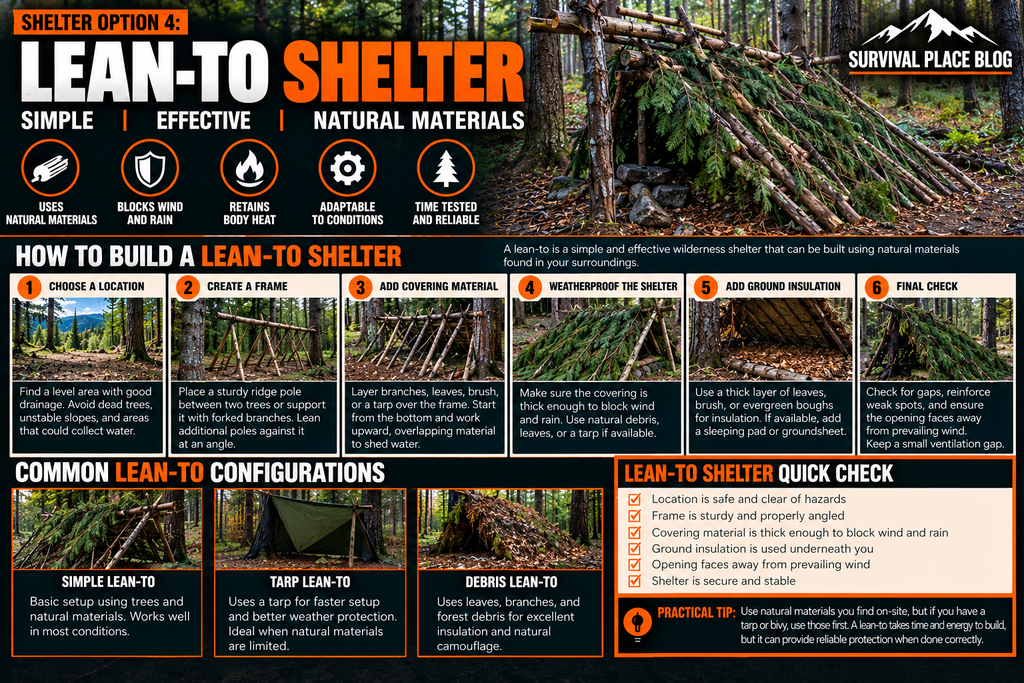
How to Build a Lean-To Shelter
A lean-to is relatively simple to construct, but it can require a significant amount of material and energy. Build the basic structure first, then improve its protection if time and conditions allow.
- Choose a safe location. Select level or reasonably stable ground with good drainage. Avoid dead trees, unstable branches, steep slopes, drainage channels, and areas that could collect water.
- Create the main support. Place a sturdy ridgepole between two trees or use another secure support arrangement. The ridgepole should be stable enough to support the shelter framework.
- Add the angled supports. Lean sturdy branches against the ridgepole at regular intervals, creating the sloping wall of the shelter.
- Add the covering material. Layer branches, brush, leaves, evergreen boughs, or a tarp over the framework. Start low and overlap the material as you work upward so water can run down the outside rather than through the shelter.
- Weatherproof the structure. Add additional layers where there are obvious gaps or areas exposed to wind and rain. A thicker covering generally provides better protection.
- Insulate the ground. Build a thick layer of dry leaves, vegetation, evergreen boughs, or other suitable insulation inside the shelter. A sleeping pad or groundsheet can provide additional protection if you have one.
- Check the finished shelter. Look for weak supports, gaps in the covering, water paths, and overhead hazards. Position the opening to reduce exposure to prevailing wind when practical.
Lean-To Shelter Quick Check
□ Location is safe and reasonably well drained
□ Ridgepole and frame are stable
□ Covering is thick enough for the expected conditions
□ Rain can run off the shelter
□ Ground insulation is in place
□ Opening is positioned appropriately for the weather
□ Shelter is stable and free of obvious hazards
Practical tip: If you already have a tarp or bivy, use it before spending hours gathering natural materials. A lean-to can provide effective protection, but building one from scratch costs time and energy.
Shelter Option 5: A-Frame
An A-frame shelter creates protection on both sides of a central ridge line.
Depending on construction and materials, it can provide better protection from changing wind directions than some open-sided shelters.
An A-frame can be constructed using:
- A tarp
- Cordage
- Trees
- Poles
- Natural materials
A tarp-based A-frame is generally much faster to construct than a completely natural-material version.
Again, use the equipment you already have before spending valuable energy harvesting materials.
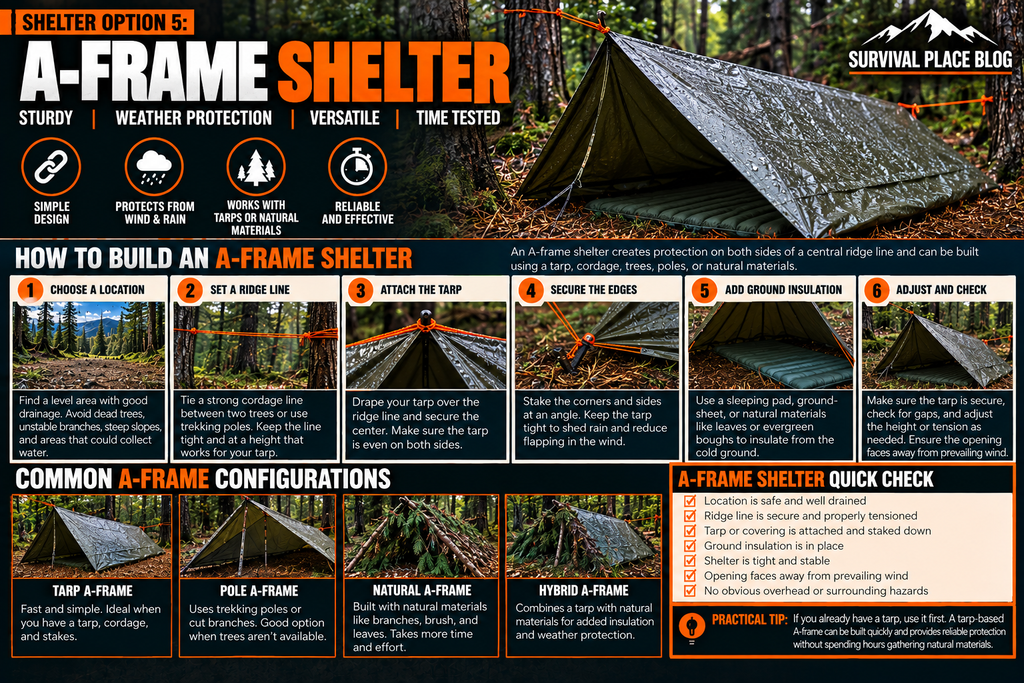
How to Build an A-Frame Shelter
An A-frame can be built with a tarp, poles, or natural materials. A tarp-based version is generally the fastest option when you already have the necessary equipment.
- Choose a safe location. Find reasonably level ground with good drainage. Avoid dead trees, unstable branches, steep slopes, drainage channels, and areas where water could collect.
- Set the ridge line. Tie sturdy cordage between two reliable anchor points, such as trees, or use suitable poles if trees aren’t available. Keep the ridge line secure and properly tensioned.
- Attach the covering. Drape the tarp evenly over the ridge line so both sides provide coverage. If using natural materials, build the framework first and add overlapping branches and other suitable material.
- Secure the edges. Stake or tie down the corners and sides. Keep the covering tight enough to shed rain and reduce movement in wind.
- Add ground insulation. Place a sleeping pad, groundsheet, dry leaves, evergreen boughs, or other suitable insulating material underneath the sleeping area.
- Adjust for conditions. Check the shelter from outside and inside. Adjust the height, tension, and opening as needed for wind, rain, ventilation, and available space.
- Perform a final safety check. Make sure the ridge line and covering are secure and that there are no obvious overhead hazards or unstable supports.
A-Frame Shelter Quick Check
□ Location is safe and well drained
□ Ridge line is secure and properly tensioned
□ Tarp or covering is attached and staked down
□ Ground insulation is in place
□ Shelter is tight and stable
□ Opening is positioned appropriately for the weather
□ No obvious overhead or surrounding hazards
Practical tip: If you already have a tarp, cordage, and stakes, use them first. A tarp-based A-frame can provide dependable protection without spending hours gathering natural materials.
Shelter Option 6: Natural Debris Shelter
When you don’t have adequate shelter equipment, natural materials may become your primary resource.
A debris shelter uses available vegetation and other natural materials to create a barrier against wind, precipitation, and cold.
The basic concept is:
Structure → coverage → insulation.
The framework supports the shelter.
The outer material blocks weather.
Additional material can provide insulation.
This type of shelter can take a considerable amount of time and energy to build properly.
That makes it a last-resort skill, not necessarily the first choice.
If you’re already wet and cold, don’t spend hours constructing a complicated shelter while your condition deteriorates.
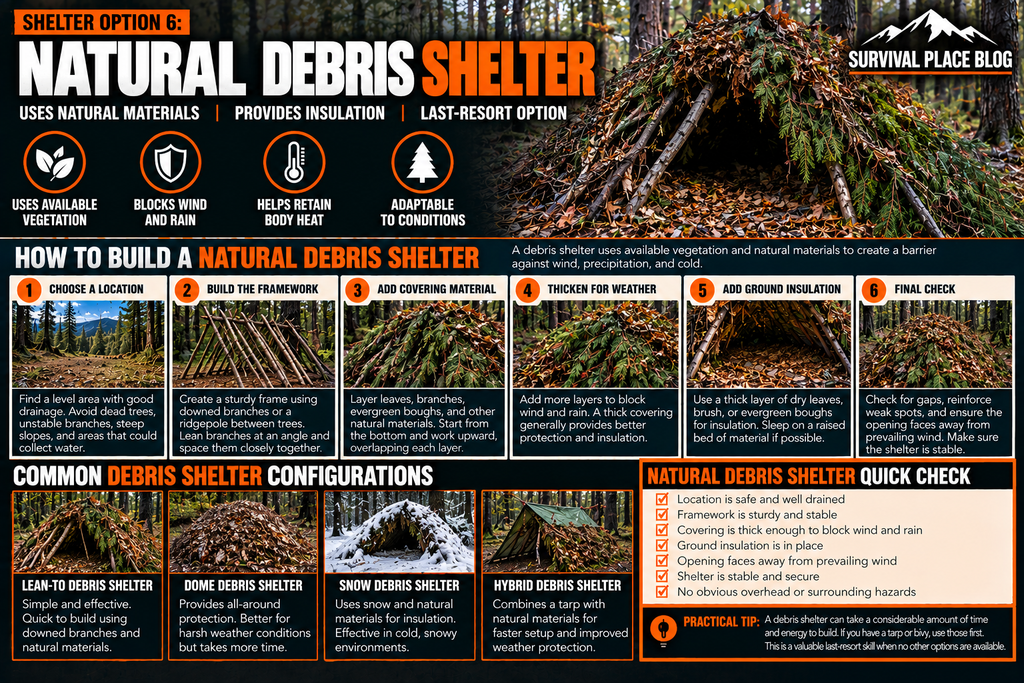
Absolutely — same format as the other shelter sections.
How to Build a Natural Debris Shelter
A natural debris shelter takes more time and energy than a tarp or bivy, so focus on creating a simple, stable structure first. You can add insulation and weather protection as materials and energy allow.
- Choose a safe location. Find reasonably level ground with good drainage. Avoid dead trees, unstable branches, steep slopes, drainage channels, and areas where water could collect.
- Build the framework. Use a sturdy ridgepole or downed branches to create the main structure. Lean additional branches against the support at an angle, spacing them closely enough to create a strong framework.
- Add covering material. Layer leaves, branches, evergreen boughs, brush, and other available natural materials over the framework. Start near the bottom and work upward, overlapping each layer so water can run down the outside.
- Thicken the shelter for weather. Continue adding material until the covering provides a substantial barrier against wind and precipitation. Thicker layers can also improve insulation.
- Insulate the ground. Place a thick layer of dry leaves, brush, evergreen boughs, or other suitable material inside the shelter. If possible, create a raised sleeping area to reduce contact with the cold ground.
- Adjust for conditions. Add material to exposed areas and reinforce weak sections based on wind direction, precipitation, and available resources. Keep the entrance positioned to reduce exposure when practical.
- Perform a final safety check. Check for gaps, loose supports, unstable branches, and other hazards. Make sure the shelter is stable and that the entrance and interior remain usable.
Natural Debris Shelter Quick Check
□ Location is safe and reasonably well drained
□ Framework is sturdy and stable
□ Covering is thick enough for the expected conditions
□ Ground insulation is in place
□ Opening is positioned appropriately for the weather
□ Shelter is stable and secure
□ No obvious overhead or surrounding hazards
Practical tip: A debris shelter can take considerable time and energy to build. If you already have a tarp, bivy, or other shelter equipment, use it first when practical. A natural debris shelter is a valuable last-resort skill when other options aren’t available.
Shelter Option 7: Snow Shelter
Snow changes the shelter equation.
In appropriate winter conditions, packed snow can be used to create an insulating shelter.
Examples include:
- Snow trenches
- Snow caves
- Quinzhee-style shelters
But winter shelter construction isn’t a simple beginner technique.
You need to understand snow conditions, structural stability, ventilation, and the dangers associated with enclosed spaces.
A poorly constructed snow shelter can create additional hazards rather than solving the problem.
For winter-specific preparation, ventilation, and snow-shelter safety, review the National Park Service’s winter safety guidance before relying on a snow shelter in an emergency.
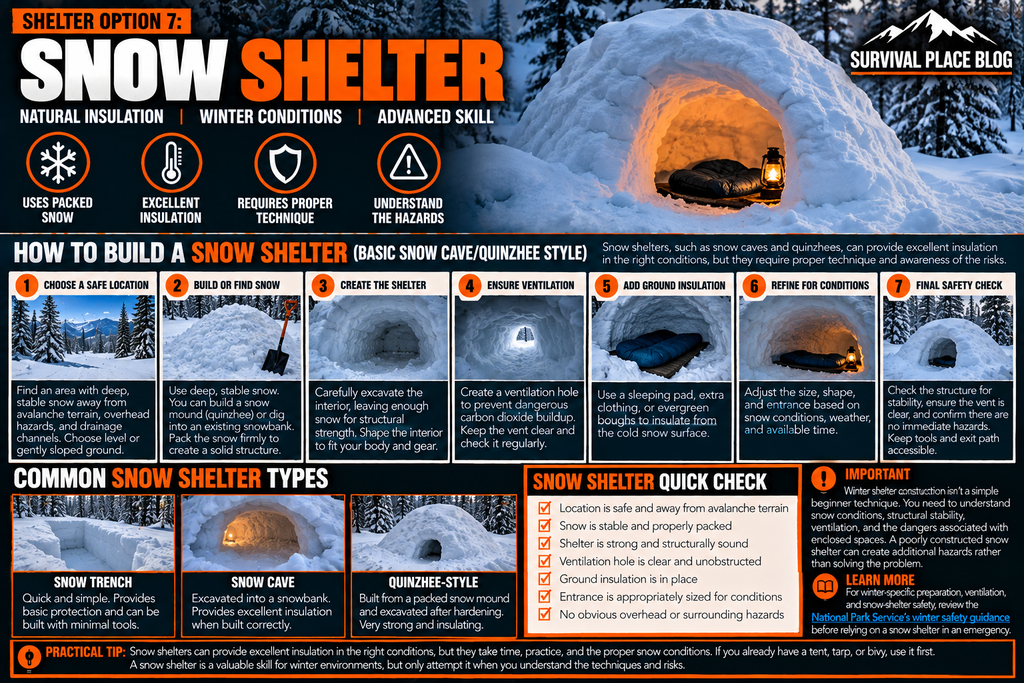
How to Build a Snow Shelter
Snow shelters require more care than the other shelter options. Only attempt one when snow conditions are suitable and you understand the risks of collapse, poor ventilation, cold exposure, and avalanches.
- Choose a safe location. Stay away from avalanche terrain, unstable slopes, drainage channels, and areas beneath hazardous trees or branches.
- Assess the snow. You need enough suitable, stable snow to create a shelter. Avoid building in questionable or unstable snow conditions.
- Choose the shelter type. A snow trench, snow cave, or quinzhee-style shelter may be appropriate depending on the snowpack, terrain, available tools, and time.
- Build the structure carefully. Create or excavate the shelter while leaving enough snow to maintain structural strength. Avoid making the walls or roof unnecessarily thin.
- Provide ventilation. Maintain a ventilation opening and keep it clear of snow. Enclosed snow shelters require particular attention to airflow.
- Insulate yourself from the snow. Use a sleeping pad, clothing, evergreen boughs, or other suitable insulation beneath you to reduce heat loss to the cold surface.
- Check the shelter before settling in. Inspect the structure for weak areas, confirm ventilation is functioning, and make sure the entrance and exit remain accessible.
Snow Shelter Quick Check
□ Location is away from obvious avalanche and overhead hazards
□ Snow is suitable and stable
□ Structure is strong and stable
□ Ventilation opening is clear
□ Ground insulation is in place
□ Entrance is appropriate for the conditions
□ Exit path remains accessible
Practical tip: Snow shelters can provide excellent insulation in the right conditions, but they are an advanced winter skill. If you already have a tent, tarp, or bivy, use that equipment when practical rather than spending valuable time constructing a snow shelter.
Don’t Forget the Ground
One of the biggest mistakes in emergency shelter construction is concentrating entirely on the roof.
The ground matters.
Cold ground can draw heat away from your body, particularly when you’re lying or sitting directly on it.
Your shelter should therefore include some type of ground insulation.
Depending on what you have available, that might be:
- Sleeping pad
- Backpack
- Clothing
- Foam pad
- Dry vegetation
- Boughs
- Emergency blanket
- Bivy
- Sleeping bag
The objective is to create a barrier between your body and the cold or wet ground.
An emergency thermal blanket can provide an additional barrier against wind and moisture and can be useful as part of a broader emergency shelter system.
In cold conditions, getting off the ground can be just as important as getting above the ground under a roof.
Cold, Wet and Windy: Shelter Becomes a Priority
Cold weather doesn’t have to mean freezing temperatures.
Wind and moisture can dramatically increase heat loss.
A person who is wet, exhausted, underdressed, and exposed to wind can develop hypothermia in conditions that don’t initially feel extreme.
If someone is becoming cold:
- Get them out of the wind
- Protect them from precipitation
- Replace wet clothing when possible
- Add dry insulating layers
- Insulate them from the ground
- Provide appropriate fluids and food when they are able to take them
- Seek professional medical help when needed
Watch for worsening shivering, confusion, unusual fatigue, poor coordination, slurred speech, or other changes in mental status.
The National Park Service’s hypothermia guidance explains the warning signs and the importance of getting a cold person protected from further heat loss.
Fire, Water and Food Still Matter
Shelter is one part of the survival problem.
Once you’re protected from the immediate environment, you need to think about the other basic needs.
Fire
Depending on local regulations and conditions, fire may provide warmth, a means of cooking, and a signaling option.
Before relying on fire in an emergency, make sure you understand the equipment, techniques, and restrictions involved. Our guide to fire starting and outdoor emergency preparedness covers the basics.
But fire isn’t appropriate everywhere.
Know the regulations and current fire restrictions before relying on it.
Water
Dehydration doesn’t stop being a problem because you’re stranded.
Carry enough water for the trip and have a method for treating additional water when appropriate.
Don’t assume that clear mountain water is automatically safe to drink.
Our guide Wilderness Water: How to Find, Filter and Purify Water Safely covers how to locate and treat water when you’re away from reliable supplies.
Food
Food becomes particularly important during an unexpected overnight or prolonged delay.
Extra, ready-to-eat food is generally more useful in an emergency than something that requires a complicated cooking setup.
If an emergency extends beyond your carried food supply, our guide Foraging for Survival: Finding Food Safely in the Wilderness covers the basics of identifying and obtaining wild food while emphasizing safety.
When an Injury Forces You to Stay
Sometimes shelter becomes necessary because someone can no longer safely continue.
A sprained ankle, serious cut, fall, illness, or other injury can turn a routine hike into an overnight emergency.
The priorities change.
Don’t automatically move an injured person simply because the trailhead is “that way.”
First assess the injury and the surrounding hazards.
If moving the person could make the injury worse, staying put and activating emergency assistance may be the safer choice.
Provide basic first aid within your level of training, protect the person from the environment, keep them as comfortable and warm as possible, and communicate your location when emergency assistance is needed.
Our guide Wilderness First Aid Basics covers additional preparation, assessment, and emergency-response considerations for injuries that occur far from immediate medical care.
If You’re Lost, Shelter May Come Before Navigation
Getting lost creates another important decision.
The instinct may be to keep walking until you find the trail.
That can make the situation worse.
If you are disoriented, conditions are deteriorating, daylight is disappearing, or continuing travel is unsafe, stopping and establishing protection may be the better option.
Once you’re in a safe location:
- Determine your last known location
- Check your map and compass
- Review your GPS if available
- Conserve battery power
- Attempt communication
- Make yourself visible
- Prepare to spend the night if necessary
If you want to strengthen your navigation skills before heading into the backcountry, our guide Wilderness Navigation: How to Navigate Without GPS covers practical techniques for finding your way without relying entirely on a phone.
Don’t let the desire to “get out” cause you to walk farther into unfamiliar terrain.
Scenario 1: The Day Hike That Runs Late
You planned a short afternoon hike.
The trail takes longer than expected.
Clouds move in.
Your phone battery is getting low.
You have a rain jacket, emergency blanket, headlamp, water, and a small first-aid kit.
What should you do?
Don’t wait until complete darkness.
Assess the weather and your route.
If continuing is safe and you know the route, return while you still have daylight.
If continuing becomes unsafe or you become disoriented, stop.
Use your emergency shelter.
Put on your extra layer before becoming cold.
Conserve your phone battery.
Use your headlamp only when necessary.
Begin thinking about signaling and emergency communication.
A $10–$20 emergency shelter carried from the beginning can completely change the situation.
Scenario 2: The Backpacker Caught in a Storm
You’re several miles into a backpacking trip.
Rain becomes heavy.
Wind increases.
You have a tarp, sleeping bag, sleeping pad, extra clothing, water treatment, food, and fire-starting equipment.
You don’t need to build a shelter from branches.
You already have one.
Find a safe location away from drainage and overhead hazards.
Set up the tarp.
Get your sleeping system protected.
Change into dry layers if necessary.
Insulate yourself from the ground.
Then deal with everything else.
The lesson isn’t that natural shelters are useless.
It’s that prepared equipment can save enormous amounts of time and energy.
Scenario 3: You’re Lost Near Dark
You realize you’ve missed a trail junction.
You’ve been trying to correct the mistake for an hour.
Now daylight is disappearing.
This is where pride can become dangerous.
Stop.
Determine what you actually know about your location.
If you cannot confidently identify a safe route, continuing blindly may increase the distance rescuers need to search.
Find a safe shelter location.
Set up your emergency shelter.
Use your navigation equipment.
Attempt communication.
Make yourself visible.
Conserve your energy.
Prepare for the possibility of spending the night.
NPS wilderness guidance advises staying put when conditions make continued travel more dangerous and emphasizes staying warm and dry while awaiting help.
Scenario 4: No Shelter Gear
This is where the shelter-building skills you’ve practiced become valuable.
You have no tarp.
No tent.
No bivy.
Your clothing is limited.
You still have daylight.
Now natural materials become important.
Look for a safe location.
Build the simplest structure that provides meaningful protection.
Insulate the ground.
Use available vegetation for additional insulation.
Protect yourself from wind and precipitation.
Don’t spend hours trying to create a perfect shelter.
Adequate shelter built early is better than an impressive shelter finished after dark.
Scenario 5: An Injured Person Needs to Stay Put
Someone in your group falls and suffers a serious injury.
They cannot safely walk.
The weather is getting colder.
The group has an emergency shelter, extra clothing, food, water, and first-aid equipment.
This is no longer simply a shelter-construction problem.
It is an emergency management problem.
Protect the patient.
Provide appropriate first aid within your training.
Activate emergency assistance as early as possible.
Give rescuers your location and information about the injury.
Keep the injured person protected from the environment.
Avoid unnecessary movement when serious injury is suspected unless staying where you are presents an immediate danger.
Shelter Is About Buying Time
A good emergency shelter doesn’t have to be comfortable.
It needs to accomplish the job.
It should help you:
- Stay warmer
- Stay drier
- Get out of the wind
- Reduce exposure
- Conserve energy
- Protect an injured person
- Improve your chances of being found
- Safely wait for changing conditions or rescue
That’s why a small emergency bivy can sometimes be more valuable than a beautifully constructed wilderness shelter.
The best shelter is not necessarily the strongest, largest, or most impressive.
It’s the shelter that gives you the protection you need with the resources, conditions, and time you actually have.
Choosing the right shelter is only part of the equation. Our Emergency Shelter Decision & Overnight Checklist gives you a quick-reference guide for choosing shelter based on conditions, checking your location, preparing for an unexpected overnight stay, and deciding what to prioritize when things go wrong.
What to Carry for Emergency Shelter
Your shelter system should match the trip.
Minimum emergency shelter for a short outing
Consider carrying:
- Emergency bivy or emergency blanket
- Rain shell
- Extra insulating layer
- Headlamp
- Basic first-aid supplies
- Water
- Water treatment capability
- Navigation backup
- Fire starter
- Emergency food
For overnight backpacking
Add:
- Primary shelter
- Sleeping bag or quilt
- Sleeping pad
- Ground protection
- Cordage
- Additional clothing
- Weather-specific equipment
For remote or difficult trips
Consider additional redundancy based on:
- Distance from help
- Weather
- Elevation
- Season
- Group size
- Medical needs
- Communication limitations
- Navigation difficulty
The National Park Service recommends adjusting equipment to the specific activity and environment rather than treating one equipment list as sufficient for every trip.
The Emergency Shelter Rule to Remember
You don’t need to become a wilderness shelter expert before heading into the woods.
But you should understand the basics.
Know where you’re going.
Know what conditions you’re likely to encounter.
Carry shelter appropriate to the trip.
Know how to use it before you need it.
Choose your location carefully.
Get off the ground.
Stay dry and out of the wind.
Conserve energy.
Don’t travel blindly when you’re lost.
Don’t move a seriously injured person unnecessarily.
Activate emergency assistance early when the situation warrants it.
And if your planned shelter fails, remember that the objective isn’t perfection.
The objective is staying alive, staying protected, and giving yourself time.
Emergency Shelter: Quick Decision Guide
You have a tarp
Use the tarp. Don’t spend your energy constructing a natural shelter unless conditions require additional protection.
You have an emergency bivy
Use it early. Especially when you’re cold, wet, injured, or facing an unexpected overnight stay.
You have only an emergency blanket
Use it as part of a shelter system and combine it with clothing, terrain, and available materials.
You have no shelter equipment
Choose a safe site and construct the simplest effective natural shelter you can.
Heavy rain is approaching
Prioritize protection from precipitation and drainage.
Strong wind is developing
Prioritize a protected location and secure the shelter before conditions deteriorate.
You’re becoming cold
Get dry, get out of the wind, insulate yourself from the ground, and address the possibility of hypothermia.
You’re lost near dark
Stop trying to solve the problem by walking blindly. Establish shelter, assess your location, communicate if possible, and prepare for the night.
Someone is seriously injured
Treat the emergency within your training, protect the patient, activate emergency assistance, and avoid unnecessary movement unless remaining in place creates an immediate threat.
Final Thoughts
Emergency shelter is one of the most important wilderness skills because it doesn’t depend on one particular piece of equipment.
A tent can fail.
A tarp can tear.
A person can forget a bivy.
Weather can change.
A hiker can become injured or lost.
Knowing how to create protection from whatever resources are available gives you another layer of resilience.
But the best wilderness shelter strategy begins before the emergency.
Plan the trip.
Understand the environment.
Carry the right equipment.
Practice using it.
And make sure your shelter system matches the reality of the trip you’re actually taking.
A two-hour trail close to the road is not the same problem as a week in the deep backcountry.
Prepare accordingly.