Affiliate Disclosure: Some links in this article are affiliate links. If you purchase a product through one of these links, Survival Place Blog may earn a commission at no additional cost to you. We only recommend products we believe may be useful for preparedness, outdoor safety, and emergency planning.
Medical Disclaimer: This article provides general wilderness first-aid information for preparedness and education. It is not a substitute for professional medical training, diagnosis, or emergency medical care. In a serious emergency, activate emergency services as soon as possible and follow instructions from qualified medical professionals.
The wilderness can be an incredible place to explore, but distance changes everything when something goes wrong.
A twisted ankle two miles down a trail is one problem. A badly injured hiker several miles into a remote backcountry trip is something entirely different.
A deep cut at a campground may be manageable with basic first aid. That same injury miles from a road can become a much more serious problem when professional medical help is hours away.
Cold rain, extreme heat, a fall, an allergic reaction, dehydration, hypothermia, or an unexpected medical emergency can quickly turn an ordinary outdoor adventure into a survival situation.
That’s what makes wilderness first aid different from first aid at home.
You may not have an ambulance nearby. Cell service may not exist. Weather can change. Darkness can arrive. Your medical supplies may be limited. And an injured person may not be able to walk out.
Your job isn’t to become a wilderness doctor.
Your job is to recognize the problem, determine what needs attention first, provide appropriate care within your training, prevent the situation from getting worse, communicate with rescuers, and make a reasonable decision about evacuation.
The farther you travel from professional medical care, the more important those skills become.
Wilderness First Aid Starts Before You Leave
The best wilderness first-aid plan begins before anyone gets hurt.
Before leaving, think about where you’re going, how long you’ll be gone, what you’ll be doing, who is going with you, and how difficult it would be to get professional help.
The National Park Service recommends planning ahead, carrying appropriate essentials, and adjusting your preparation to the activity and environment.
For more trip-planning guidance, see the National Park Service’s Trip Planning Guide.
Before the trip, ask yourself some basic questions.
Where Are You Going?
A short hike on a popular trail is not the same as a remote route several hours from a road.
Know:
- Trail or route
- Terrain
- Elevation
- Water crossings
- Weather exposure
- Wildlife concerns
- Distance from roads
- Distance from medical care
- Availability of cell service
How Long Will You Be Gone?
A two-hour hike and a seven-day backpacking trip require different levels of preparation.
If something goes wrong on a day hike, you may be able to reach help relatively quickly.
On a remote multi-day trip, you may need enough supplies and equipment to manage an injury or illness for considerably longer.
Who Is Coming?
Your group matters.
Consider:
- Number of people
- Children
- Older adults
- Medical conditions
- Allergies
- Medications
- Physical abilities
- Previous injuries
- Experience level
A first-aid kit for one experienced adult shouldn’t necessarily be the same kit used for a family or larger group.
What Will You Be Doing?
Your activity creates its own risks.
A fishing trip, mountain hike, climbing trip, hunting trip, paddling trip, winter camping trip, and ordinary day hike don’t expose you to exactly the same hazards.
Your first-aid and emergency equipment should reflect that.
How Long Could It Take to Get Help?
This may be the most important question of all.
The farther you are from professional medical care, the more important preparation becomes.
Pack According to the Trip
There is no single perfect wilderness first-aid kit.
A two-hour day hike near a populated trail system doesn’t necessarily require the same medical supplies as a seven-day backpacking trip deep in the backcountry.
That doesn’t mean the short hike requires no preparation.
It means your level of preparation should match your exposure and your distance from help.
Short Day Hike
For a relatively short hike where help is reasonably accessible, a compact kit might include:
- Adhesive bandages
- Gauze
- Medical tape
- Wound-cleaning supplies
- Blister treatment
- Nitrile gloves
- Elastic wrap
- Personal medications
- Emergency blanket
- Basic emergency signaling equipment
A well-stocked first-aid kit can provide the basic wound-care supplies needed to deal with common injuries without having to assemble every component individually.
You should still carry the other basic outdoor essentials appropriate for the trip.
Full-Day or Remote Hike
As your distance from help increases, consider expanding your capability.
That could include:
- Additional wound-care supplies
- Larger dressings
- More blister supplies
- Additional gloves
- Bleeding-control equipment appropriate to your training
- Emergency insulation
- Emergency shelter
- Navigation backup
- Signaling equipment
- Emergency communication
- Additional water and food capability
The goal isn’t to carry a hospital in your backpack.
The goal is to have enough capability to manage a realistic emergency while waiting for help or making a safe exit.
Multi-Day Backpacking Trip
A multi-day trip deep into the backcountry changes the equation again.
You may be dealing with:
- Longer evacuation times
- Changing weather
- Greater exposure
- More opportunities for injury
- Limited resupply
- Multiple people
- Greater physical demands
- Limited communication
Your kit should reflect those realities.
You may need additional wound-care supplies, foot-care supplies, bleeding-control equipment, emergency insulation, personal medications, communication equipment, navigation backups, water treatment, emergency food, and repair equipment.
NPS guidance similarly recommends adjusting the Ten Essentials to the activity and carrying first-aid supplies, navigation, shelter, illumination, fire, extra food, and water.
For a complete breakdown, review the National Park Service’s Ten Essentials for outdoor emergencies.
The Simple Rule
The farther you go, the longer you’re staying, and the harder it is to reach help, the more self-sufficient your emergency preparation should be.
But there’s another rule that’s just as important:
Don’t carry equipment you don’t know how to use.
A small kit containing equipment you understand can be more useful than a large medical bag full of equipment you’ve never practiced using.
Your Environment Should Change Your Kit
Distance isn’t the only consideration.
A desert hike, a wet Pacific Northwest backpacking trip, and a winter mountain excursion can expose you to very different problems.
Think about:
Weather
Heat, cold, rain, snow, wind, and sudden weather changes.
Terrain
Steep slopes, loose rock, rivers, cliffs, and dense vegetation.
Wildlife
Snakes, insects, ticks, bears, and other animals.
Activity
Climbing, fishing, paddling, hunting, biking, or working around camp equipment.
Communication
Cellular coverage versus satellite communication.
Rescue Access
A trail five minutes from a road is very different from a route requiring a long-distance ground rescue, boat, or helicopter.
Build your kit around the trip—not around a generic shopping list.
The First Five Minutes: Wilderness Triage
When someone gets hurt, your first instinct may be to run straight to them.
Stop.
Look around first.
A falling tree, unstable slope, wildfire, lightning, moving water, rockfall, aggressive animal, or other hazard could turn one patient into two.
A simple way to organize your response is:
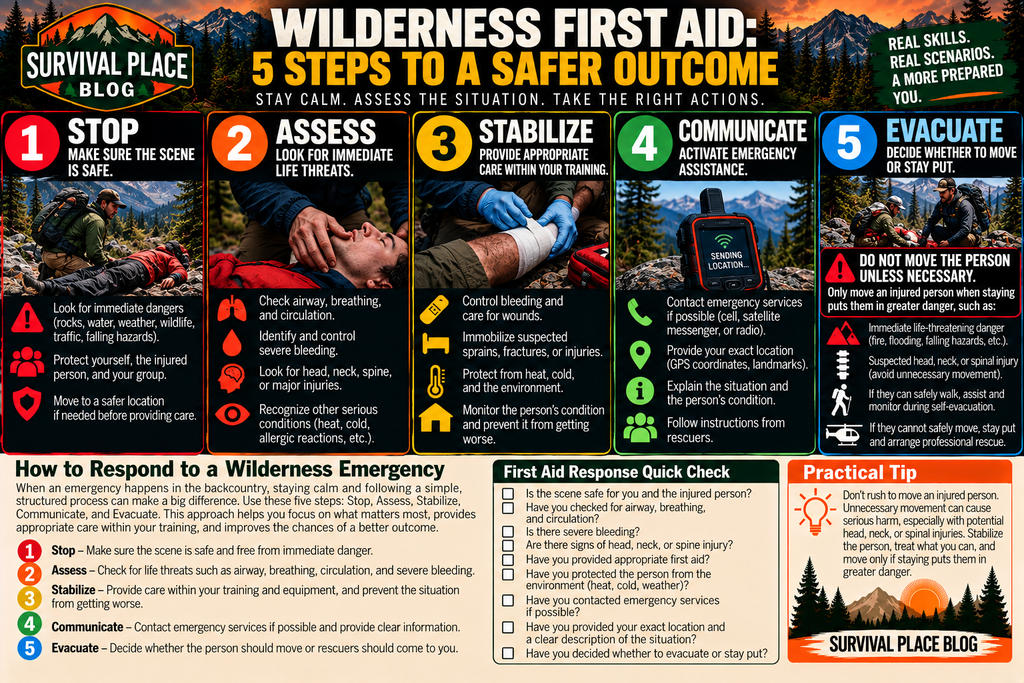
STOP → ASSESS → STABILIZE → COMMUNICATE → EVACUATE
This isn’t about becoming a combat medic or emergency physician.
It’s a simple framework for organizing your response when something goes wrong.
STOP
Take a breath.
Don’t rush blindly into an unsafe situation.
Ask:
What happened?
What caused the injury?
Is that danger still present?
Are there other hazards?
ASSESS
Look for immediate threats first.
Ask:
- Is the person responsive?
- Are they breathing normally?
- Is there severe bleeding?
- Are they showing signs of serious deterioration?
- What happened?
- Are there multiple injuries?
- Is their condition changing?
You’re not necessarily diagnosing the patient.
You’re determining what needs attention first.
STABILIZE
Provide the care you can safely provide based on your training and equipment.
That might mean:
- Controlling serious bleeding
- Supporting breathing
- Protecting an injured limb
- Keeping the person warm
- Cooling someone suffering from dangerous heat
- Covering a wound
- Protecting the patient from the environment
- Monitoring their condition
Don’t perform complicated procedures simply because you read about them online.
COMMUNICATE
If the situation warrants emergency assistance, activate it as early as possible.
Give rescuers:
- Your location
- GPS coordinates if available
- Trail or route name
- What happened
- Number of patients
- Patient condition
- Known medical conditions
- Equipment available
- Environmental hazards
- Best access point
Knowing what information to provide can make a wilderness emergency call more useful. The National Park Service’s emergency planning guidance provides additional direction on communicating your location and situation to rescuers.
First Aid Response Quick Check
□ Is the scene safe for you and the injured person?
□ Have you checked airway, breathing, and circulation?
□ Is there severe bleeding?
□ Are there signs of head, neck, or spinal injury?
□ Have you provided appropriate first aid within your training?
□ Have you protected the person from heat, cold, weather, or other environmental hazards?
□ Have you contacted emergency services if possible?
□ Have you provided your location and a clear description of the situation?
□ Have you decided whether to evacuate or stay put?
Practical Tip
Don’t rush to move an injured person. Unnecessary movement can create additional problems, particularly when a serious head, neck, or spinal injury is suspected. Stabilize the person, assess the situation, and move them only when staying where they are creates a greater danger.
EVACUATE
Now comes one of the hardest questions:
Can this person safely move?
Sometimes the answer is yes.
Sometimes the answer is no.
And sometimes the answer changes as the situation develops.
Severe Bleeding: One of the First Things to Address
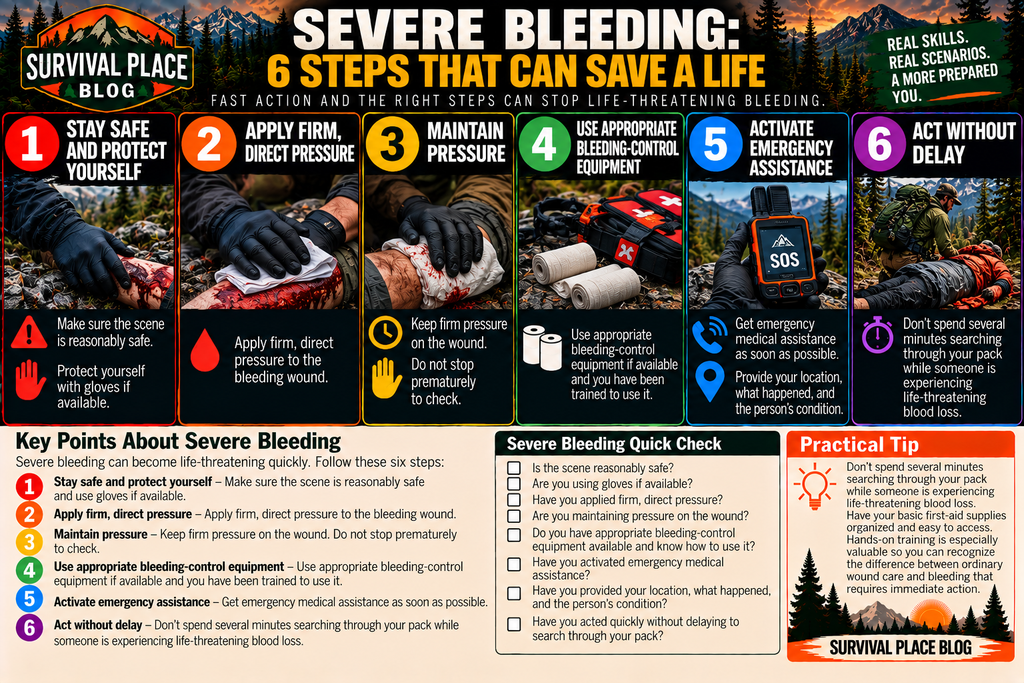
Severe bleeding can become life-threatening quickly.
If someone is bleeding heavily:
- Make sure the scene is reasonably safe.
- Protect yourself with gloves if available.
- Apply firm, direct pressure.
- Maintain pressure.
- Use appropriate bleeding-control equipment if available and you have been trained to use it.
- Activate emergency medical assistance.
Don’t spend several minutes searching through your pack while someone is experiencing life-threatening blood loss.
This is one area where hands-on training is especially valuable.
A wilderness traveler should understand the difference between ordinary wound care and bleeding that requires immediate action.
For practical guidance on recognizing and responding to life-threatening bleeding, review the American Red Cross first-aid guidance on severe bleeding.
Severe Bleeding Quick Check
□ Is the scene reasonably safe?
□ Am I using gloves if available?
□ Have I applied firm, direct pressure?
□ Am I maintaining pressure on the wound?
□ Do I have appropriate bleeding-control equipment available?
□ Am I trained to use that equipment?
□ Have I activated emergency medical assistance?
□ Have I provided the person’s location, what happened, and their condition?
□ Am I acting without unnecessary delay?
Cuts, Scrapes and Puncture Wounds
Small wounds can often be treated in the field, but they shouldn’t simply be ignored.
For an appropriate minor wound:
- Clean your hands if possible.
- Irrigate or clean the wound with appropriate clean water.
- Remove visible dirt when it can be done safely.
- Cover the wound.
- Monitor it during the remainder of the trip.
Seek professional medical care for wounds that are deep, badly contaminated, caused by an animal bite, won’t stop bleeding, or develop concerning signs such as increasing redness, swelling, warmth, drainage, or worsening pain.
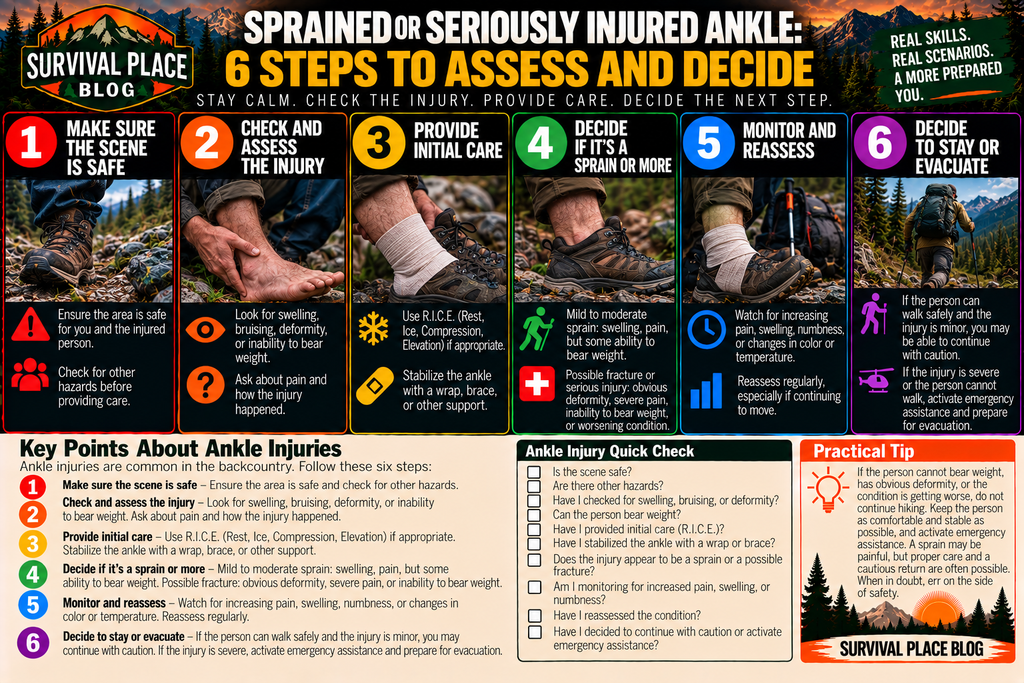
Sprains and Strains
An injured ankle is one of the most common problems that can turn a routine hike into an evacuation decision.
How to Assess a Sprained or Seriously Injured Ankle
An ankle injury can quickly turn a routine hike into an evacuation decision. Stop first, assess the injury, provide appropriate care, and then decide whether the person can safely continue.
- Make sure the scene is safe. Ensure the area is safe for you and the injured person before providing care.
- Check and assess the injury. Look for swelling, bruising, deformity, or inability to bear weight. Ask about the pain and how the injury happened.
- Provide initial care. For a minor injury, rest and protection may be enough. Use appropriate care and stabilize the ankle with a wrap, brace, or other support when appropriate and within your training.
- Decide if it’s a sprain or something more serious. Severe pain, obvious deformity, significant swelling, or inability to use the limb normally can indicate a more serious injury. Pasted markdown
- Monitor and reassess. Watch for increasing pain, swelling, numbness, or changes in color or temperature. Reassess the person’s condition regularly.
- Decide whether to stay or evacuate. If the person can safely walk and the injury is minor, continuing cautiously may be possible. If the person cannot safely walk or the injury appears serious, activate emergency assistance and prepare for evacuation.
NPS guidance similarly advises treating minor injuries, resting, staying hydrated, and turning around when the injury prevents someone from safely completing the activity.
If the person cannot safely walk, the situation becomes an evacuation problem.
Ankle Injury Quick Check
□ Is the scene safe?
□ Are there other hazards nearby?
□ Have I checked for swelling, bruising, or deformity?
□ Can the person bear weight?
□ Have I asked how the injury happened and how severe the pain is?
□ Have I provided appropriate initial care?
□ Have I stabilized the ankle when appropriate?
□ Am I monitoring for increasing pain, swelling, numbness, or changes in color or temperature?
□ Can the person safely continue, or is evacuation necessary?
Practical Tip
Don’t tell someone to simply “walk it off.” Stop and assess the injury first. If the person cannot safely bear weight, has obvious deformity, or the condition is getting worse, don’t continue the hike—activate emergency assistance and prepare for evacuation.
Suspected Fractures
Signs of a possible fracture can include:
- Severe pain
- Swelling
- Deformity
- Abnormal movement
- Significant tenderness
- Inability to use the limb normally
If you suspect a fracture:
- Keep the person as still as practical.
- Protect the injured area from further movement.
- Immobilize it when appropriate and within your training.
- Don’t force a deformed limb back into position.
- Cover an open wound with a clean dressing.
- Arrange professional medical evaluation.
The goal isn’t to “fix” the fracture.
The goal is to prevent additional injury while getting the person to appropriate care.
Head, Neck and Back Injuries
A fall can produce injuries that aren’t immediately obvious.
Watch for:
- Loss of consciousness
- Confusion
- Repeated vomiting
- Severe or worsening headache
- Seizure
- Weakness or numbness
- Problems speaking
- Problems walking
- Vision changes
- Significant neck or back pain
Unless there is an immediate danger at the scene, avoid unnecessary movement of someone with a potentially serious head, neck, or spinal injury.
For more information on current wilderness recommendations for protecting the spine, review the Wilderness Medical Society’s spinal cord protection guidance.
Current Wilderness Medical Society guidance has shifted away from a blanket “immobilize everyone” approach toward the goal of spinal cord protection and minimizing unwanted movement, while recognizing the realities and risks of wilderness care.
Burns
Wilderness burns commonly occur around:
- Campfires
- Stoves
- Hot cookware
- Boiling water
- Fuel
- Heated equipment
For a minor thermal burn, cool the affected area with clean, cool running water when available.
Don’t apply ice directly to a burn.
After cooling, protect the burn with an appropriate clean dressing.
More serious burns require medical evaluation, particularly burns that are deep, extensive, or involve critical areas.
And remember:
Preventing the burn is easier than treating it.
Blisters: A Small Problem That Can Become a Big One
A blister may seem insignificant when you’re still near the trailhead.
Twenty miles into a backpacking trip, it can become a serious mobility problem.
At the first sign of a hot spot:
- Stop.
- Remove the footwear.
- Inspect the area.
- Protect the developing blister.
- Address moisture and friction.
- Change socks when appropriate.
Don’t wait until the blister is large and painful before dealing with it.
Foot care is wilderness first aid.
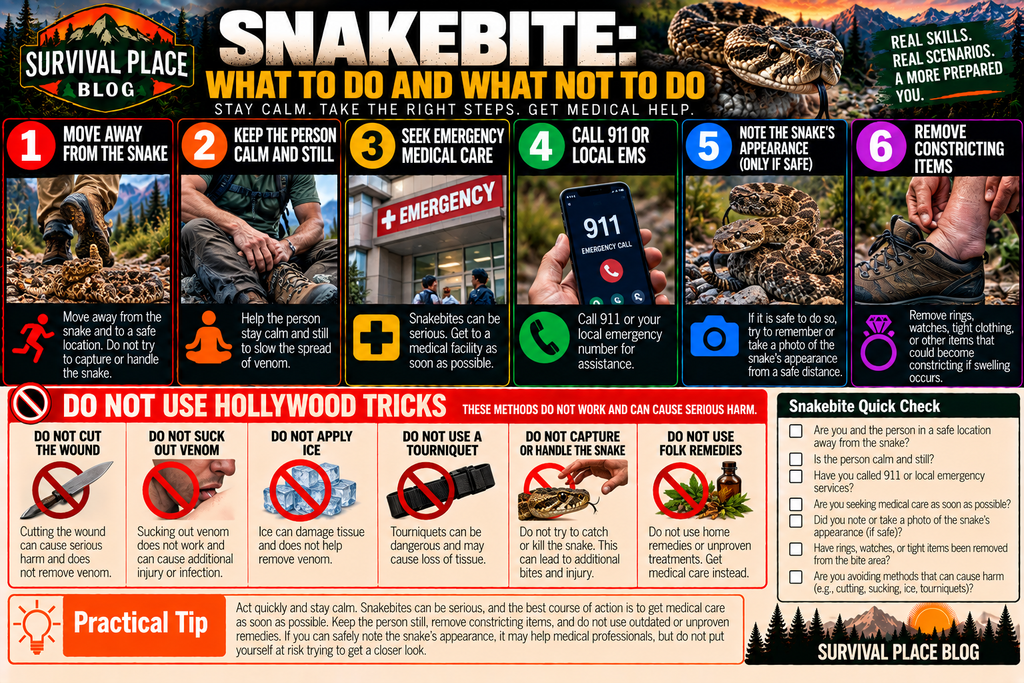
Snakebites: Forget the Hollywood Tricks
Snakebite is one of the clearest examples of why current information matters.
What to Do After a Snakebite
A snakebite should be treated as a situation requiring prompt medical attention. Focus on getting away from the snake, keeping the person calm and still, and getting professional medical help.
- Move away from the snake. Get to a safe location and do not attempt to capture or handle the snake.
- Keep the person calm and still. Avoid unnecessary activity while arranging medical care.
- Seek emergency medical care. Snakebites can be serious, so seek medical attention as soon as possible.
- Call 911 or local EMS. Activate emergency assistance and provide the information rescuers need.
- Note the snake’s appearance if safe. If you can do so without approaching or handling the snake, remember or photograph its appearance from a safe distance.
- Remove constricting items. Remove rings or other items that could become constricting if swelling is expected.
Do not:
- Cut the wound.
- Suck out venom.
- Apply ice.
- Apply a tourniquet as a venom treatment.
- Attempt to capture or handle the snake.
- Use folk remedies.
Snakebite Quick Check
□ Am I and the injured person safely away from the snake?
□ Is the person calm and still?
□ Have I called 911 or local EMS?
□ Am I seeking medical care as soon as possible?
□ Did I note the snake’s appearance only if it was safe to do so?
□ Have I removed rings or other constricting items if swelling is expected?
□ Am I avoiding cutting the wound?
□ Am I avoiding sucking out venom?
□ Am I avoiding ice and tourniquets as venom treatment?
□ Am I avoiding folk remedies and attempts to capture or handle the snake?
Practical Tip
Don’t waste time trying to treat the venom yourself. Get away from the snake, keep the person calm and still, and seek professional medical care as soon as possible. If you can safely note the snake’s appearance from a distance, that information may be useful—but don’t put yourself at risk trying to get a closer look.
The CDC advises keeping the person still and calm, seeking medical attention quickly, and specifically warns against cutting the wound, sucking out venom, applying ice, or using a tourniquet as snakebite treatment.
For current recommendations on responding to a snakebite, review the CDC’s snakebite prevention and treatment guidance.
Insect Stings and Severe Allergic Reactions
A localized insect sting may produce:
- Pain
- Redness
- Swelling
- Itching
But a severe allergic reaction can become life-threatening.
Watch for:
- Difficulty breathing
- Swelling of the lips, tongue, face, or throat
- Widespread hives
- Faintness
- Collapse
- Rapid deterioration
If the person has a prescribed epinephrine auto-injector, help them use it according to their medical plan and seek emergency medical care.
Don’t wait for a severe allergic reaction to “see if it gets better.”
Tick Bites and Wildlife-Related Injuries
Ticks deserve attention because some can transmit disease.
After outdoor activities in areas where ticks are present:
- Check yourself and others.
- Check clothing and gear.
- Remove attached ticks promptly and appropriately.
- Monitor for symptoms afterward.
Animal bites are different.
A bite from a wild or unfamiliar animal can create concerns beyond the wound itself, including infection and potential rabies exposure.
Clean the wound as soon as practical and seek medical advice regarding the specific exposure.
Don’t assume a small bite is automatically harmless.
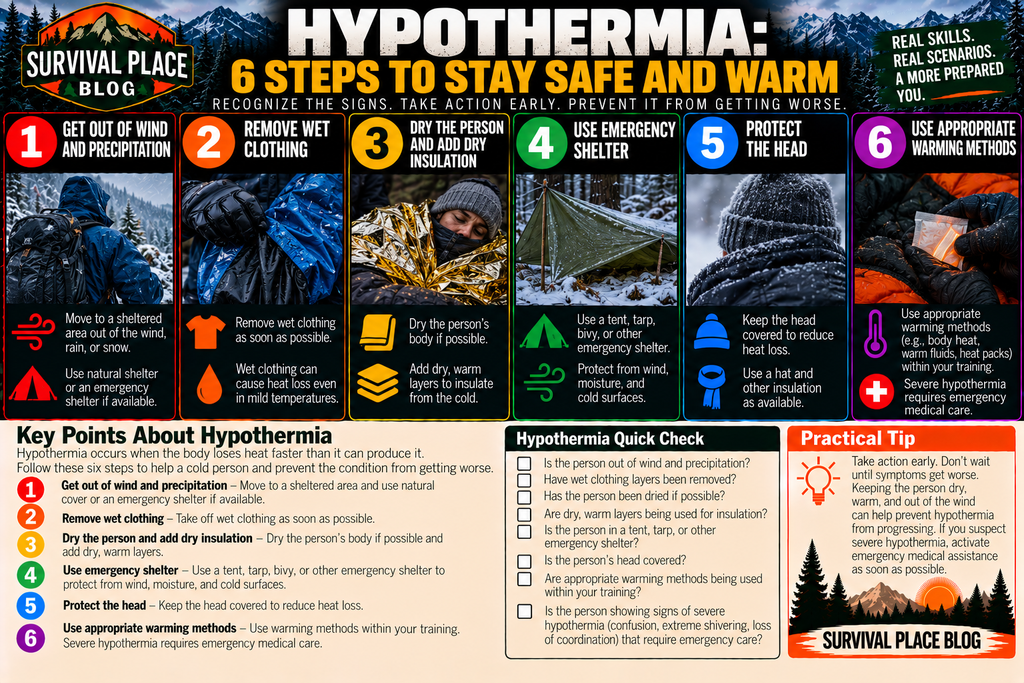
Hypothermia: Cold Doesn’t Have to Mean Snow
Hypothermia can develop when the body loses heat faster than it can replace it.
You don’t need subzero temperatures.
Rain, wind, cold water, wet clothing, exhaustion, and inadequate insulation can all contribute.
Early signs can include:
- Shivering
- Fatigue
- Clumsiness
- Confusion
- Slurred speech
- Increasing drowsiness
How to Help Someone With Hypothermia
Hypothermia can develop when the body loses heat faster than it can replace it. Rain, wind, cold water, wet clothing, exhaustion, and inadequate insulation can all contribute, even when temperatures are not below freezing.
1. Get out of wind and precipitation. Move the person to a sheltered location away from wind, rain, or other precipitation.
2. Remove wet clothing. When practical, remove wet clothing that is contributing to continued heat loss.
3. Dry the person and add insulation. Dry the person when possible and add dry insulating layers to help retain body heat.
4. Use emergency shelter and insulation. Use available emergency shelter and insulation to protect the person from the surrounding environment. An emergency bivvy can provide an additional layer of protection while waiting for help. Pasted markdown
5. Protect the head. Keep the person’s head covered to help reduce further heat loss.
6. Provide appropriate warming. Use warming methods appropriate to your training and the situation. Severe hypothermia requires emergency medical care.
A compact emergency bivvy can provide an additional layer of protection when someone needs shelter from wind, rain, or cold while waiting for help.
Hypothermia Quick Check
□ Is the person out of wind and precipitation?
□ Have wet clothing layers been removed when practical?
□ Has the person been dried if possible?
□ Are dry insulating layers being used?
□ Is emergency shelter or insulation available?
□ Is the person’s head protected?
□ Are appropriate warming methods being used within my training?
□ Is the person’s condition improving or getting worse?
□ Does the person require emergency medical assistance?
Practical Tip
Act early. Don’t wait for cold-weather symptoms to become severe before protecting the person from further heat loss. Getting out of wind and precipitation, removing wet clothing when practical, and adding dry insulation can help keep the situation from getting worse. If severe hypothermia develops, seek emergency medical care.
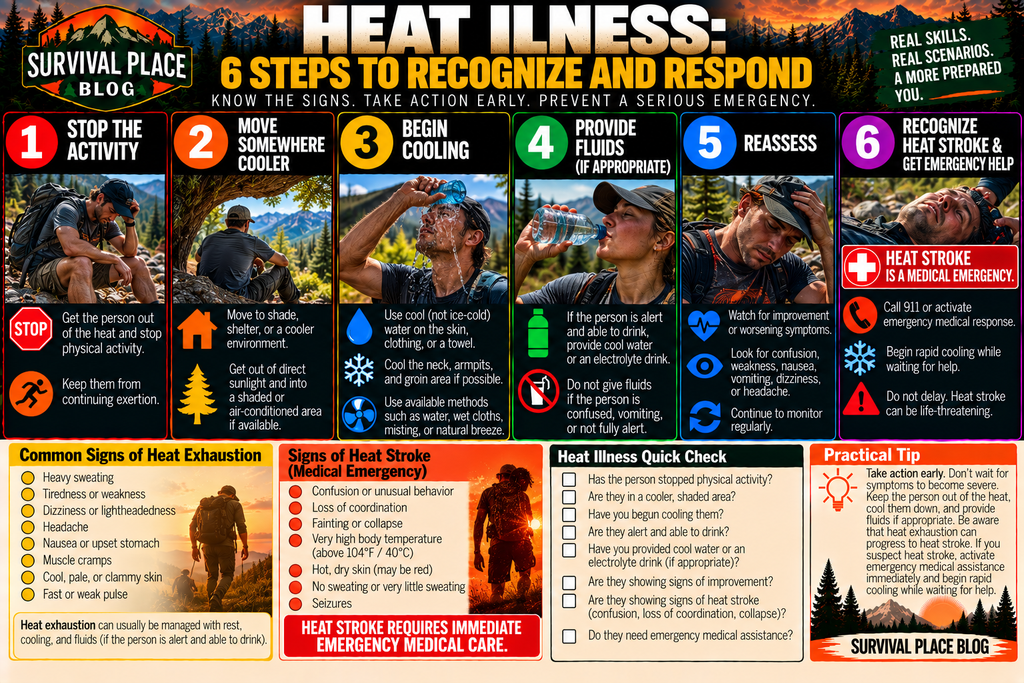
Heat Exhaustion and Heat Stroke
Heat illness can progress rapidly.
Heat Exhaustion
Heat exhaustion can become serious if the person is not cooled and their condition continues to worsen.
Possible signs include:
- Heavy sweating
- Weakness or fatigue
- Dizziness
- Headache
- Nausea or vomiting
- Muscle cramps
- Cool, pale, or clammy skin
- Fainting or worsening symptoms
If someone is showing signs of heat exhaustion:
- Stop the activity.
- Move the person somewhere cooler, such as shade or another cooler environment.
- Begin cooling with cool water, wet cloths, misting, fanning, or other appropriate methods.
- Provide appropriate fluids if the person is alert and able to drink.
- Reassess regularly and watch for worsening symptoms.
Seek medical assistance if symptoms worsen, vomiting occurs, or the person does not improve.
Heat Stroke
Heat stroke is different from heat exhaustion and is a medical emergency.
Warning signs can include:
- Very high body temperature
- Confusion or altered mental status
- Loss of coordination
- Collapse or loss of consciousness
- Severe headache
- Nausea or vomiting
- Hot skin that may be dry or damp
If you suspect heat stroke, activate emergency medical assistance immediately.
Call 911 or activate emergency medical response, move the person to a cooler location, and begin rapid cooling while waiting for help. Use appropriate cooling methods available in the environment, such as cool or cold water, wet cloths, or other effective cooling methods.
Do not delay emergency assistance while attempting to manage the situation yourself.
For additional information on recognizing and responding to dangerous heat illness, review the American Red Cross guidance on heat emergencies.
Dehydration and Water Problems
Dehydration can develop gradually during strenuous outdoor activity.
Possible signs include:
- Thirst
- Dry mouth
- Fatigue
- Dizziness
- Headache
- Dark urine
Don’t wait until someone is severely dehydrated before addressing water needs.
This is another reason water planning belongs in first-aid preparation.
Your water supply should be sufficient for the planned activity, and you should have a way to treat additional water when appropriate.
If you’re traveling beyond reliable water sources, our guide Wilderness Water: How to Find, Filter and Purify Water Safely explains how to locate and treat water in the field.
Frostbite
Frostbite occurs when tissue freezes.
Affected skin may become:
- Numb
- Pale or waxy
- Hard
- Unusually cold
Don’t rub or massage suspected frostbite.
For current recommendations on recognizing and treating frostbite, review the CDC’s frostbite guidance.
Protect the area from additional cold and seek medical care.
Eye Injuries
Eyes are vulnerable to branches, dirt, dust, chemicals, and other debris.
For a minor foreign particle:
- Don’t rub the eye.
- Blink normally.
- Rinse with clean water when appropriate.
If something is embedded in the eye, don’t try to pull it out.
Protect the eye and seek medical attention.
Severe pain, significant vision changes, penetrating injuries, or serious chemical exposures require prompt medical evaluation.
Chest Pain, Breathing Problems and Other Medical Emergencies
Not every wilderness emergency starts with an injury.
Someone can suddenly develop:
- Chest pain
- Difficulty breathing
- Severe weakness
- Confusion
- Seizures
- A diabetic emergency
- An asthma attack
- A serious allergic reaction
- Stroke symptoms
- Loss of consciousness
Don’t assume that someone is simply tired.
If the person’s condition is serious, worsening, or potentially life-threatening, activate emergency medical assistance.
The American Red Cross first-aid guidance provides a useful overview of when emergency medical services should be activated and what immediate care may be appropriate within your level of training.
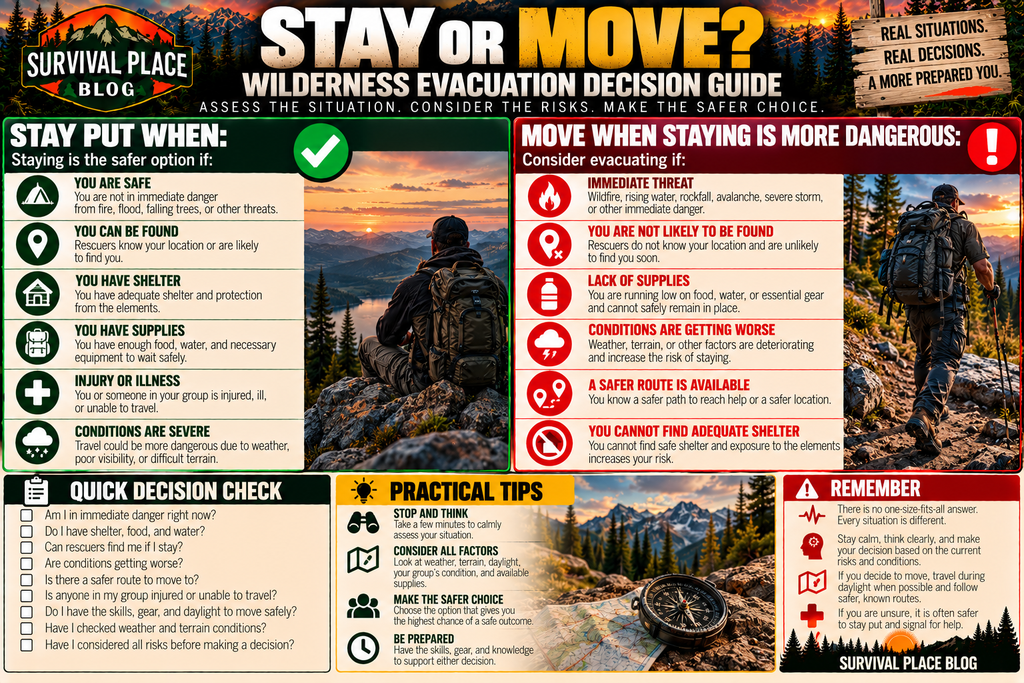
The Stay-or-Move Decision
This may be the most important wilderness first-aid decision after the initial assessment.
A common mistake is thinking:
“We need to get them out.”
Sometimes that’s true.
Sometimes moving them is exactly what you shouldn’t do.
For a serious injury, the safer choice may be to protect the patient in place and bring rescuers to them.
Stay Put When:
- The location is reasonably safe.
- The patient has a potentially serious injury.
- Moving could worsen the injury.
- Emergency assistance has been activated.
- The patient cannot safely walk.
- Rescuers can reach your location.
Keep the patient warm, protected, monitored, and visible to rescuers.
Move When Staying Is More Dangerous
There are situations where staying creates a greater danger.
Examples include:
- Wildfire
- Rising floodwater
- Rockfall
- Lightning exposure
- Immediate wildlife threat
- Dangerous terrain
- Other environmental hazards
In those situations, movement may become necessary.
But don’t confuse “we’d rather be at the trailhead” with “we are in immediate danger here.”
Those are very different situations.
NPS emergency guidance makes the same basic distinction: after sharing your location for a major injury, stay put unless remaining there creates an immediate threat to life.
Stay-or-Move Quick Check
□ Is our current location reasonably safe?
□ Is anyone seriously injured or unable to safely walk?
□ Could moving make the injury worse?
□ Have emergency responders been contacted?
□ Do rescuers know our location?
□ Is there an immediate environmental threat where we are?
□ Are conditions getting worse?
□ Is there a safer route to another location?
□ Can we move safely if movement becomes necessary?
Scenario 1: A Hiker Breaks an Ankle Three Miles From the Trailhead
You’re three miles into a hike when one member of the group steps into a hole and severely twists their ankle.
They can’t put weight on it.
What Do You Do?
First: Get everyone somewhere safe.
Second: Assess the injury.
Look for severe pain, swelling, deformity, numbness, or other concerning signs.
Third: Protect and stabilize the injury within your training.
Fourth: Determine whether the person can safely walk.
If they cannot, don’t simply tell them to tough it out.
Should You Move Them?
Not automatically.
If the area is safe and help can reach you, staying put may be preferable to carrying or dragging an injured person.
The lesson: An injury doesn’t automatically mean “move.” Sometimes the safest evacuation strategy is to stop moving and bring help to the patient.
Scenario 2: A Deep Cut While Preparing Firewood
Someone slips while preparing firewood and suffers a deep cut with significant bleeding.
First Priority?
Not cleaning the campsite.
Not taking a photograph.
Not figuring out how far you are from the trailhead.
Control the bleeding.
Apply direct pressure and use appropriate bleeding-control equipment if available and if you have been trained to use it.
Then activate emergency assistance if the bleeding is severe or cannot be adequately controlled.
While waiting:
- Keep the person calm.
- Monitor their condition.
- Protect them from cold.
- Prepare for evacuation.
- Keep track of what happened and what care was provided.
The Lesson
Treat the immediate life threat first.
Scenario 3: A Hiker Becomes Confused on a Hot Afternoon
Your group is climbing during a hot afternoon.
One person becomes unusually confused and stops responding normally.
Don’t Assume They’re Merely Tired.
Move them out of the heat and begin cooling immediately while activating emergency medical assistance.
If heat stroke is suspected, rapid cooling is critical.
The Lesson
A change in mental status can be a medical emergency.
Scenario 4: A Wet Hiker Starts Shivering
A storm arrives earlier than expected.
One member of your group is soaked and begins shivering heavily. They’re becoming clumsy and having difficulty concentrating.
What Changed?
The person isn’t merely uncomfortable anymore.
They’re showing signs consistent with worsening cold stress.
Get them out of the wind and rain.
Replace wet clothing with dry insulation when practical.
Use your emergency shelter and insulation.
Monitor them closely and consider evacuation depending on severity and response to warming.
The Lesson
Weather can turn a minor inconvenience into a medical emergency.
Scenario 5: A Suspected Snakebite
Someone steps near a snake and is bitten.
What Shouldn’t You Do?
Don’t chase the snake.
Don’t cut the bite.
Don’t suck out venom.
Don’t apply ice.
Don’t use a tourniquet as a venom treatment.
Instead:
- Move away from the snake.
- Keep the person calm and still.
- Activate emergency medical assistance.
- Follow instructions from medical professionals.
- Monitor the patient.
The Lesson
Don’t waste valuable time on movie-style snakebite treatments.
Scenario 6: A Serious Fall
A hiker falls several feet onto rocks.
They’re conscious but complain of severe neck pain.
What Do You Do?
Don’t immediately sit them upright.
Don’t ask them to walk.
Don’t move them simply because they’re uncomfortable.
Assess their responsiveness and breathing, activate emergency assistance, and minimize unnecessary movement unless remaining there creates an immediate danger.
The Lesson
Sometimes the safest thing you can do is keep the patient where they are and bring rescuers to them.
What Can a Normally Prepared Person Actually Do?
You don’t need to be a doctor to provide useful wilderness first aid.
With appropriate basic training, you can learn to:
- Recognize major emergencies.
- Control serious bleeding.
- Provide basic wound care.
- Protect an injured limb.
- Assist with appropriate emergency medications.
- Recognize heat and cold emergencies.
- Protect someone from further environmental exposure.
- Monitor a patient’s condition.
- Communicate effectively with rescuers.
- Help determine whether continuing is safe.
- Prepare a patient for evacuation.
But there are limits.
You shouldn’t attempt complicated medical procedures simply because you have a first-aid kit.
Equipment doesn’t replace training.
Military and Tactical Triage: What Civilians Can Learn
Military and tactical emergency care deals with situations where casualties may be numerous, hazards may remain present, and evacuation can be delayed.
There are useful principles here for wilderness travelers.
The most important is simple:
Treat the problem that threatens life most immediately before worrying about less serious injuries.
A person with a minor scrape doesn’t take priority over someone experiencing catastrophic bleeding.
Someone with a serious breathing problem doesn’t take a back seat to someone with a blister.
But recreational wilderness travelers shouldn’t try to copy advanced battlefield procedures without appropriate training.
Take the principle, not the entire medical system.
Immediate threat first.
Reassess continuously.
Don’t create another casualty.
Prepare for evacuation early.
Know your limitations.
That’s the useful lesson.
Communication Is Part of First Aid
Emergency communication shouldn’t begin after something goes wrong.
Before your trip, somebody should know:
- Where you’re going
- Your route
- Who is with you
- When you expect to return
- When they should become concerned
If an emergency occurs, rescuers need useful information.
The National Park Service’s emergency planning guidance explains what information to provide when requesting help and how to prepare for an emergency in the backcountry.
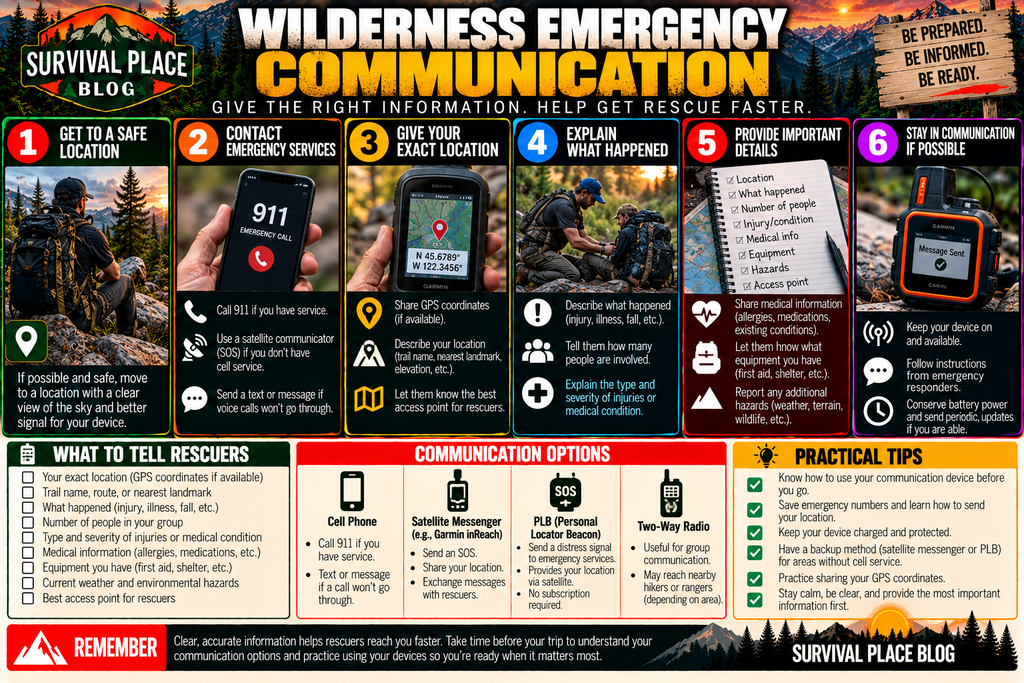
Wilderness Emergency Communication
When you need help in the wilderness, clear and accurate information can make a major difference. The goal is to give rescuers enough information to understand where you are, what happened, who needs help, and what conditions they may encounter.
- Contact emergency services. Call 911 if you have cell service. If you don’t, use an available satellite communicator, personal locator beacon, or other communication device to request help.
- Give your exact location. Provide GPS coordinates if available. Also provide the trail name, route, nearest landmark, campsite, road, river crossing, or other useful location information.
- Explain what happened. Tell rescuers what happened and when it happened. Describe the type of incident and how many people are involved.
- Provide important details. Describe the patient’s condition, including whether they are conscious, breathing, bleeding, or able to walk. Provide relevant medical information and explain what equipment and resources you have available.
- Report hazards. Tell rescuers about wildfire, flooding, rockfall, lightning, dangerous terrain, wildlife, weather, or other hazards that could affect the response.
- Stay in communication if possible. Keep your communication device available, follow instructions from emergency responders, and conserve battery power when practical.
Wilderness Emergency Communication Quick Check
□ Do I have a way to contact emergency services?
□ Do I know how to use my communication device?
□ Can I provide my exact location or GPS coordinates?
□ Can I identify the trail, route, or nearest landmark?
□ Can I clearly explain what happened?
□ Do I know how many people are involved?
□ Can I describe the patient’s condition?
□ Do I know any relevant medical information?
□ Can I tell rescuers what equipment and resources we have?
□ Can I identify current environmental hazards?
□ Do I know the best access point for rescuers?
□ Is my communication device charged and ready to use?
Practical Tip
Practice before you need it. Don’t wait until an emergency to figure out how your communication device works. Know how to send an SOS or emergency message, share your GPS coordinates, and describe your location. Keep your device charged, protected, and accessible when you’re in the backcountry.
What to Do While Waiting for Rescue
Once you’ve activated emergency assistance, your job isn’t over.
Continue monitoring the patient.
Keep them:
- Warm when appropriate
- Cool when appropriate
- Protected from weather
- As comfortable as practical
- Calm
- Visible to rescuers
Prepare your location for rescue.
If you have an emergency blanket, tarp, tent, bright clothing, whistle, flashlight, or other signaling equipment, use it appropriately.
Don’t wander away simply because you’re anxious to find rescuers unless your emergency plan requires someone to seek help.
If someone must leave to obtain help, think carefully about whether the patient can safely be left alone.
Build Your First-Aid Kit Around Problems
Instead of asking:
“What should every first-aid kit contain?”
Ask:
“What problems am I reasonably preparing to manage?”
Bleeding
- Gloves
- Gauze
- Pressure dressings
- Appropriate bleeding-control equipment
- Medical tape
Wounds
- Wound-cleaning supplies
- Sterile dressings
- Bandages
- Medical tape
Blisters
- Blister dressings
- Moleskin or equivalent
- Extra socks
Sprains
- Elastic wrap
- Appropriate support material
Environmental Emergencies
- Emergency blanket
- Emergency shelter
- Extra clothing
- Head covering
- Water
- Water treatment
- Cooling capability where appropriate
Communication
- Charged phone
- Emergency numbers
- Whistle
- Navigation equipment
- Appropriate satellite communication for remote trips
Personal Medical Needs
- Prescription medications
- Personal emergency medications
- Medical information
- Emergency contacts
For trips where medical needs are only one part of a larger emergency-preparedness plan, a compact emergency survival kit can provide additional supplies for shelter, signaling, and unexpected delays.
Don’t Forget the Rest of Your Survival Gear
A first-aid kit is only one part of wilderness emergency preparation.
If you’re injured and waiting several hours for help, the rest of your equipment may become extremely important.
Your:
Shelter protects you from weather.
Extra clothing protects against cold.
Fire-starting equipment can help provide warmth and signaling.
Water treatment can extend your water supply.
Navigation equipment helps rescuers locate you and can help prevent you from becoming lost in the first place.
Light becomes critical when darkness arrives.
Extra food provides energy during an unexpected delay.
For a broader look at what to carry when you’re spending time outdoors, see our Essential Camping Checklist.
When a First-Aid Kit Isn’t Enough
There are situations where your first-aid kit is essentially a bridge to professional care.
Examples include:
- Severe bleeding
- Difficulty breathing
- Chest pain
- Loss of consciousness
- Major trauma
- Serious head injury
- Suspected spinal injury
- Major fractures
- Severe burns
- Heat stroke
- Severe hypothermia
- Serious allergic reactions
- Snakebite
- Rapidly worsening symptoms
Your equipment isn’t supposed to replace an ambulance.
It’s supposed to help keep someone alive and protected until that ambulance—or wilderness rescue team—can reach them.
Prevention Is Still the Best First Aid
The easiest injury to treat is the one that never happens.
Before leaving:
☐ Check the weather.
☐ Understand the route.
☐ Know the terrain.
☐ Carry enough water.
☐ Carry extra food.
☐ Bring appropriate clothing.
☐ Carry navigation equipment.
☐ Carry a first-aid kit.
☐ Carry emergency shelter.
☐ Carry reliable light.
☐ Have a fire-starting method.
☐ Consider emergency communication.
☐ Tell someone where you’re going.
☐ Know your group’s limitations.
☐ Have an emergency plan.
NPS specifically recommends telling someone where you’re going, carrying the Ten Essentials, and adjusting your equipment to the activity and environment.
Training Matters More Than Most People Think
You can read this entire article and still not be prepared to perform every procedure discussed.
That’s normal.
Reading about CPR isn’t the same as performing CPR.
Reading about bleeding control isn’t the same as applying a bleeding-control device during a stressful emergency.
Reading about splinting isn’t the same as stabilizing an injured person.
Hands-on training matters.
Consider taking:
- Basic first aid
- CPR/AED
- Wilderness First Aid
- More advanced wilderness medical training appropriate to your activities
The American Red Cross first-aid and CPR training resources can help you find courses for building practical emergency-response skills.
Wilderness First Aid Quick Reference
When something goes wrong, remember:
STOP
Make sure the scene is safe.
ASSESS
Look for immediate life threats.
STABILIZE
Provide the care you can safely provide based on your training and equipment.
COMMUNICATE
Activate emergency assistance and provide your location and patient information.
EVACUATE
Determine whether the patient should move—or whether rescuers should come to you.
Want a field-ready version of this guide? Download our free Wilderness Emergency First Aid Checklist and use it to prepare your kit, review emergency steps, and make sure you’re ready before heading into the backcountry.
Wilderness First Aid: Know When to Stop the Trip
One of the hardest decisions for outdoor enthusiasts is admitting that the trip is over.
Maybe the weather changed.
Maybe someone is injured.
Maybe someone is becoming sick.
Maybe your route is taking longer than expected.
Turning around isn’t failure.
It is part of wilderness risk management.
A successful wilderness trip isn’t measured by how stubbornly you finished the route.
It’s measured by getting everyone home safely.
Final Thoughts: Preparation Buys You Time
Wilderness first aid isn’t about pretending you can provide hospital-level treatment in the backcountry.
It is about knowing what to do before professional help arrives.
Recognize the emergency.
Protect yourself and the patient.
Treat the immediate life threats.
Prevent the situation from getting worse.
Communicate with rescuers.
Then make the best evacuation decision you can based on the patient’s condition, the environment, your training, and the resources available.
Sometimes the right answer is to carefully walk out.
Sometimes the right answer is to turn around.
Sometimes the right answer is to stay exactly where you are and bring rescuers to the patient.
The difference is understanding when each decision makes sense.
The wilderness doesn’t care whether you’re five minutes from the trailhead or five days from civilization.
Preparation is what gives you options.
Carry the basics.
Pack according to the trip.
Know how to use your equipment.
Practice before you need the skills.
Know how to communicate your location.
And most importantly, understand the limits of what you can safely do.
Recognize. Stabilize. Communicate. Evacuate.
That’s wilderness first aid.
And when the unexpected happens miles from the nearest road, the preparation you did before the trip may become the most important piece of survival gear you brought with you.