Affiliate Disclosure: This post contains affiliate links. If you purchase through these links, Survival Place Blog may earn a commission at no additional cost to you. As an Amazon Associate I earn from qualifying purchases.
Important Safety & Disclaimer
Wilderness navigation involves inherent risks, including getting lost, injury, changing weather, difficult terrain, and other hazards. The information, illustrations, exercises, and printable materials provided in this article are intended for general educational and preparedness purposes only and are not a substitute for professional navigation instruction, current maps, official land-management information, or sound judgment in the field.
Conditions, routes, maps, compass readings, magnetic declination, trail information, and other circumstances can change. Always verify current conditions and information from appropriate official sources before traveling, and use equipment and navigation methods appropriate for your experience and the environment.
Practice the skills in a familiar, low-risk area before attempting more demanding terrain. Do not rely solely on this article, a printed map, a compass, GPS, or any single source of information for your safety.
Survival Place Blog and its authors are not responsible for injury, loss, damage, or other consequences resulting from the use or misuse of the information presented here.
Getting lost in the wilderness rarely starts with one dramatic mistake. More often, it’s a missed trail junction, an unexpected detour, fading daylight or a few minutes of walking in the wrong direction.
GPS has made backcountry navigation easier than ever. A smartphone or handheld GPS can show your location, route and distance to your destination in seconds.
But electronics can fail. Batteries die. Phones get wet or damaged. Maps may not be downloaded before cellular service disappears.
That’s why wilderness navigation still matters.
Knowing how to read a topographic map, use a compass, recognize terrain and keep track of your location gives you another way to get home when technology isn’t available.
The goal isn’t to stop using GPS. It’s to combine modern navigation with traditional skills so one equipment failure doesn’t leave you without a plan.
Why Wilderness Navigation Still Matters in the GPS Era
Modern navigation technology is extremely useful, but wilderness travel rewards redundancy.
The National Park Service recommends that people heading outdoors carry navigation tools such as a map, compass or GPS and know how to use them before a trip.
Use GPS. Download offline maps. Carry a phone or dedicated GPS when appropriate. But also understand enough traditional navigation that losing one electronic device doesn’t eliminate your ability to find your way.
Navigation mistakes can create additional problems surprisingly quickly.
You may:
- use more water than expected
- burn unnecessary calories and energy
- get caught outside after dark
- enter steeper or more hazardous terrain
- become separated from your group
- miss a campsite or water source
- become exposed to worsening weather
- move farther from your planned route
Good wilderness navigation isn’t about rejecting technology. It’s about having more than one way to determine where you are and where you need to go.
Pay Attention Before You Get Lost
One of the most effective navigation habits is maintaining awareness of your location throughout the trip.
Don’t wait until you reach a confusing intersection to look at the map.
As you travel, periodically ask yourself:
What direction am I traveling?
What major terrain feature should be ahead of me?
What is behind me?
Where is the nearest road, trail, ridge or river?
How far have I traveled since my last known location?
When you pass an obvious trail junction, creek crossing, ridge, lake or other landmark, note it mentally and compare it with the map.
Those checkpoints help you recognize navigation mistakes early, when they’re usually easier to correct.
Look Behind You
Trails can look surprisingly different when traveled in the opposite direction.
When you reach an important junction or confusing section of trail, turn around for a moment and look at it from the direction you’ll see on your return trip.
Notice distinctive trees, rocks, signs, slopes and trail features.
It’s a simple habit, but it can make the return route much easier to recognize.
Build a Redundant Wilderness Navigation System
Reliable wilderness navigation isn’t based on one trick or one piece of equipment.
A practical system combines:
- A topographic map
- A compass
- GPS or a smartphone with offline maps
- Terrain awareness
- Distance estimation
- Route planning
- Basic natural-navigation skills
- An emergency plan
No single method is perfect. When several methods agree, you can be much more confident about your position and direction of travel.
Carry a Reliable Baseplate Compass
A basic baseplate compass is one of the most useful backup navigation tools you can carry.
It weighs very little, doesn’t require charging and can be used with a topographic map to establish direction and bearings.
Choose a compass intended for actual outdoor navigation rather than a novelty keychain compass, and learn how your specific model works before relying on it in the field.
Understanding a Topographic Map
A topographic map does much more than show roads and trails. It represents the shape of the land.
Depending on the map, you may see:
- mountains
- ridges
- valleys
- rivers
- lakes
- roads
- trails
- buildings
- vegetation
- boundaries
- elevation
- geographic coordinates
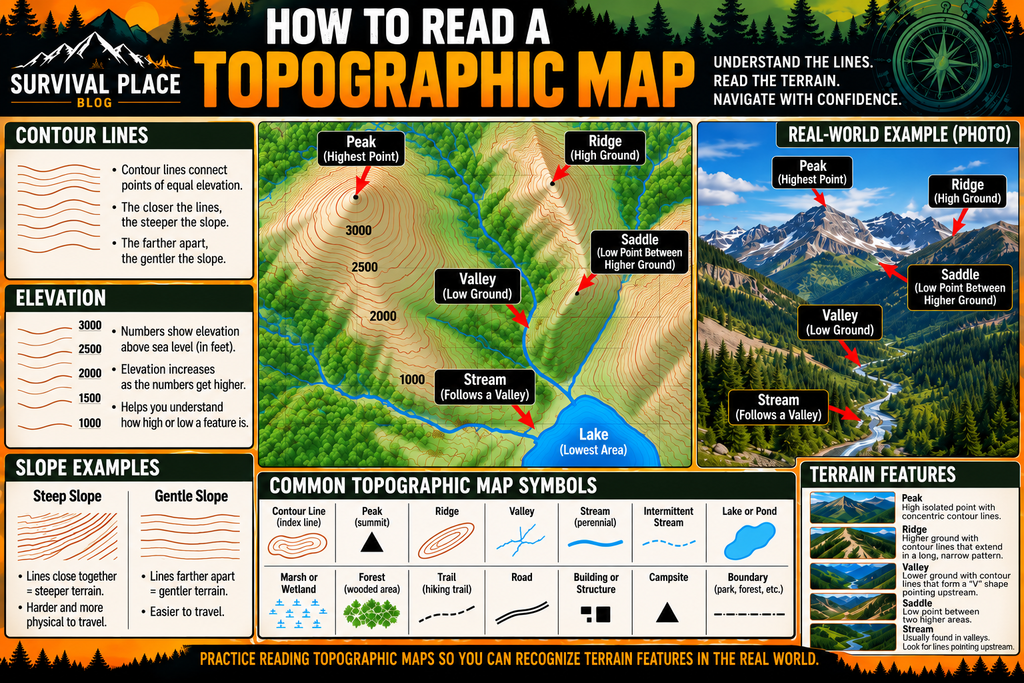
One of the most important features is the contour line.
What Contour Lines Tell You
Contour lines connect locations of equal elevation. Learning to read their patterns allows you to visualize three-dimensional terrain from a flat map.
Closely Spaced Contour Lines
Closely spaced lines generally indicate steep terrain.
Widely Spaced Contour Lines
Widely spaced lines generally indicate gentler terrain.
Closed Contours
Closed contour lines commonly represent hills or summits. Depressions can also appear as closed contours but use special markings, so check the map legend.
V-Shaped Contours
When contour lines cross a stream or drainage, their V shape generally points toward higher ground.
With practice, contour lines allow you to anticipate climbs, valleys, ridges and steep terrain before reaching them.
Understand Map Scale
A map’s scale tells you how distances on the map relate to distances on the ground.
Never assume two maps use the same scale.
A map covering a huge wilderness region generally shows less detail than one covering a smaller area.
Before a trip, familiarize yourself with:
- map scale
- contour interval
- symbols
- coordinate system
- declination information
- boundaries
The map legend contains much of this information.
Protect Your Paper Map
A paper map is an excellent non-electronic backup, but it needs protection from rain, snow and repeated handling.
Options include:
- waterproof maps
- laminated maps
- resealable plastic bags
- waterproof map cases
For longer or more remote trips, keeping a second copy somewhere else in your equipment adds another layer of redundancy.
Understand Your Compass Before the Trip
Common components of a baseplate compass include:
- magnetic needle
- direction-of-travel arrow
- rotating bezel or housing
- degree markings
- orienting arrow
- orienting lines
- baseplate
Knowing the names isn’t nearly as important as knowing how to use them.
Practice with your compass somewhere familiar before heading into remote country. You should be comfortable orienting a map and following a basic bearing before you need those skills under pressure.
True North, Magnetic North and Declination
This is one of the most important concepts in map-and-compass navigation.
True north refers to geographic north.
A magnetic compass aligns with Earth’s magnetic field and points toward magnetic north.
Those directions are not necessarily the same.
The angle between true north and magnetic north is called magnetic declination.
Declination varies depending on where you are and changes gradually over time. A declination value from another region—or from an old map—shouldn’t automatically be assumed to be correct for your trip.
Check a reasonably current declination for the area where you’ll be traveling.
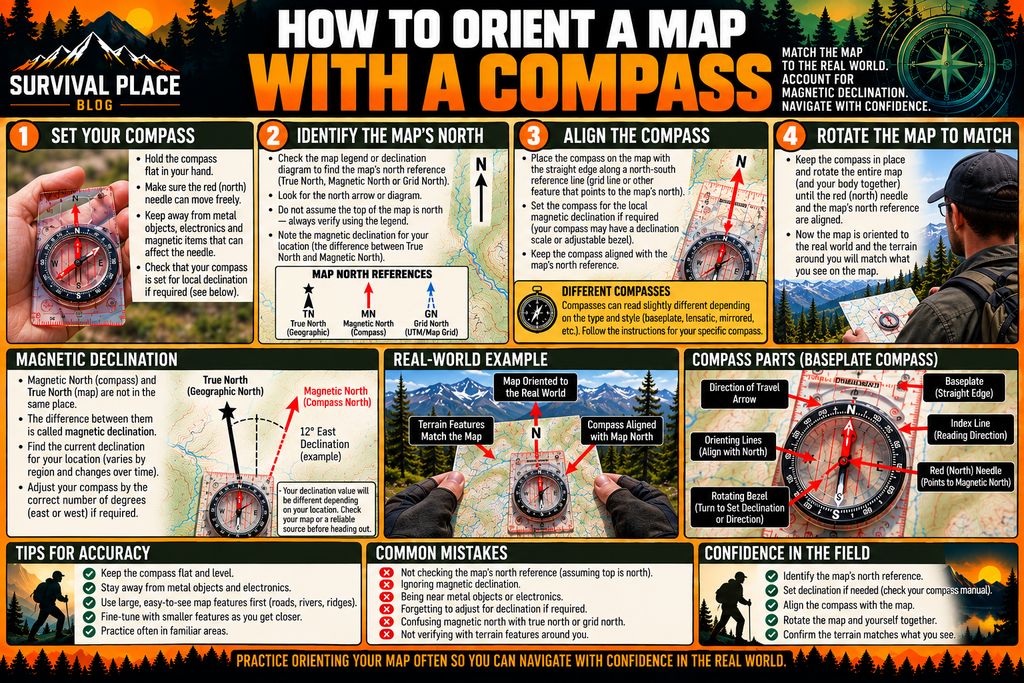
How to Orient a Map With a Compass
Orienting a map means aligning it with the terrain around you so north on the map corresponds correctly with north in the real world.
The exact procedure depends partly on the type of compass you’re using, particularly whether it has adjustable declination.
At a basic level:
- Place the map on a stable surface.
- Identify north on the map.
- Position your compass along a north-south reference line.
- Account for the local magnetic declination.
- Rotate the map and compass until they’re properly aligned.
- Compare visible terrain features with the features shown on the map.
Once the map is oriented, the landscape becomes easier to interpret.
A ridge shown on your right should appear in the corresponding direction. A river or trail shown ahead should make sense relative to your position.
What Is a Bearing?
A bearing describes a direction in degrees.
A compass divides the circle around you into 360 degrees.
Approximately:
- North = 0° or 360°
- East = 90°
- South = 180°
- West = 270°
Instead of saying, “Go northwest,” a bearing can provide a much more precise direction.
For example:
Follow a bearing of 315°.
That precision is useful when navigating between known locations or when visibility is limited.
Taking a Bearing From a Map
If you know your current position and your destination on a map, a compass can help determine the direction between them.
The procedure varies somewhat depending on the compass, especially when adjustable declination is involved, but the general process is:
- Place the compass edge between your known position and destination.
- Point the direction-of-travel arrow toward the destination.
- Rotate the compass housing until its orienting lines align with north on the map.
- Account for local magnetic declination as required for your compass.
- Read the bearing.
- Hold the compass level.
- Turn yourself until the magnetic needle aligns correctly with the orienting arrow.
- Follow the direction-of-travel arrow.
Practice with the compass you actually carry because different designs handle declination differently.
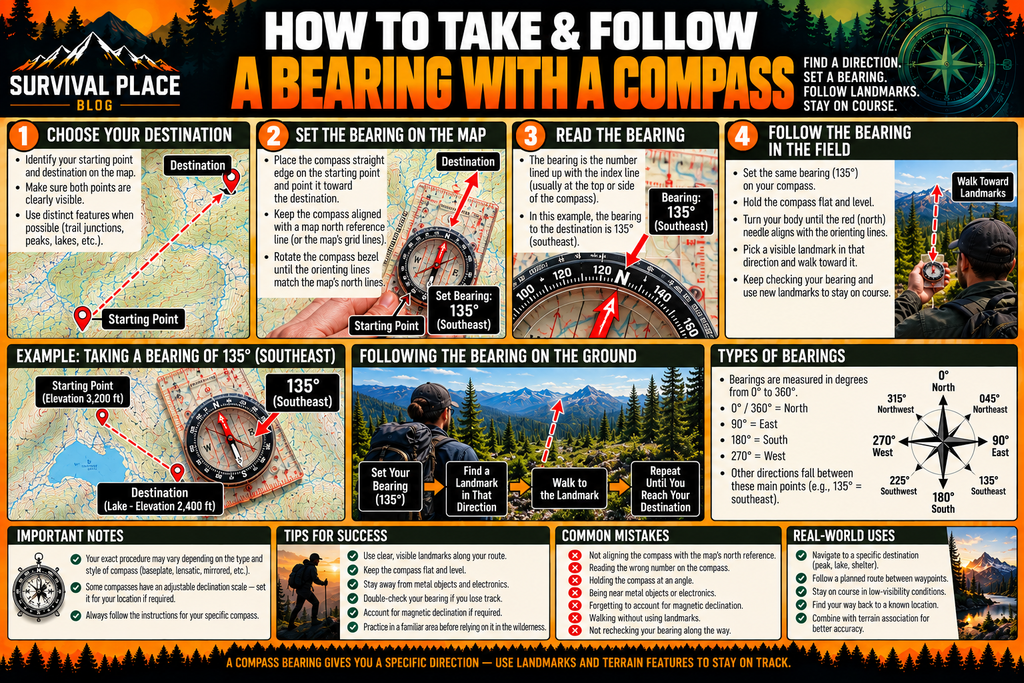
Sight a Landmark Before Walking
Once you’ve established your bearing, don’t spend the entire time staring down at the compass.
Look ahead and identify a visible object along your intended direction.
It could be:
- a distinctive tree
- a large rock
- an opening in the forest
- a hill
- another obvious feature
Walk toward that feature while watching the terrain around you.
When you reach it, check the bearing again and identify the next landmark.
This makes travel easier and helps reduce gradual drift away from your intended route.
Use Terrain Association
Terrain association means comparing the landscape around you with features shown on the map.
Look for major features such as:
- ridges
- valleys
- saddles
- peaks
- rivers
- lakes
- cliffs
- roads
- trail intersections
If the map shows a north-south ridge in a particular direction and the terrain matches that expectation, you’ve gained another clue about your location.
Don’t depend on one feature alone when several are available. Matching multiple terrain features gives you more confidence that you’re reading the landscape correctly.
Use Handrails to Simplify Navigation
A handrail is an obvious linear feature that follows or parallels your intended route.
Examples include:
- established trails
- rivers
- ridgelines
- shorelines
- roads
- powerline corridors
- obvious valleys
Instead of trying to hold an exact compass bearing for miles through difficult terrain, you may sometimes be able to follow an unmistakable feature.
A river, for example, can provide an obvious reference.
But don’t blindly follow waterways. Rivers and streams can lead into waterfalls, cliffs, canyons, dangerous crossings and dense vegetation.
Use the terrain feature together with your map.
Use Backstops to Know When You’ve Gone Too Far
A backstop is a major feature beyond your intended destination.
Suppose you’re looking for a trail intersection and a large river lies beyond it.
If you reach the river, you know you’ve passed the intersection.
Useful backstops can include:
- major roads
- rivers
- lakes
- ridges
- cliffs
- large trails
Identifying backstops before you start moving gives you another way to catch navigation errors.
Use Catching Features Near Your Destination
A catching feature is an obvious landmark close to your destination.
Imagine you’re looking for a campsite located shortly after a creek crossing.
Instead of trying to judge the exact campsite location from several miles away, navigate toward the creek first.
Once you reach the creek, you know the campsite should be nearby.
Breaking a long route into recognizable sections makes navigation much easier.
Estimating Distance Without GPS
Knowing your direction isn’t enough. You also need a reasonable idea of how far you’ve traveled.
Two traditional methods are travel time and pace counting.
Estimate Distance With Time
If you know roughly how fast you travel over a particular type of terrain, elapsed time can provide a rough distance estimate.
Your speed can change substantially because of:
- steep slopes
- heavy packs
- snow
- mud
- thick vegetation
- elevation
- fatigue
- river crossings
- darkness
Treat travel time as an estimate rather than an exact measurement.
Estimate Distance With Pace Counting
You can also determine approximately how many paces you normally take over a known distance and use that number as a rough field reference.
Your pace changes with terrain, slope, fatigue and load, so practice under different conditions.
The purpose isn’t perfect measurement. It’s to have another way to estimate how far you’ve traveled when electronic navigation isn’t available.
Plan Your Route Before Leaving
Good wilderness navigation starts before you reach the trailhead.
Study the route and identify:
- starting point
- destination
- major intersections
- elevation changes
- rivers and creek crossings
- ridges
- alternate routes
- bailout points
- nearby roads
- potential hazards
- expected water sources
- campsites
- turnaround time
Also look beyond your planned route.
Ask:
If I accidentally continue too far, what major feature will eventually tell me I’ve passed my destination?
That question helps identify useful backstops before you need them.
Leave a Trip Plan With Someone
Before leaving, give a trusted person your basic trip plan and expected return time.
Useful information includes:
- trailhead
- intended route
- destination
- vehicle description
- expected return time
- names of people in the group
- emergency contact information
If you don’t return as expected, that information can help narrow the area where a search begins.
Use GPS—But Build Redundancy
Traditional navigation skills don’t require abandoning modern technology.
Before leaving:
- download offline maps
- fully charge your phone
- carry backup power
- protect electronics from water
- learn how your mapping application works
- carry a map and compass when appropriate
A GPS position can be extremely useful. The goal is simply to prevent one dead battery from eliminating your ability to navigate.
What to Do When You Realize You’re Lost
This may be the most important wilderness navigation skill in the article:
Recognize uncertainty early.
If the trail, terrain or direction stops matching what you expected, don’t continue walking simply because you’re reluctant to turn around.
Stop and assess the situation.
Try to establish your position using:
- your map
- compass
- GPS if available
- identifiable landmarks
- terrain features
- your last known location
A small navigation error caught early may be easy to correct. Continuing for another hour in an uncertain direction can create a much larger problem.
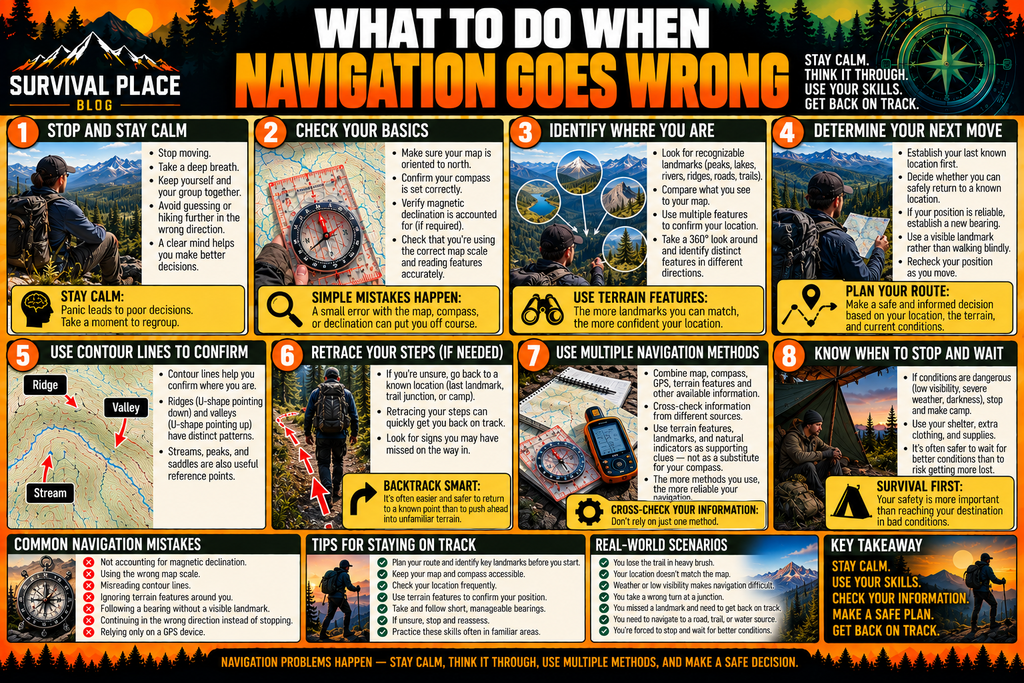
Use STOP When You’re Lost
A useful framework is STOP:
Stop
Stop moving long enough to assess the situation instead of continuing in an uncertain direction.
Think
Ask yourself when you last knew exactly where you were and what happened after that point.
Observe
Examine:
- your map
- compass
- GPS if available
- surrounding terrain
- weather
- remaining daylight
- water supply
- injuries
- available equipment
Plan
Use the information you’ve gathered to decide whether you can safely return to a known location, establish your position or need to remain where you are and seek assistance.
Put Your Navigation Skills Into Practice
You’ve now covered the basic skills of reading a topographic map, orienting a map with a compass, taking a bearing, and recognizing when something doesn’t match your plan. Now it’s time to practice them. Use the printable practice guide below as your field homework. Take it to a familiar, low-risk area, work through the exercises at your own pace, and use what you learned in this article to check your results.
Print it, take it with you, and practice the skills in the field. If a particular terrain feature isn’t present in your area, simply leave that exercise blank and work on the skills that apply to the terrain around you.
Find Your Last Known Location
Ask:
Where was the last place I was certain of my location?
It might have been:
- a signed trail junction
- creek crossing
- bridge
- summit
- campsite
- road
- lake
Then reconstruct what happened after that point.
How long did you travel?
Which direction?
Did you climb or descend?
Did you cross water?
Did the trail make a major turn?
Those details can help narrow your possible position on the map.
Should You Retrace Your Steps?
If you recently left a clearly identifiable route and know how to return to it safely, retracing your steps may solve the problem.
But don’t let the desire to get back to the trail push you into a dangerous situation.
Don’t attempt to retrace a route that would require unsafe travel through:
- dangerous water
- unstable terrain
- avalanche terrain
- cliffs
- wildfire
- other immediate hazards
When you cannot establish a safe route, continuing to wander may increase the area rescuers have to search.
When Staying Put Makes Sense
In some situations, staying in a safe location is the better survival decision.
If you’re genuinely lost, cannot establish a reliable route to safety and someone knows your itinerary, remaining near your current location may make you easier to find than continually changing your position.
There are important exceptions.
Move if remaining where you are exposes you to an immediate danger such as:
- wildfire
- flooding
- falling rocks
- avalanche danger
- dangerous exposure
- another immediate threat
The priority is choosing the safest available option rather than following a rule blindly.
Make Yourself Easier to Find
If rescue may be necessary, make yourself visible and audible.
Useful signaling equipment can include:
- whistle
- signal mirror
- bright clothing
- flashlight
- headlamp
- reflective emergency blanket
A whistle is particularly useful because its sound can travel farther than your voice and allows repeated signaling without exhausting yourself by yelling.
Carry Emergency Shelter Even on a Day Hike
A navigation problem can turn a planned afternoon hike into an unexpected night outdoors.
A compact emergency blanket or similar emergency shelter weighs very little compared with the protection it can provide from wind and heat loss while you wait for daylight or assistance.
The right shelter depends on the environment, season and length of the trip, but even day hikers should consider what they would do if they couldn’t return before dark.
Navigating With the Sun
The sun can provide useful general directional information, but treat it as a secondary clue rather than a substitute for a compass.
The familiar statement that the sun rises in the east and sets in the west is only approximately true.
The exact position of sunrise and sunset changes with season and latitude.
Natural clues become more useful when several independent observations support the same conclusion.
The Shadow-Stick Method
A simple shadow method can provide a rough east-west reference when sunlight and time allow.
Place a straight stick vertically in reasonably level ground.
Mark the tip of the shadow.
Wait for the shadow to move noticeably and mark the new position of its tip.
The line between the two marks provides an approximate east-west reference.
This is a rough field technique, not a replacement for a compass when accurate navigation matters.
Navigating by the Stars
Clear night skies can provide additional directional information, but celestial navigation requires practice.
It’s much better to learn these techniques somewhere safe than to experiment with them for the first time after becoming lost.
Finding North With Polaris
In the Northern Hemisphere, Polaris, commonly called the North Star, lies close to the north celestial pole and provides a useful reference for north.
A familiar method begins with the Big Dipper.
Locate the two stars along the outer edge of the Big Dipper’s bowl and imagine a line extending through them toward Polaris.
Remember that Polaris isn’t necessarily the brightest star in the sky.
Once correctly identified, it provides a useful approximate north reference.
Navigation in the Southern Hemisphere
The Southern Hemisphere doesn’t have a bright equivalent of Polaris located conveniently near the south celestial pole.
The Southern Cross can be used as part of a method for estimating south, but it requires more interpretation.
Anyone planning wilderness travel in the Southern Hemisphere should learn and practice the appropriate celestial-navigation techniques for that region rather than assuming Northern Hemisphere methods apply.
Don’t Rely on Moss for Direction
You’ve probably heard the saying that moss grows on the north side of trees.
Don’t depend on it for navigation.
Moss growth is influenced by moisture, shade, bark, terrain and local conditions. It can grow on several sides of the same tree.
A local pattern might provide an environmental clue, but it isn’t reliable enough to replace a compass.
Rivers Can Help—and Get You Into Trouble
Another common survival claim says that if you’re lost, you should simply follow a river downstream until you reach civilization.
Sometimes waterways do lead toward roads, towns, trails or developed valleys.
But following water can also lead toward:
- waterfalls
- steep ravines
- cliffs
- impassable canyons
- dangerous crossings
- dense vegetation
- remote wilderness
A river is a geographic feature, not a guarantee of rescue.
Use waterways as terrain references together with a map and an understanding of the surrounding landscape.
Cross-Check Natural Navigation Clues
Natural navigation becomes much more useful when several independent observations agree.
For example:
- the sun suggests a general direction
- the terrain matches your map
- a ridgeline has the expected orientation
- a river appears where you expected it
- your compass confirms the direction
Together, those clues provide much stronger evidence than any one observation alone.
Navigation in Fog, Rain and Snow
Poor visibility can make familiar terrain difficult to recognize.
Problems increase in:
- fog
- heavy rain
- snowfall
- blowing snow
- darkness
When visibility deteriorates, slow down.
Check your direction more frequently and use shorter navigation legs between identifiable points.
Most importantly, recognize when conditions have become too dangerous to continue.
Snow Can Erase the Trail
A trail that’s obvious in summer may disappear completely beneath snow.
Tracks left by other people shouldn’t automatically be trusted. They may belong to someone heading somewhere else—or someone who was lost themselves.
If snow travel is expected, map-and-compass skills become more important.
Mountain snow can also introduce avalanche hazards that require training beyond ordinary wilderness navigation.
Night Navigation Requires Extra Caution
Distances become harder to judge after dark. Terrain features disappear, intersections become easier to miss and even familiar trails can look completely different.
A reliable headlamp keeps your hands free for a map, compass, trekking poles or balance over difficult terrain.
Depending on weather, temperature, equipment, injuries and terrain, stopping somewhere safe and resuming travel in daylight may be better than pushing through unfamiliar country at night.
Don’t Let the Shortest Route Become the Most Dangerous
The shortest line between two points on a map isn’t necessarily the safest route on the ground.
Contour lines can warn you about steep terrain before you reach it.
If contours become extremely tight, examine the route carefully before committing to it.
Saving half a mile isn’t worthwhile if the shortcut puts you on unstable slopes, cliffs or terrain beyond your ability.
Good navigation includes choosing terrain you can safely travel.
Treat River Crossings With Respect
A stream that looks minor on a map can become dangerous because of:
- snowmelt
- heavy rain
- flooding
- seasonal changes
Don’t allow a planned route to pressure you into an unsafe crossing.
Changing the route or turning around can be the correct navigation decision.
Avoid Compass Interference
Magnetic compasses can be affected by nearby metal or magnetic sources.
When taking an important reading, move away from potential interference such as:
- vehicles
- metal structures
- fences
- speakers
- magnets
- some electronic equipment
If a reading doesn’t make sense, move away from possible interference and check it again.
Compare the result with the terrain and other navigation information available to you.
Build a Small Wilderness Navigation Kit
You don’t need a pack full of electronics to create useful navigation redundancy.
A practical kit might include:
- current topographic map
- baseplate compass
- smartphone or GPS
- offline maps
- backup battery
- waterproof map protection
- pencil
- small notebook
- headlamp
- whistle
Keep the equipment appropriate for the environment and the trip.
Prepare for an Unexpected Night Outside
Getting lost often means spending more time outdoors than expected.
Navigation equipment alone won’t keep you warm, hydrated or protected from the weather.
Depending on the environment, your emergency gear may need to cover:
- shelter
- insulation
- first aid
- fire
- food
- water
- illumination
- signaling
This doesn’t mean carrying a huge survival pack on every walk. It means matching your equipment to the consequences of something going wrong.
Practice Wilderness Navigation Before You Need It
Reading about map-and-compass navigation is useful.
Actually doing it is better.
Choose a familiar, low-risk outdoor area and practice.
Try to:
- orient the map
- identify terrain features
- determine your direction
- take a bearing
- follow a short bearing
- estimate distance
- identify your position
- predict which terrain feature you’ll encounter next
Then use GPS to verify your location.
That’s an excellent use of technology because it provides immediate feedback while you’re learning.
Try This Simple Navigation Exercise
Step 1: Pick a Familiar Location
Choose a park or trail system where a navigation mistake won’t create a serious emergency.
Step 2: Study the Map
Identify several obvious landmarks.
Step 3: Orient the Map
Align the map with the surrounding terrain.
Step 4: Predict What Comes Next
Before moving, determine what you expect to encounter.
For example:
The trail should climb for about half a mile, turn west and cross a creek.
Step 5: Walk and Observe
Pay attention to whether the terrain matches your prediction.
Step 6: Verify
Check your position with GPS.
Step 7: Repeat
Over time, you’ll become faster at connecting what you see on the map with the terrain around you.
Teach More Than One Person in Your Group
Don’t allow one person to become the group’s entire navigation system.
At least one other person should understand:
- the planned route
- destination
- map
- basic compass use
- emergency plan
If the primary navigator becomes injured or separated from the group, someone else should be able to continue safely or provide useful location information to rescuers.
Common Wilderness Navigation Mistakes
Navigation failures often result from several small mistakes rather than one dramatic event.
Relying Entirely on a Phone
A smartphone is an excellent navigation tool, but it shouldn’t be your only one.
Forgetting to Download Offline Maps
Don’t assume cellular service will be available when you need map data.
Carrying a Compass You Can’t Use
Equipment doesn’t replace skill.
Ignoring Magnetic Declination
A directional error can become significant over distance.
Continuing When You’re Uncertain
Stop and reassess while the error is still small.
Taking an Unplanned Shortcut
A shortcut may be steeper, slower or much harder to navigate than the established route.
Following Someone Else’s Tracks
Their destination may have nothing to do with yours.
Navigating From Memory Alone
Fatigue, darkness and stress can make memory less reliable.
Failing to Look Behind You
The return route may look completely different.
Not Leaving a Trip Plan
If nobody knows where you intended to go, locating you can become much harder.
What to Do Before Every Wilderness Trip
Before heading out:
- study the route
- check current conditions
- download offline maps
- carry a paper map when appropriate
- inspect your compass
- check current magnetic declination
- charge electronics
- carry backup power
- give someone your itinerary
- establish a turnaround time
- identify bailout routes
- carry appropriate emergency equipment
Preparation can’t prevent every problem.
It gives you more options when something goes wrong.
Wilderness Navigation Quick Checklist
Before leaving the trailhead, ask yourself:
Do I Know Where I’m Starting?
Locate the trailhead or starting point on the map.
Do I Know My Intended Route?
Understand the basic direction, distance and major intersections.
Do I Understand the Terrain?
Look at elevation changes, waterways, ridges and major landmarks.
Do I Have a Turnaround Time?
Know when you need to turn around even if you haven’t reached the destination.
Do I Have More Than One Navigation Method?
Avoid depending entirely on a single electronic device.
Does Someone Know Where I’m Going?
Leave your itinerary and expected return time with someone you trust.
Could I Handle an Unexpected Night Outside?
Carry equipment appropriate for the environment and conditions.
When a Navigation Mistake Becomes a Survival Problem
There’s a major difference between being temporarily uncertain of your location and becoming seriously lost.
If you notice the problem early, you may only need to stop, orient the map and identify your last known location.
If you continue walking for hours while guessing, you’ve created a much larger problem.
Good navigation is usually a series of small, routine checks:
There’s the creek shown on the map.
There’s the ridge we expected.
There’s the trail junction.
We’re still traveling northwest.
We’ve covered roughly the expected distance.
Those small confirmations help catch mistakes before they become emergencies.
Traditional Navigation and Technology Work Together
Traditional wilderness navigation isn’t a rejection of modern technology.
A smartphone with offline maps can be extremely useful.
A dedicated GPS can be extremely useful.
In remote country, a satellite communicator can add another layer of emergency communication.
A paper map and compass provide a non-electronic backup.
The strongest approach combines them.
Technology provides speed and convenience. Traditional skills provide another option when technology isn’t available. Situational awareness connects the two.
Final Thoughts
Wilderness navigation isn’t about memorizing survival tricks. It’s about understanding your surroundings well enough to make deliberate decisions.
Learn how to read a topographic map.
Carry a compass and know how to use it.
Understand magnetic declination.
Practice taking bearings.
Learn to recognize ridges, valleys, waterways and other major terrain features.
Use GPS intelligently, but don’t make one battery-powered device your only method of finding your way.
Most importantly, recognize uncertainty early.
When the trail or terrain stops matching what you expected, stop and determine why before continuing.
A small navigation error noticed quickly is often manageable.
That same error followed confidently for another hour can become a genuine survival problem.
Build the skills before you need them, practice somewhere safe and carry more than one way to find your way home.