
Affiliate Disclosure: This post contains affiliate links. If you purchase through these links, Survival Place Blog may earn a commission at no additional cost to you. As an Amazon Associate I earn from qualifying purchases.
Knowing how to build a lean-to shelter is a useful wilderness survival skill because exposure to wind, rain, cold, and heat can become a serious problem long before hunger does. A simple shelter can reduce that exposure, give you a protected place to rest, and help you conserve energy while you decide what to do next.
But building a lean-to is not always the first or best answer. If you already have a tarp, emergency bivvy, tent, or other shelter, using what you carry will usually be faster and require less energy than constructing everything from natural materials.
Just as important, the location you choose can matter more than the shelter itself.
Shelter is only one part of deciding what matters first outdoors. For the bigger picture, see our guide, Outdoor Survival Basics: The Rule of Threes and What to Prioritize First.
Why a Lean-To Shelter Works
A lean-to is one of the simplest wilderness shelters to understand. At its most basic, it consists of a sloped roof supported by a ridgepole or line, with the open side generally facing away from the worst weather.
A properly built lean-to can help:
- Block wind
- Shed rain
- Provide shade
- Reduce exposure
- Create a defined sleeping area
- Support additional insulation
- Conserve body heat when designed for the conditions
Its simplicity is also its limitation.
A lean-to is usually open on one side, so it does not provide the same protection as a fully enclosed tent or emergency shelter. In cold, windy, or severe weather, additional protection may be necessary.
The goal isn’t to build an impressive wilderness cabin. The goal is to create enough protection to improve your situation without wasting time, energy, or materials.
Choose the Shelter Site Before Building Anything
One of the most important shelter-building decisions happens before you pick up the first branch.
Look up, look down, and look around.
Avoid setting up beneath dead branches, leaning trees, unstable rocks, or anything else that could fall. Stay away from cliff edges, exposed ridges, avalanche paths, and other terrain hazards.
Avoid depressions and low areas where rainwater can collect.
Dry streambeds, washes, narrow ravines, and areas immediately beside streams can also become dangerous when heavy rain occurs upstream—even if it isn’t raining where you are.
Look for ground that is reasonably level, protected from prevailing wind, and naturally suited to shelter without requiring major alterations.
The National Park Service recommends checking a campsite for hazards such as flash flooding, lightning, wind, dead trees and overhead branches before settling in, and avoiding low areas, ravines and exposed locations where conditions can become dangerous.
For more guidance, see the National Park Service’s Finding and Setting Up a Campsite guide.
Before constructing any natural-material shelter on public land, also check local regulations. Cutting vegetation, moving natural resources, or constructing shelters may be prohibited outside a genuine emergency.
Natural Lean-To or Tarp Lean-To?
There are two basic ways to approach this shelter.
Natural-Material Lean-To
A traditional lean-to can be constructed from fallen branches, sticks, leaves, grasses, bark, and other available material.
The advantage is obvious: you may be able to build one without carrying dedicated shelter equipment.
The disadvantages are equally important.
Gathering enough material takes time and energy. Natural roofing can require a surprisingly thick layer before it provides meaningful protection from wind and rain. Construction can also damage the surrounding environment.
Tarp Lean-To
If you carry a tarp, much of that work disappears.
A tarp can be attached to a ridgeline or support and angled toward the ground, creating a basic weather barrier in a fraction of the time required to build a roof from branches and vegetation.
For a lightweight shelter option, the FREE SOLDIER Waterproof Camping Tarp can be pitched as a lean-to, windbreak or rain shelter without requiring you to build an entire roof from natural materials.
For planned hiking, hunting, camping, or backcountry travel, carrying emergency shelter material is generally a better strategy than assuming you’ll be able to build everything after something goes wrong.
How to Build a Lean-To Shelter Using Natural Materials
If you genuinely need to improvise a shelter and local conditions allow it, keep the design simple.
Step 1: Establish the Main Support
A traditional lean-to needs a solid ridgepole or main support.
Look for a strong fallen branch long enough to create the shelter you need. Avoid cutting live trees when suitable dead and down material is available and its use is permitted.
The ridgepole can sometimes be supported between two trees or secured to a sturdy natural anchor.
Before continuing, make sure the support is stable.
A shelter built underneath a heavy branch that can fall during the night creates a new hazard instead of solving one.
Step 2: Build the Roof Frame
Lean smaller branches against the ridgepole to form the basic roof.
Place them close enough together to support whatever roofing material you plan to use.
You don’t need a huge shelter.
In cold conditions especially, a compact sleeping space generally requires less material and can be easier to protect from wind than an oversized structure.
If cordage is available, it can make the frame easier to secure and reduce the amount of time spent improvising lashings.
For shelter setup and other general camp tasks, TECEUM 550 Paracord provides compact utility cordage that can be carried in a daypack or survival kit.
Step 3: Add Roofing Material
Natural roofing works best when it sheds water rather than simply collecting it.
Start near the bottom of the roof and work upward, overlapping material so rain tends to travel over the layers instead of underneath them.
Depending on the environment, available material might include:
- Fallen leaves
- Dry grasses
- Pine needles
- Bark already on the ground
- Small evergreen boughs where collection is legal and appropriate
A thin decorative layer won’t accomplish much. Natural roofing often needs substantial depth to provide useful weather protection.
As you build, periodically step inside and look for obvious daylight through the roof. Large gaps are also places where wind and rain can enter.
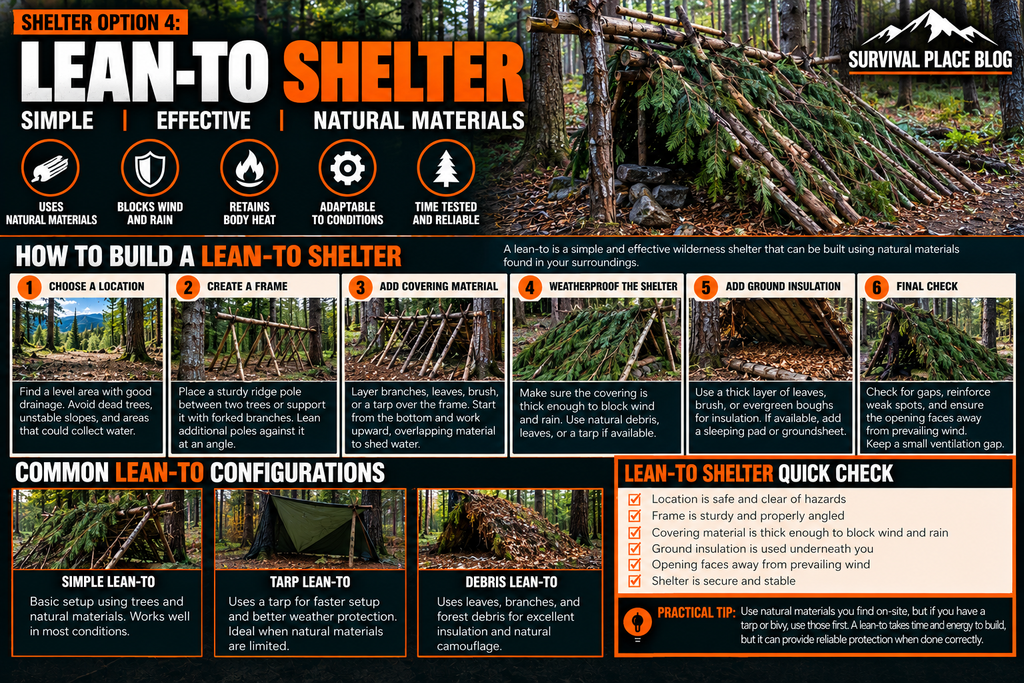
How to Build a Lean-To Shelter
A lean-to is relatively simple to construct, but it can require a significant amount of material and energy. Build the basic structure first, then improve its protection if time and conditions allow.
- Choose a safe location. Select level or reasonably stable ground with good drainage. Avoid dead trees, unstable branches, steep slopes, drainage channels, and areas that could collect water.
- Create the main support. Place a sturdy ridgepole between two trees or use another secure support arrangement. The ridgepole should be stable enough to support the shelter framework.
- Add the angled supports. Lean sturdy branches against the ridgepole at regular intervals, creating the sloping wall of the shelter.
- Add the covering material. Layer branches, brush, leaves, evergreen boughs, or a tarp over the framework. Start low and overlap the material as you work upward so water can run down the outside rather than through the shelter.
- Weatherproof the structure. Add additional layers where there are obvious gaps or areas exposed to wind and rain. A thicker covering generally provides better protection.
- Insulate the ground. Build a thick layer of dry leaves, vegetation, evergreen boughs, or other suitable insulation inside the shelter. A sleeping pad or groundsheet can provide additional protection if you have one.
- Check the finished shelter. Look for weak supports, gaps in the covering, water paths, and overhead hazards. Position the opening to reduce exposure to prevailing wind when practical.
Lean-To Shelter Quick Check
□ Location is safe and reasonably well drained
□ Ridgepole and frame are stable
□ Covering is thick enough for the expected conditions
□ Rain can run off the shelter
□ Ground insulation is in place
□ Opening is positioned appropriately for the weather
□ Shelter is stable and free of obvious hazards
Practical tip: If you already have a tarp or bivy, use it before spending hours gathering natural materials. A lean-to can provide effective protection, but building one from scratch costs time and energy.
Ground Insulation Is Part of Your Shelter
One of the most overlooked parts of an emergency shelter is underneath you.
The ground can pull heat from your body, particularly in cold or wet conditions. A roof may keep rain off your shoulders while doing little to prevent heat loss into cold ground.
Before settling in, remove sharp objects that could injure you or damage your equipment.
Then create insulation between your body and the ground using appropriate dry material when available.
This could include:
- Dry leaves
- Pine needles
- Dry grasses
- A sleeping pad
- An emergency bivvy
- Spare dry clothing
- A backpack or other insulating equipment
A compact backup such as the Survive Outdoors Longer Emergency Bivvy can add another layer of emergency protection from wind, rain and cold when an unexpected night outdoors becomes unavoidable.
The objective is not comfort alone. You’re creating a barrier between your body and a surface that can continuously draw away heat.
Build for the Wind and Weather
A lean-to should work with the environment rather than fight it.
When wind is the primary problem, position the protected side of the shelter toward the prevailing wind when terrain and other hazards allow.
When rain is expected, roof angle becomes especially important. A shallow roof can allow water to collect or penetrate natural roofing material, while a steeper angle generally helps water run off.
Don’t build so close to a stream that rising water can reach you.
Don’t choose a dry wash because the ground looks flat and convenient.
And don’t assume today’s weather will remain unchanged overnight.
Weather and terrain should determine the shelter—not a diagram memorized at home.
What About Building a Fire in Front of the Lean-To?
Traditional survival illustrations often show a lean-to with a large fire burning directly in front of it.
That should not be treated as a requirement.
A fire may provide warmth, light, signaling, or a way to heat water, but it also introduces additional hazards. Sparks can ignite dry shelter material, wind can carry embers, and seasonal fire restrictions may prohibit open fires entirely.
If fire is legal and conditions are safe, maintain adequate separation between the fire and anything that can burn.
Never build a fire simply because a survival diagram says one belongs there.
Before using an open fire, check current restrictions and conditions for the area you’re visiting. The National Park Service provides additional guidance on campfire and wildfire safety for park visitors.
A properly chosen shelter site, adequate clothing, ground insulation, and an emergency bivvy may sometimes provide a safer solution than relying on an open fire.
A Tarp Makes the Same Basic Shelter Much Faster
The lean-to concept becomes considerably easier when you carry shelter material with you.
Instead of gathering enough vegetation to create a weather-resistant roof, run paracord between suitable anchor points or secure one edge of the tarp higher than the other.
Stake or secure the lower edge toward the ground.
The result is the same basic geometry: a sloped surface that blocks wind and sheds precipitation.
Depending on weather conditions, you can pitch the tarp lower for greater protection or higher when ventilation and shade matter more.
A tarp also allows you to dismantle the shelter quickly and leave the area with far less impact.
Minimize Your Impact
Practicing shelter-building is useful, but practicing doesn’t mean tearing apart the landscape.
Leave No Trace guidance emphasizes minimizing alterations to campsites and leaving natural areas as you found them. Constructed lean-tos and other makeshift improvements can damage vegetation and encourage repeated disturbance of the same location. For more information on minimizing disturbance to natural areas, see the Leave No Trace guidance on leaving what you find.
For practice, a tarp and cordage allow you to learn the principles of shelter placement, roof angle, wind protection, knots, and drainage without cutting branches or constructing a permanent structure.
In a genuine life-threatening emergency, priorities can obviously change. But during ordinary recreation and training, minimize your impact and follow the rules of the land you’re using.
Common Lean-To Shelter Mistakes
A simple design can still fail if the fundamentals are wrong.
Building in the Wrong Location
A beautifully constructed shelter beneath a dangerous tree or inside a flood-prone drainage is still a dangerous shelter.
Site selection comes first.
Making the Shelter Too Large
Bigger isn’t automatically better.
A larger shelter requires more materials, more construction time, and more energy. Build enough space for the people and equipment that actually need protection.
Ignoring the Ground
A roof gets most of the attention, but inadequate ground insulation can leave you cold even when you’re protected from wind and rain.
Using Too Little Roofing Material
A few handfuls of leaves won’t create a waterproof roof.
If you’re relying entirely on natural material, expect to need considerably more than it appears from the outside.
Waiting Until Dark
Building a shelter becomes much more difficult when you can no longer clearly evaluate terrain, identify hazards, or gather materials.
If circumstances suggest you may be spending the night outdoors, begin thinking about shelter while you still have useful daylight.
Relying on Fire to Fix a Poor Shelter
A fire shouldn’t compensate for bad site selection, inadequate insulation, or a poorly constructed roof.
Solve the shelter problem first.
What Should You Carry for Emergency Shelter?
The best emergency shelter may be the one you don’t have to build from scratch.
For day hikes and other outdoor trips where an unexpected night outside is possible, a compact shelter setup can be surprisingly small.
Consider carrying:
- Emergency bivvy
- Lightweight tarp
- Paracord or utility cord
- Headlamp
- Cutting tool
- Extra insulation appropriate for the weather
A dependable fixed-blade knife can also be useful for ordinary camp and shelter tasks such as cutting cordage, preparing small pieces of dead material, and working with appropriate natural materials.
For a practical fixed-blade option, the Morakniv Companion Stainless Steel Fixed-Blade Knife provides a simple 4.1-inch blade and protective sheath without the size or cost of heavier tactical-style knives.
The point isn’t to carry an entire hardware store into the wilderness.
It’s to carry a few items that reduce the amount of improvisation required when you’re tired, cold, wet, injured, or losing daylight.
Practice Before You Need the Skill
Reading about shelter construction and actually building one are very different experiences.
Practice a tarp lean-to somewhere safe and legal.
Learn a few basic knots.
Experiment with roof angles.
Notice how wind changes direction around terrain.
Pay attention to how quickly the ground becomes cold after sunset.
If you practice a natural-material shelter, do it only where construction is permitted and minimize your impact afterward.
The objective is not to prove that you can survive with nothing.
The objective is to understand shelter well enough that you can solve the problem efficiently with whatever resources you actually have.
Lean-To Shelter Quick Checklist
Before committing to a shelter location, ask:
- Is anything dangerous above me?
- Could water collect or flow through this location?
- Am I exposed to strong wind?
- Is the ground reasonably level?
- Can I insulate myself from the ground?
- Do I already have a tarp or emergency shelter?
- How much daylight remains?
- Am I spending more energy building than necessary?
- Are fires permitted and safe?
- Is shelter construction permitted here?
Final Thoughts
Knowing how to build a lean-to shelter gives you another way to protect yourself when weather, injury, navigation problems, or an unexpected overnight stay turns an ordinary outdoor trip into a survival situation.
But the most important lesson isn’t memorizing where every branch goes.
Choose a safe location. Get out of the wind and precipitation. Insulate yourself from the ground. Conserve energy. Use the equipment you already have before spending hours recreating it from natural materials.
A lean-to is simply one tool for accomplishing those goals.
Shelter skills become much more valuable when they’re combined with sound decision-making, navigation, signaling, safe water, first aid, and the other fundamentals of outdoor survival.