Affiliate Disclosure: This post contains affiliate links. If you purchase through these links, Survival Place Blog may earn a commission at no additional cost to you. As an Amazon Associate I earn from qualifying purchases.
Fire Safety Notice: Outdoor fires can become dangerous quickly, especially during dry, windy or restricted conditions. Always follow current local fire regulations and land-management rules. Never start a fire when open burning is prohibited, and make sure any permitted fire is completely extinguished before leaving the area.
Knowing how to start a fire can be an important wilderness skill. Fire can provide warmth, help dry damp clothing, boil water, cook food and provide light. In some situations, a controlled fire may also improve morale or help rescuers locate you.
But wilderness fire starting is about more than knowing how to rub two sticks together. The smartest approach is preparation: carry dependable ignition sources, protect your tinder from moisture, understand how to build and maintain a fire, and practice primitive techniques before you ever need them.
Primitive fire-starting methods such as the bow drill and hand drill are valuable skills to learn. They are also considerably more difficult than they can appear in demonstrations. Wood selection, moisture, technique, tinder preparation and weather all affect whether they work.
In a real emergency, the goal isn’t to prove how primitive you can be. The goal is to safely produce fire when you genuinely need it.
For the bigger picture of what to prioritize when a wilderness emergency begins, see our guide, Outdoor Survival Basics: The Rule of Threes and What to Prioritize First.
Wilderness Fire Starting Begins Before You Make a Spark
A successful fire requires three basic ingredients: heat, fuel and oxygen. But knowing the fire triangle doesn’t automatically produce a usable wilderness fire.
You also need properly prepared combustible material.
Think of the process as a progression:
Ignition source → tinder → kindling → small fuel → larger fuel
Skipping part of that progression is one of the most common reasons people struggle to establish a fire.
A lighter may produce an instant flame, and a ferro rod may throw hot sparks, but neither guarantees a sustainable fire if your tinder is damp or your fuel hasn’t been prepared.
Know When Not to Start a Fire
Before discussing how to make fire, it’s important to recognize when you shouldn’t.
Wildfire danger, seasonal restrictions, strong winds, drought conditions and land-management regulations can make an otherwise useful campfire unsafe or illegal.
If fires are prohibited, don’t assume a survival-skills exercise is an exception.
Whenever possible, check current restrictions before entering the backcountry. If you’re already outdoors and conditions appear dangerously dry or windy, use another method of staying warm, preparing food or signaling rather than introducing an unnecessary ignition source.
Before building a fire, check the National Park Service’s Wildland Fire Safety for Park Visitors guidance for additional information about wildfire conditions, fire restrictions and responsible outdoor fire use.
Prepare Tinder, Kindling and Fuel First
One of the most useful fire-starting habits is simple:
Build your fire before you light your fire.
Gather and prepare enough material to move from the first spark or flame to a stable fire before using your ignition source.
Tinder
Tinder is the fine, dry material that accepts your initial flame, spark or ember.
Depending on your environment, usable natural tinder may include very dry:
- Fine grass
- Bark fibers
- Plant fibers
- Small wood shavings
- Fine dead twigs
- Resin-rich wood shavings where locally available and appropriate to collect
The important characteristics are dryness, surface area and ease of ignition, not simply the name of the material.
A tinder bundle should be loose enough to allow oxygen through it but dense enough to transfer heat from one piece of material to another.
Prepared commercial tinder or dry tinder carried in a waterproof container removes much of the uncertainty.
Kindling
Kindling bridges the gap between tinder and larger fuel.
Start small.
Collect thin dry twigs and progressively larger sticks before attempting ignition. A small flame can easily be smothered by placing a large piece of wood on it too soon.
Fuel
Larger pieces keep an established fire burning.
Whenever possible, gather enough fuel before starting the fire so you aren’t wandering around looking for wood after your tinder is already burning.
In wet conditions, the outside of dead wood may be damp while the interior remains considerably drier. Splitting suitable wood can sometimes expose more usable interior material.
For preparing wood shavings, feather sticks and smaller pieces of suitable dead wood, the Morakniv Companion Stainless Steel Fixed-Blade Knife is a practical lightweight option for a wilderness kit.
Modern Fire-Starting Methods: Start With Reliability
Primitive methods are worth learning, but preparedness begins with tools that provide the greatest chance of success for the least effort.
For most people heading into the wilderness, that means carrying more than one method of ignition.
Method 1: A Lighter
A basic lighter is difficult to beat for simplicity.
It provides an immediate flame, requires relatively little skill and weighs almost nothing. For many outdoor situations, it makes sense as the primary ignition source.
Its weaknesses are also worth understanding. Lighters can become wet, run out of fuel, malfunction or become more difficult to operate in very cold conditions.
That’s why a lighter shouldn’t necessarily be your only fire-starting method.
Keep it protected from moisture and carry a backup.
For a rechargeable option, the LcFun Electric Dual Arc Plasma Lighter provides a wind-resistant, flameless ignition source that can be USB charged and carried as part of a prepared wilderness fire kit.
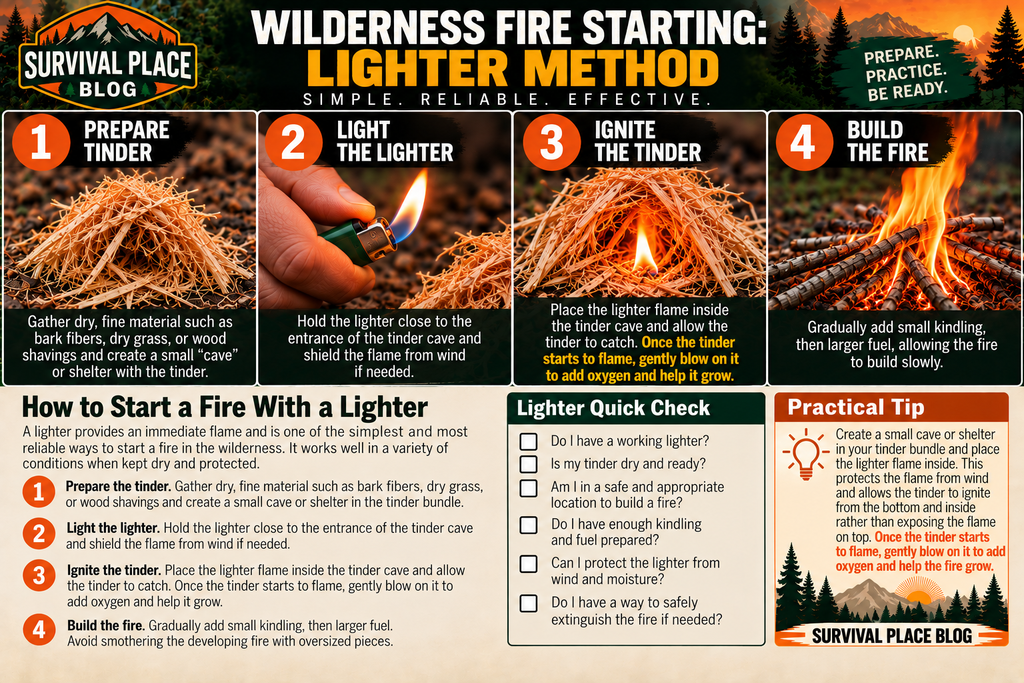
How to Start a Fire With a Lighter
A lighter provides an immediate flame and is one of the simplest and most reliable ways to start a fire in the wilderness. It works well in a variety of conditions when kept dry and protected.
- Prepare tinder. Gather dry, fine material such as bark fibers, dry grass, or wood shavings and place it in a small, loose bundle.
- Position the lighter. Hold the lighter close to the tinder and shield it from wind if needed.
- Ignite the tinder. Apply the flame to the tinder until it catches and begins to burn on its own. Once it starts to flame, gently blow on it to add oxygen and help it grow.
- Build the fire. Gradually add small kindling, then larger fuel, allowing the fire to build slowly.
Lighter Quick Check
□ Do I have a working lighter?
□ Is my tinder dry and ready?
□ Am I in a safe and appropriate location to build a fire?
□ Do I have enough kindling and fuel prepared?
□ Can I protect the lighter from wind and moisture?
□ Do I have a way to safely extinguish the fire if needed?
Practical tip: Keep your lighter protected from moisture and carry a backup ignition source.
Method 2: Waterproof or Stormproof Matches
Matches provide another straightforward source of flame and make a useful backup to a lighter.
Outdoor-oriented waterproof or storm-resistant matches can perform better than ordinary household matches in poor weather, but they are still a limited resource. Once you’ve used them, they’re gone.
Protect matches inside a waterproof container even if they’re marketed as water-resistant.
And before striking one, have your tinder and kindling ready.
For a backup ignition source, these Stormproof Waterproof Matches come in a protective container and are designed for outdoor conditions where ordinary household matches may be less dependable.
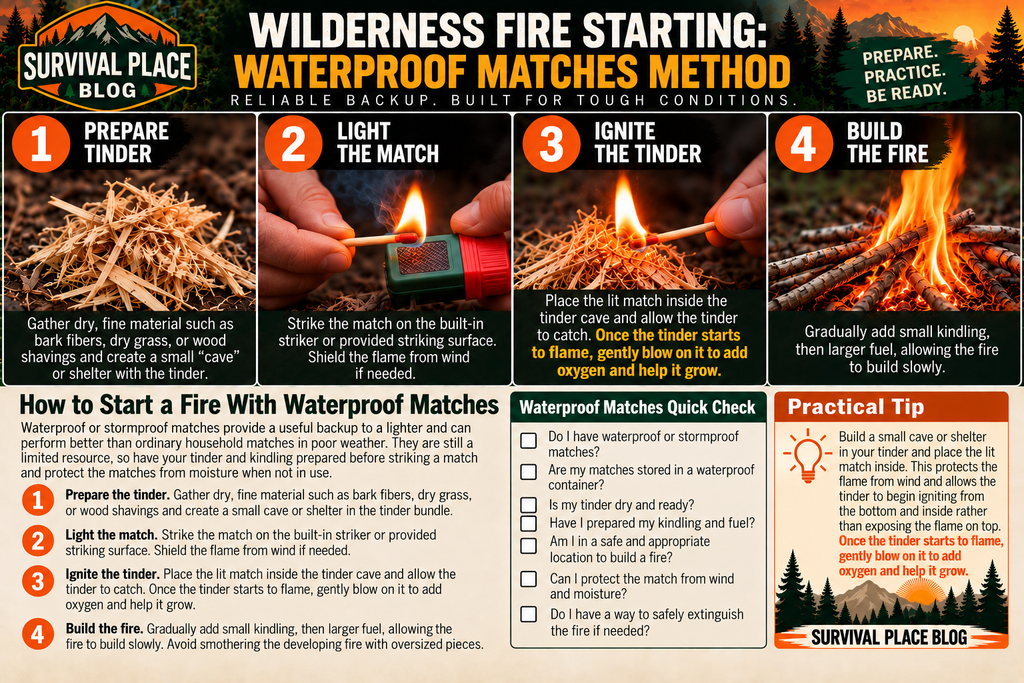
How to Start a Fire With Waterproof or Stormproof Matches
Waterproof or stormproof matches provide a useful backup to a lighter and can perform better than ordinary household matches in poor weather. They are still a limited resource, so have your tinder and kindling prepared before striking a match and protect the matches from moisture when not in use.
- Prepare the tinder. Gather dry, fine material such as bark fibers, dry grass, or wood shavings. Arrange it into a small, loose bundle and create a small opening or “cave” where the flame can be protected.
- Light the match. Strike the match using its built-in striker or the appropriate striking surface. Shield the flame from wind when necessary.
- Ignite the tinder. Place the lit match inside the small tinder cave rather than trying to light the top of the bundle. This allows the flame to work from the inside and underneath the tinder, helping protect it from wind while it catches. Once it starts to flame, gently blow on it to add oxygen and help it grow.
- Build the fire. Once the tinder is burning steadily, gradually add small kindling and then larger fuel. Allow the fire to build rather than adding large pieces too quickly.
Waterproof Match Quick Check
□ Do I have waterproof or stormproof matches?
□ Are my matches stored in a waterproof container?
□ Is my tinder dry and ready?
□ Have I prepared my kindling and fuel?
□ Is the fire location safe and appropriate?
□ Can I protect the flame from wind?
□ Do I have a way to safely extinguish the fire?
Practical tip: Build a small “cave” or shelter in your tinder and place the lit match inside it. This protects the flame from wind and allows the tinder to begin igniting from the bottom and inside rather than exposing the flame on top.
Method 3: Ferrocerium Rod
A ferrocerium rod, commonly called a ferro rod, produces a shower of hot sparks when scraped with an appropriate striker.
It does not work exactly like traditional flint and steel.
A ferro rod can be a particularly useful wilderness backup because it is compact, doesn’t rely on liquid fuel and can provide many strikes.
But there’s an important catch:
Throwing sparks is easy. Turning those sparks into fire takes practice.
Your tinder must be capable of accepting the sparks. Fine, dry material or purpose-made fire tinder makes the process considerably easier.
Hold the ferro rod close to the tinder so the sparks are concentrated where they’re needed. Depending on the striker and technique, you can scrape the rod or hold the striker relatively steady while pulling the rod back to reduce the chance of scattering your prepared tinder.
Practice both the spark-producing technique and tinder preparation before depending on a ferro rod outdoors.
For a simple reusable backup, the bayite 4-Inch Ferrocerium Rod and Striker provides a dedicated ferro rod and striker that can be practiced with before adding it to your wilderness fire kit.
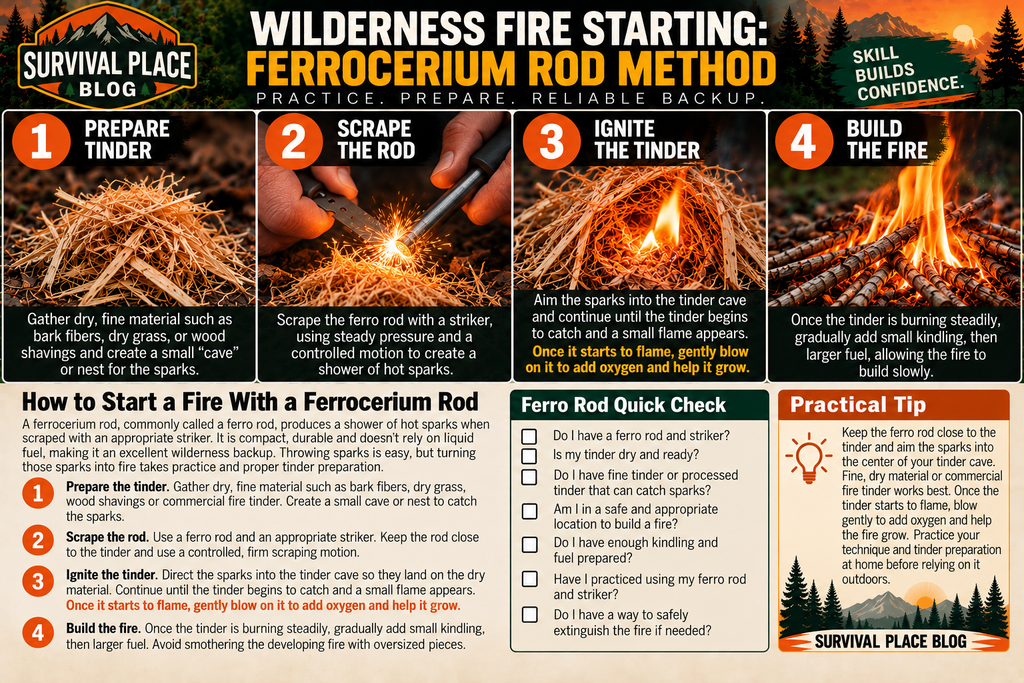
How to Start a Fire With a Ferrocerium Rod
A ferrocerium rod, commonly called a ferro rod, produces a shower of hot sparks when scraped with an appropriate striker. It is compact, reusable, and doesn’t rely on liquid fuel, but turning those sparks into a fire requires proper tinder preparation and practice.
- Prepare the tinder. Gather fine, dry material such as bark fibers, dry grass, wood shavings, or purpose-made fire tinder. Create a small tinder cave or nest where the sparks can land and concentrate.
- Scrape the rod. Hold the ferro rod close to the tinder and use the striker with a controlled, firm motion to produce a shower of hot sparks. Depending on your technique and striker, you can scrape the rod or hold the striker relatively steady while pulling the rod backward.
- Ignite the tinder. Direct the sparks into the tinder cave so they land on the dry material. Continue producing sparks until the tinder begins to catch and a small flame appears. Once it starts to flame, gently blow on it to add oxygen and help it grow.
- Build the fire. Once the tinder is burning, gradually add small kindling and then larger fuel. Avoid smothering the developing fire with oversized pieces.
Ferro Rod Quick Check
□ Do I have a ferrocerium rod and striker?
□ Is my tinder fine, dry, and ready?
□ Have I prepared a tinder nest or cave for the sparks?
□ Am I in a safe and appropriate location?
□ Do I have enough kindling and fuel prepared?
□ Have I practiced using the ferro rod and striker?
□ Do I have a way to safely extinguish the fire?
Practical tip: Keep the ferro rod close to the tinder and concentrate the sparks in one small area. Fine, dry tinder or purpose-made fire tinder makes a major difference. Practice both your spark-producing technique and tinder preparation before depending on a ferro rod outdoors.
Method 4: Traditional Flint and Steel
Traditional flint and steel is often confused with a modern ferro rod, but they aren’t the same technique.
With traditional flint and steel, a piece of hard stone such as flint strikes high-carbon steel, producing small hot particles from the steel.
Those sparks generally require tinder capable of accepting them readily. Historically, prepared materials such as char cloth have commonly been used to catch the spark and form a glowing ember.
The ember is then transferred into a dry tinder bundle and carefully encouraged into flame.
Traditional flint and steel can be an excellent skill to practice because it teaches tinder preparation and ember management. However, it is generally less forgiving than simply producing a flame with a lighter.
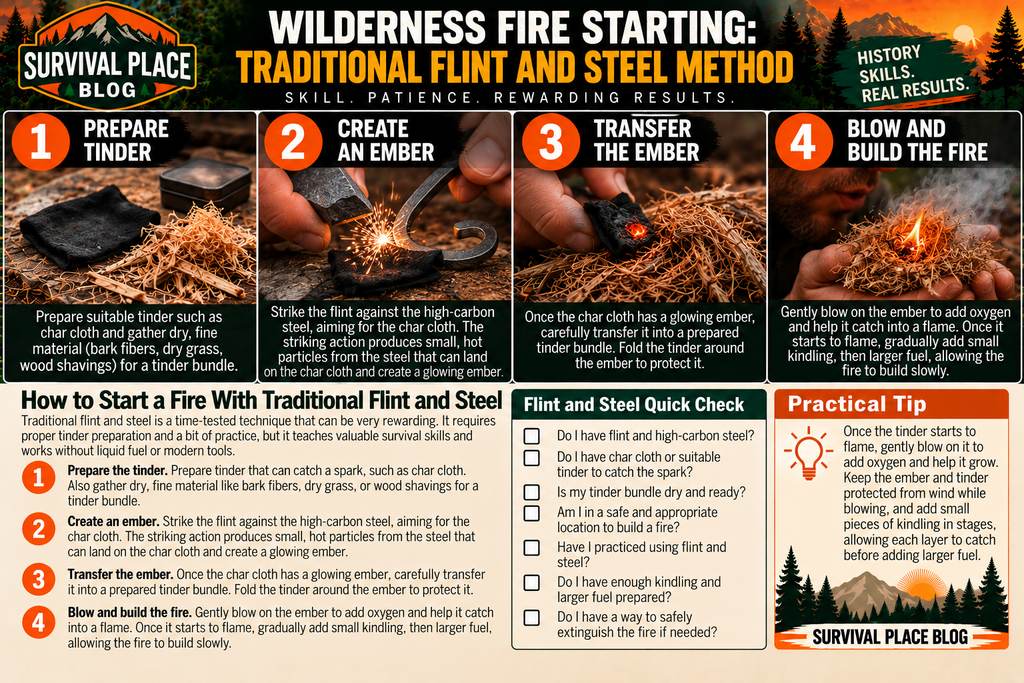
How to Start a Fire With Traditional Flint and Steel
Traditional flint and steel is different from a modern ferro rod. A piece of hard stone such as flint strikes high-carbon steel, producing small hot particles from the steel. Those sparks generally need tinder capable of catching them readily, with materials such as char cloth historically used to capture the spark and create a glowing ember.
- Prepare the tinder. Have suitable spark-catching material ready, such as char cloth, along with a dry tinder bundle made from fine material such as bark fibers, dry grass, or wood shavings.
- Create the ember. Strike the flint against the high-carbon steel so the sparks land on the prepared char cloth. Continue until a spark produces a glowing ember.
- Transfer the ember. Carefully move the glowing ember into the prepared tinder bundle. Fold the tinder around it without crushing the ember.
- Blow and build the fire. Gently introduce oxygen to encourage the ember to spread through the tinder. Once the tinder begins to flame, continue gently blowing as needed and gradually add small kindling, followed by larger fuel.
Flint and Steel Quick Check
□ Do I have suitable flint and high-carbon steel?
□ Do I have char cloth or suitable spark-catching tinder?
□ Is my tinder bundle dry and ready?
□ Am I in a safe and appropriate location?
□ Do I have enough kindling and fuel prepared?
□ Have I practiced the technique beforehand?
□ Do I have a way to safely extinguish the fire?
Practical tip: Protect the glowing ember from wind while transferring it into the tinder. Once the tinder begins to flame, gently blow on it to add oxygen and help it grow. Then build the fire gradually rather than overwhelming the new flame with too much fuel at once.
Method 5: Solar Fire Starting
Under the right conditions, concentrated sunlight can ignite suitable tinder.
A magnifying lens or another appropriate convex lens can focus sunlight onto a small area. The goal is to create the smallest, brightest focal point possible on dry tinder and hold it steadily in position.
As the tinder heats, it may begin to smoke and develop a glowing area. That ember can then be encouraged and transferred into additional tinder.
Solar ignition has obvious limitations.
You need:
- Strong direct sunlight
- A suitable focusing lens
- Very dry tinder
- Proper positioning
- Time and patience
Cloud cover, shade, poor tinder or weak sunlight can make the technique ineffective.
For that reason, solar ignition is an interesting skill and potential backup under favorable conditions—not a substitute for carrying a dependable ignition source.
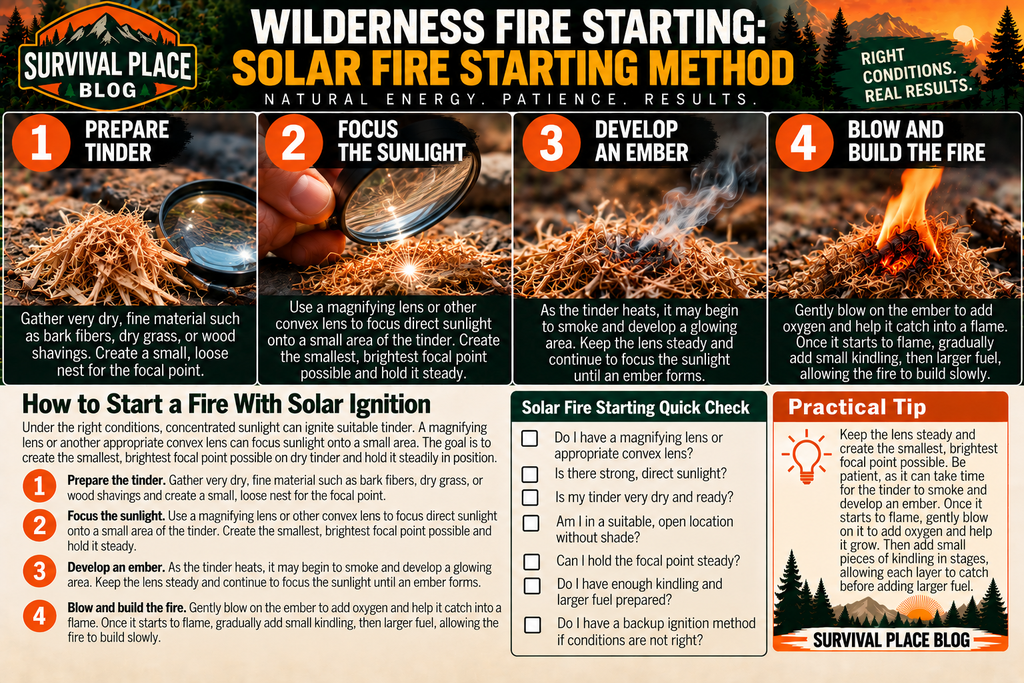
How to Start a Fire With Solar Ignition
Under the right conditions, concentrated sunlight can ignite suitable tinder. A magnifying lens or another appropriate convex lens can focus sunlight onto a small area. Solar ignition requires strong direct sunlight, very dry tinder, proper positioning, and patience.
- Prepare the tinder. Gather very dry, fine material such as bark fibers, dry grass, or wood shavings. Arrange it so the focused sunlight can heat a small area effectively.
- Focus the sunlight. Use a magnifying lens or another appropriate convex lens to concentrate direct sunlight onto the tinder. Adjust the lens until you create the smallest, brightest focal point possible, then hold it steadily in position.
- Develop the ember. Keep the focal point steady as the tinder heats. It may begin to smoke and develop a glowing area. Continue focusing the sunlight until an ember forms.
- Blow and build the fire. Once an ember has developed, gently blow on it to add oxygen and encourage it toward a flame. Once the tinder begins to flame, gradually add small kindling and then larger fuel.
Solar Fire Starting Quick Check
□ Do I have a magnifying lens or suitable convex lens?
□ Is there strong, direct sunlight?
□ Is my tinder very dry and ready?
□ Can I hold the focal point steady?
□ Do I have enough kindling and fuel prepared?
□ Do I have enough time and patience for the ember to develop?
□ Do I have a backup ignition method if conditions aren’t suitable?
Practical tip: The smaller and brighter the focal point, the more concentrated the sunlight. Keep the lens steady and be patient as the tinder heats. Once it begins to flame, gently blow on it to add oxygen and help it grow, then add small pieces of kindling gradually.
Method 6: Battery and Fine Steel Wool
A battery and very fine steel wool can create enough heat to ignite the steel fibers.
This is best understood as an improvised emergency technique, not something we’d recommend instead of carrying a lighter, matches or ferro rod.
The technique also deserves caution. Steel wool can ignite very quickly, creating hot material capable of causing burns or starting an unintended fire. Batteries can also be damaged or dangerously short-circuited if mishandled.
If someone chooses to learn this method, it should be practiced carefully in a controlled, fire-safe environment rather than attempted for the first time during an emergency.
Preparedness makes improvisation less necessary.
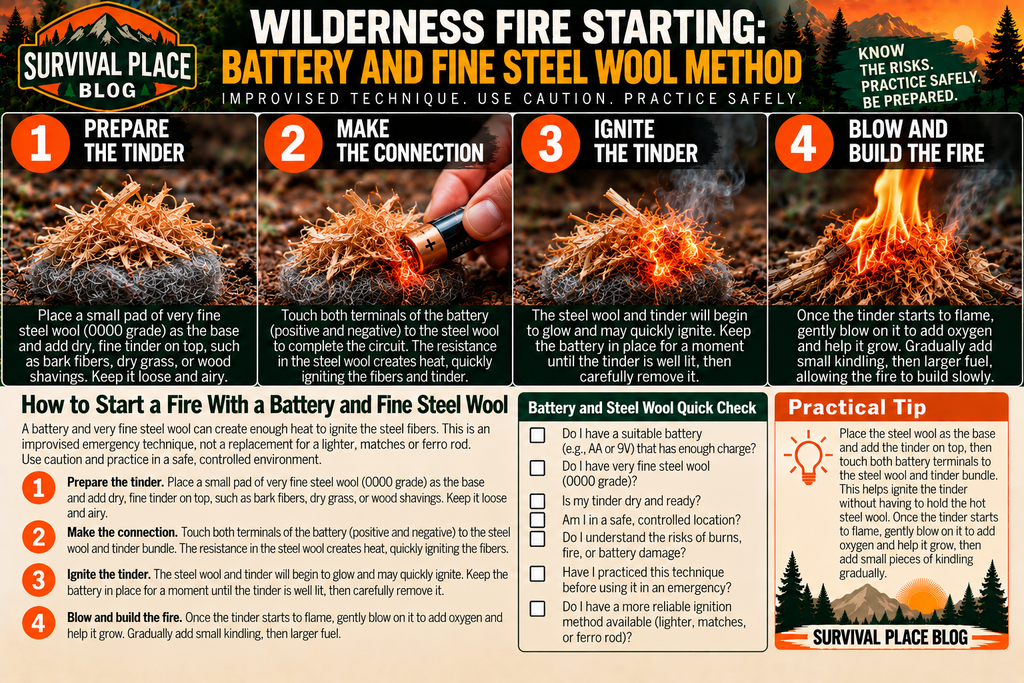
How to Start a Fire With a Battery and Fine Steel Wool
A battery and very fine steel wool can create enough heat to ignite the steel fibers. This is best understood as an improvised emergency technique, not a replacement for carrying a lighter, matches, or ferro rod.
The steel wool can ignite very quickly, creating hot material capable of causing burns or starting an unintended fire. Batteries can also be damaged or dangerously short-circuited if mishandled. Practice this technique only in a controlled, fire-safe environment rather than attempting it for the first time during an emergency.
- Prepare the tinder. Place a small, loose pad of very fine steel wool on a safe, nonflammable surface. Add dry, fine tinder loosely on top of the steel wool, such as bark fibers, dry grass, or wood shavings. Have additional kindling ready before creating the ignition.
- Make the connection. Touch both battery terminals to the steel wool so the circuit is completed through the steel fibers. The resulting heat can cause the steel wool to begin glowing and ignite.
- Ignite the tinder. Keep the tinder positioned directly over the steel wool as it begins to glow and ignite. Do not pick up or hold the hot steel wool. Allow the heat and glowing fibers beneath the tinder to transfer the ignition naturally.
- Blow and build the fire. Once the tinder starts to flame, gently blow on it to add oxygen and help it grow. Gradually add small pieces of kindling, then larger fuel, allowing each stage to catch before adding more.
Battery and Steel Wool Quick Check
□ Do I have very fine steel wool?
□ Is my tinder dry and ready?
□ Is the steel wool positioned as the base with tinder above it?
□ Am I working in a controlled, fire-safe location?
□ Do I understand the risk of burns and unintended fire?
□ Do I understand the risk of battery damage or short-circuiting?
□ Have I practiced this technique before an emergency?
□ Do I have a more reliable ignition method available?
Practical tip: Use the steel wool as the base and place the tinder loosely on top rather than trying to hold the hot steel wool. This keeps your hands away from the rapidly heating material. Once the tinder starts to flame, gently blow on it to add oxygen and help it grow, then add small pieces of kindling gradually.
Primitive Fire-Starting Methods
Primitive fire making takes us into a very different category.
These methods can be extremely rewarding to learn. They develop an understanding of friction, wood selection, tinder preparation, ember handling and the amount of work required to produce fire without modern ignition tools.
But watching someone experienced create a bow-drill ember in a few minutes can give beginners the wrong impression.
Success may depend on:
- Wood species
- Dryness
- Spindle dimensions
- Fireboard preparation
- Cordage
- Body position
- Downward pressure
- Speed
- Tinder quality
- Experience
Primitive fire isn’t something you should assume you’ll figure out because you’ve read the instructions once.
Practice is the difference.
Method 7: Bow Drill
The bow drill is one of the best-known friction-fire methods.
Compared with a hand drill, the bow allows the spindle to rotate rapidly without requiring you to continuously roll it between your palms.
A typical bow-drill set includes:
- Bow
- Cord
- Spindle
- Fireboard or hearth board
- Bearing block
- Prepared tinder bundle
Step 1: Prepare the Fireboard
Create a shallow depression where the spindle will rotate.
After establishing the spindle’s position, a properly prepared notch allows the hot wood dust generated by friction to collect in one area.
The goal isn’t simply to make smoke.
The goal is to produce enough hot material for that dust to form a persistent glowing coal.
Step 2: Prepare the Bow and Spindle
The bow should be comfortable to move back and forth while maintaining control of the spindle.
Wrap the cord around the spindle so moving the bow rotates it.
The cord needs enough tension to grip without preventing the spindle from rotating properly.
Step 3: Stabilize Your Position
Good body mechanics make an enormous difference.
Use the bearing block to apply controlled downward pressure from above while keeping the spindle as stable and vertical as possible.
Your bowing motion should be controlled rather than frantic.
Step 4: Build Heat
Move the bow back and forth, rotating the spindle against the fireboard.
As friction increases, you should begin producing dark wood dust and smoke.
Maintain the combination of speed and pressure necessary to generate heat.
Step 5: Develop the Coal
Seeing smoke doesn’t mean you’re finished.
Continue until the accumulated wood dust supports a coal that continues glowing after you stop drilling.
This is one of the places practice matters most. Beginners frequently stop as soon as they see smoke and discover that they haven’t actually produced a sustainable ember.
Step 6: Transfer the Coal
Carefully move the coal into your prepared tinder bundle.
Fold the tinder around it without crushing or smothering it. Provide oxygen gradually until the ember spreads through the tinder.
Once the bundle ignites, place it into your prepared kindling structure and begin feeding the fire.
If you’re practicing the bow-drill method, TECEUM 550 Paracord Type III can provide durable cordage for experimenting with bow-drill setups while also serving other general camp and emergency uses.
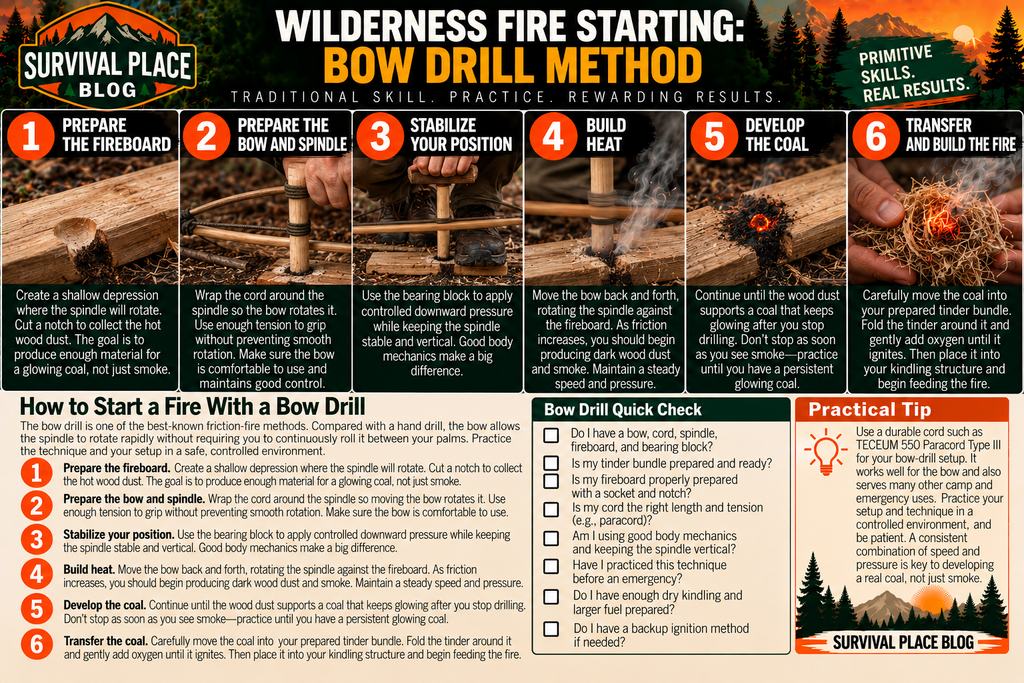
How to Start a Fire With a Bow Drill
The bow drill is one of the best-known friction-fire methods. Compared with a hand drill, the bow allows the spindle to rotate rapidly without requiring you to continuously roll it between your palms.
A typical bow-drill set includes a bow, cord, spindle, fireboard or hearth board, bearing block, and prepared tinder bundle.
Practice Before You Rely on It: The bow drill is a primitive fire-starting method that requires practice to develop the technique, body mechanics, tinder preparation, and patience needed to produce a reliable coal. It should not be considered a dependable emergency fire-starting method if you have never successfully used one before. Practice this technique in a safe, controlled environment and learn to consistently produce a coal before considering it a practical wilderness skill. When heading into the field, carry a reliable ignition source rather than depending on an unpracticed primitive method.
- Prepare the fireboard. Create a shallow depression where the spindle will rotate. After establishing the spindle’s position, prepare a notch that allows the hot wood dust generated by friction to collect in one area. The goal is to produce enough hot material for that dust to form a persistent glowing coal—not simply smoke.
- Prepare the bow and spindle. Wrap the cord around the spindle so moving the bow rotates it. The cord needs enough tension to grip the spindle without preventing smooth rotation. Make sure the bow is comfortable to move back and forth while maintaining control.
- Stabilize your position. Use the bearing block to apply controlled downward pressure from above while keeping the spindle as stable and vertical as possible. Good body mechanics make a significant difference.
- Build heat. Move the bow back and forth, rotating the spindle against the fireboard. As friction increases, you should begin producing dark wood dust and smoke. Maintain a controlled combination of speed and pressure.
- Develop the coal. Continue until the accumulated wood dust supports a coal that continues glowing after you stop drilling. Seeing smoke doesn’t mean you’re finished. Practice until you can consistently produce a sustainable ember.
- Transfer the coal. Carefully move the coal into your prepared tinder bundle. Fold the tinder around it without crushing or smothering it. Gently provide oxygen until the ember spreads through the tinder. Once the bundle ignites, place it into your prepared kindling structure and begin feeding the fire.
Bow Drill Quick Check
□ Do I have a bow, cord, spindle, fireboard, and bearing block?
□ Is my tinder bundle prepared and ready?
□ Is the fireboard properly prepared?
□ Is my cord properly tensioned?
□ Can I maintain a stable position and controlled motion?
□ Have I practiced the technique before an emergency?
□ Do I have enough kindling and larger fuel prepared?
□ Do I have a backup ignition method if needed?
Practical tip: Don’t stop just because you see smoke. The goal is a persistent glowing coal. Maintain controlled speed and pressure, and once the coal is transferred to the tinder and begins to flame, gently add oxygen to help it grow. Have your kindling prepared before you start.
Method 8: Hand Drill
The hand drill removes the bow and cordage from the process.
That sounds simpler.
In practice, it can be considerably harder.
The spindle is rotated directly between the palms while downward pressure is maintained against the fireboard. Your hands naturally travel down the spindle as you work, requiring you to reposition them repeatedly.
The basic sequence is:
- Prepare a suitable dry spindle and fireboard
- Create and burn in the spindle depression
- Prepare the notch for collecting hot wood dust
- Position the spindle vertically
- Rotate it rapidly between your palms while applying downward pressure
- Build sufficient heat and dust to develop a coal
- Transfer the coal into prepared tinder
Material selection and technique are critical.
Humidity, wood properties, hand technique and physical endurance can all affect the outcome. Even someone who understands the concept may struggle to produce a coal without substantial practice.
That’s precisely why the hand drill is valuable to learn before an emergency rather than during one.
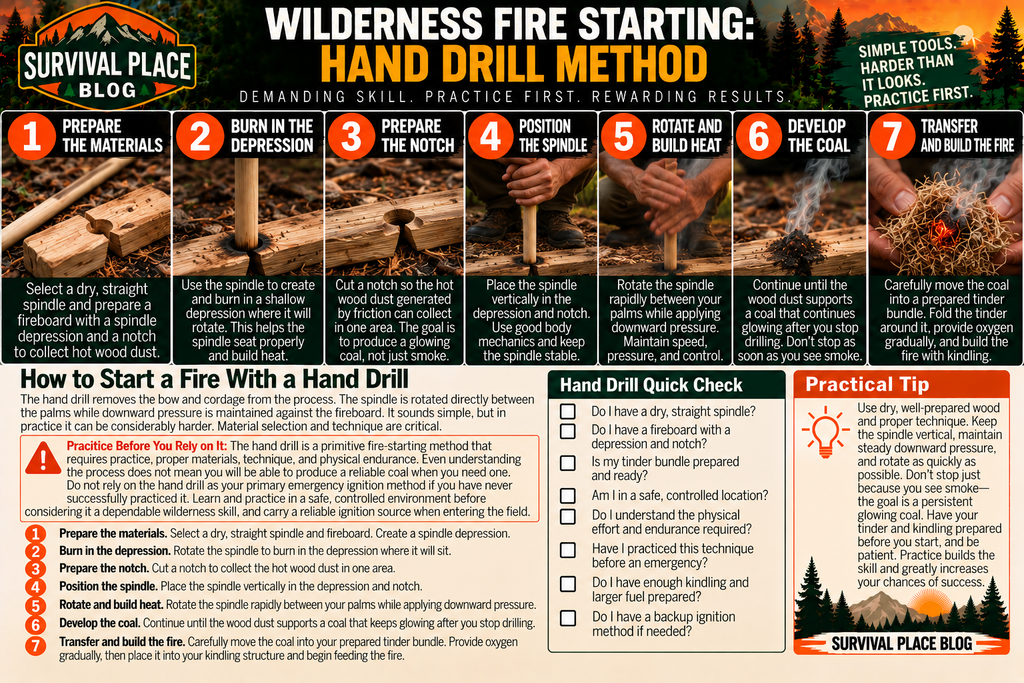
How to Start a Fire With a Hand Drill
The hand drill removes the bow and cordage from the process. That sounds simpler, but in practice it can be considerably harder. The spindle is rotated directly between your palms while downward pressure is maintained against the fireboard, requiring you to repeatedly reposition your hands as they travel down the spindle.
Practice Before You Rely on It
The hand drill is a primitive fire-starting method that requires practice to develop the technique, body mechanics, physical endurance, and tinder preparation needed to produce a reliable coal. Even understanding the process does not mean you will be able to successfully produce an ember when you need one. Do not rely on the hand drill as your primary emergency ignition method if you have never successfully practiced it. Learn and practice the technique in a safe, controlled environment before considering it a dependable wilderness skill, and carry a reliable ignition source when entering the field.
- Prepare the materials. Select a suitable dry spindle and fireboard. The materials need to be properly prepared before you begin.
- Burn in the depression. Use the spindle to create and burn in a shallow depression in the fireboard where the spindle will rotate. This helps establish a proper working surface.
- Prepare the notch. Cut a notch beside the spindle depression so the hot wood dust created by friction can collect in one area. This material is what will eventually support the glowing coal.
- Position the spindle. Place the spindle vertically in the depression and notch. Maintain a stable position and prepare to apply controlled downward pressure.
- Rotate and build heat. Rotate the spindle rapidly between your palms while applying downward pressure against the fireboard. As friction increases, you should begin producing dark wood dust and smoke. Maintain controlled speed and pressure rather than rushing the movement.
- Develop the coal. Continue working until the accumulated wood dust supports a coal that continues glowing after you stop drilling. Smoke alone does not mean you have successfully produced an ember.
- Transfer and build the fire. Carefully move the glowing coal into your prepared tinder bundle. Fold the tinder around it without crushing or smothering the ember. Provide oxygen gradually until the tinder begins to flame, then gently blow on the flame to help it grow. Transfer the burning tinder into your prepared kindling structure and gradually build the fire.
Hand Drill Quick Check
□ Do I have a dry, straight spindle?
□ Do I have a properly prepared fireboard?
□ Is the spindle depression and notch ready?
□ Is my tinder bundle prepared and ready?
□ Am I in a safe, controlled location?
□ Have I practiced the technique before an emergency?
□ Do I have enough kindling and larger fuel prepared?
□ Do I have a reliable backup ignition method?
Practical tip: Use dry, well-prepared wood and focus on consistent technique rather than simply trying to move as fast as possible. Keep the spindle vertical, maintain steady downward pressure, and rotate as quickly as you can while maintaining control. Don’t stop just because you see smoke—the goal is a persistent glowing coal. Once the tinder starts to flame, gently blow on it to add oxygen and help it grow.
Method 9: Fire Plough
The fire plough uses friction in a different way.
Instead of rotating a spindle, a harder stick or wooden edge is driven repeatedly along a groove in a softer piece of wood.
The movement creates friction and pushes heated wood fibers toward the end of the groove.
With appropriate materials and enough speed, pressure and repetition, those fibers may develop into an ember.
The general process is:
- Select compatible, dry materials
- Prepare a groove in the fireboard
- Drive the plough rapidly along the groove
- Maintain pressure and speed
- Allow hot wood material to accumulate
- Develop the material into a sustainable ember
- Transfer the ember to prepared tinder
Like the hand drill, this method can require considerable effort and proper material selection.
It is worth exploring as a primitive skill, but it should not be treated as a guaranteed emergency solution.
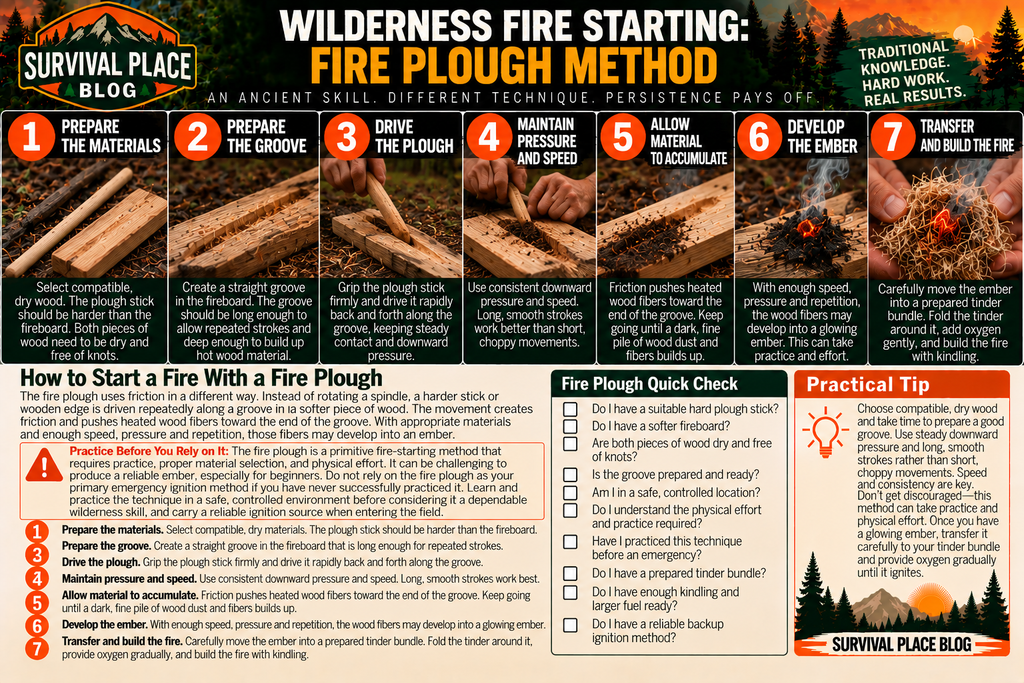
How to Start a Fire With a Fire Plough
The fire plough uses friction in a different way from a bow drill or hand drill. Instead of rotating a spindle, a harder stick or wooden edge is driven repeatedly along a groove in a softer piece of wood. The movement creates friction and pushes heated wood fibers toward the end of the groove.
With appropriate materials and enough speed, pressure, and repetition, those fibers may develop into an ember.
Practice Before You Rely on It
The fire plough is a primitive fire-starting method that can require considerable effort, proper material selection, and practice. Success depends on factors such as wood selection, dryness, technique, pressure, speed, and physical endurance. Do not rely on this method as your primary emergency ignition source if you have never successfully practiced it. Learn and practice the technique in a safe, controlled environment before considering it a dependable wilderness skill, and carry a reliable ignition source when entering the field.
- Select compatible materials. Choose dry wood with a harder stick or wooden edge for the plough and a softer piece of wood for the fireboard. Have your tinder and kindling prepared before you begin.
- Prepare the groove. Create a suitable groove in the fireboard. It should provide enough length and depth for repeated strokes and allow heated wood material to collect toward one end.
- Drive the plough. Grip the plough firmly and drive it repeatedly along the groove. Keep the movement controlled and maintain contact with the fireboard.
- Maintain pressure and speed. Use consistent downward pressure and speed. Controlled, repeated strokes are more useful than simply trying to move as fast as possible.
- Allow material to accumulate. Friction pushes heated wood fibers toward the end of the groove. Continue working until a dark, fine pile of wood dust and fibers begins accumulating.
- Develop the ember. Continue with sufficient speed, pressure, and repetition until the accumulated material develops into a glowing ember. Smoke alone does not mean you’ve produced a sustainable coal.
- Transfer and build the fire. Carefully move the glowing ember into your prepared tinder bundle. Fold the tinder around it without crushing or smothering the ember. Provide oxygen gradually until the tinder begins to flame, then gently blow on the flame to help it grow. Transfer the burning tinder to your prepared kindling and build the fire gradually.
Fire Plough Quick Check
□ Do I have compatible dry wood?
□ Is the plough stick harder than the fireboard?
□ Is the groove prepared and ready?
□ Is my tinder bundle prepared?
□ Am I in a safe, controlled location?
□ Have I practiced this technique before an emergency?
□ Do I have enough kindling and larger fuel prepared?
□ Do I have a reliable backup ignition method?
Practical tip: Take the time to prepare a good groove and use steady, controlled strokes rather than short, choppy movements. Speed, pressure, and consistency work together to generate heat. Don’t get discouraged if it takes practice and physical effort. Once you have a glowing ember, transfer it carefully to your tinder bundle and provide oxygen gradually until it ignites.
Why Primitive Fire Starting Often Fails
Primitive methods usually don’t fail because friction fire is impossible.
They fail because one or more conditions aren’t right.
The Wood Is Too Damp
Moisture absorbs heat and makes it difficult to reach the temperature needed to develop a coal.
Wood that feels relatively dry on the outside can still contain enough moisture to make friction fire difficult.
The Materials Don’t Work Well Together
Not every random stick and board makes a good friction-fire set.
People who become proficient at primitive fire learn which locally available materials work well and how to recognize them.
The Tinder Isn’t Ready
Producing an ember is only half the job.
If your tinder can’t accept and expand that ember, all the work required to produce it can be wasted.
Poor Technique
Too little pressure may not generate sufficient heat. Too much pressure at the wrong stage can make rotation difficult.
Poor body position wastes energy.
Inconsistent motion reduces efficiency.
These are physical skills developed through repetition.
Stopping Too Soon
Smoke is encouraging, but smoke is not the same as a sustainable coal.
This is particularly important with bow drills.
Learning to recognize when the accumulated material has actually formed a viable coal comes from experience.
Turning an Ember Into Flame
Primitive fire-starting methods often produce an ember rather than an immediate flame.
That changes the process.
Your tinder bundle should already be prepared before attempting to create the ember.
Once you have a viable coal, carefully place it into the tinder and gently close the material around it.
Introduce oxygen gradually.
As the ember spreads, smoke should increase. Continue supplying controlled airflow until the tinder reaches ignition.
Be prepared for the transition to happen quickly.
Once the tinder flames, move it immediately into the prepared kindling and allow the smallest material to ignite before adding progressively larger pieces.
Don’t crush a new fire under oversized fuel.
Starting a Fire in Wet Conditions
Wet weather makes every part of fire building more difficult.
The solution isn’t simply producing more sparks.
Your first priority is finding and protecting the driest combustible material available.
Look for material protected from direct precipitation, such as appropriate dead material beneath dense cover or dry portions within suitable dead wood. Where collecting natural material is permitted, split damp dead wood when practical to expose drier interior surfaces.
Prepare fine shavings or feathered wood to increase surface area.
Keep your tinder protected while you work.
And don’t wait until you’re cold, wet and losing dexterity before thinking about fire.
If worsening weather makes fire potentially important, begin preparing while you can still work effectively.
Fire is only one part of protecting yourself from cold and exposure. For a practical shelter option using natural materials or a tarp, see How to Build a Lean-To Shelter for Wilderness Survival.
Build a Fire That You Can Control
Once tinder and kindling ignite, resist the urge to immediately make the fire large.
Add fuel gradually.
A small, efficient fire may provide what you need while consuming less fuel and being easier to manage.
Maintain airflow between the fuel rather than packing everything tightly together.
Keep your remaining fuel organized and sufficiently separated from the flames that it cannot ignite accidentally.
And remember that building a fire is only justified when conditions, regulations and the situation allow it.
Fire Safety and When Not to Build One
Fire can help in a wilderness emergency, but it can also create a second emergency.
Never allow the desire for warmth or comfort to override obvious wildfire danger.
Avoid starting an open fire when:
- Fire restrictions prohibit it
- Winds make control difficult
- Vegetation is exceptionally dry
- You cannot safely clear or use an appropriate fire area
- You don’t have the ability to extinguish it
- A safer alternative can meet the same need
Use established fire rings where required or appropriate rather than unnecessarily disturbing new ground.
Never leave an active fire unattended.
Keep water and appropriate extinguishing materials available whenever practical.
When extinguishing the fire, use sufficient water, stir the material, and continue checking for heat. A fire that looks extinguished can retain hot material below the surface.
Before leaving, it should be fully out and cold.
For additional guidance on safely managing and extinguishing outdoor fires, review the National Park Service’s campfire and wildland fire safety guidance before your trip.
Don’t Depend on Fire as Your Only Source of Warmth
Fire can be valuable, but wilderness preparedness shouldn’t depend on your ability to produce one.
Weather may prevent it.
Restrictions may prohibit it.
You may be injured.
Fuel may be difficult to obtain.
Your ignition source may fail.
That’s why appropriate clothing, insulation and emergency shelter belong in the plan too.
A compact backup such as the Survive Outdoors Longer Emergency Bivvy can provide another layer of protection from wind, rain and cold when conditions make building a fire unsafe or impossible.
A fire is a tool—not a substitute for an overall survival strategy.
Fire also shouldn’t be your only source of light after dark. A dependable headlamp such as the Energizer Universal LED Headlamp keeps both hands free for shelter work, fire preparation and other nighttime tasks.
What Should Be in a Wilderness Fire-Starting Kit?
A practical fire kit doesn’t need to be complicated.
Consider carrying:
- Reliable lighter
- Backup lighter or waterproof matches
- Ferrocerium rod
- Prepared dry tinder
- Waterproof storage
- Appropriate cutting tool
- Basic knowledge of local fire regulations
The point is redundancy.
If your primary lighter fails, you have another option.
If natural tinder is soaked, you have prepared tinder.
If conditions make an open fire unsafe, your clothing and emergency shelter still provide protection.
And if you enjoy primitive skills, your practiced knowledge gives you another layer of capability.
Practice Primitive Fire Starting Before You Need It
There’s real value in learning to make fire with a bow drill, hand drill, fire plough or traditional flint and steel.
Practice teaches lessons that modern ignition tools can hide.
You’ll learn how much tinder preparation matters. You’ll discover how moisture changes everything. You’ll understand the difference between smoke and a viable coal. You’ll become better at managing an ember and developing a small flame into a sustainable fire.
Those skills can make you better at fire building even when you’re carrying a lighter.
But practice under controlled conditions where fires are permitted.
Don’t make your first bow-drill attempt the night you’re unexpectedly stranded outdoors in cold weather.
Preparedness Beats Improvisation
Primitive survival skills are worth preserving and learning. They can increase your confidence, deepen your understanding of the outdoors and provide additional options when equipment fails.
But being prepared doesn’t mean intentionally giving up reliable tools.
For most wilderness travelers, a sensible system looks something like this:
Primary ignition: dependable lighter
Backup ignition: waterproof matches
Durable backup: ferrocerium rod
Prepared fuel source: dry carried tinder
Knowledge backup: practiced primitive fire-starting skills
That combination gives you something much more useful than relying entirely on either equipment or improvisation.
It gives you options.
Wilderness Fire Starting Quick Checklist
Before attempting to start an outdoor fire:
- Check current fire restrictions
- Evaluate wind and surrounding vegetation
- Decide whether a fire is actually necessary
- Choose an appropriate permitted location
- Prepare tinder
- Gather kindling
- Gather sufficient fuel
- Have an extinguishing method ready
- Protect backup ignition sources from moisture
- Keep the fire controlled
- Never leave it unattended
- Extinguish it completely before leaving
Final Thoughts
The ability to create fire from natural materials is one of the most fascinating traditional outdoor skills you can practice. Successfully producing a bow-drill coal or catching a traditional flint-and-steel spark gives you a much deeper appreciation for what fire actually requires.
But the biggest lesson shouldn’t be that modern tools are unnecessary.
It should be the opposite.
Once you’ve struggled to make fire using friction, wet tinder or marginal materials, carrying a lighter, backup matches, ferro rod and dry tinder makes even more sense.
Learn the primitive methods because they’re valuable skills.
Practice them because skills deteriorate when they’re never used.
But when you head into the wilderness, prepare so that your safety doesn’t depend on everything going perfectly.