Affiliate Disclosure: This post contains affiliate links. If you purchase through these links, Survival Place Blog may earn a commission at no additional cost to you. As an Amazon Associate I earn from qualifying purchases.
A bug out bag is supposed to help you evacuate quickly and safely when staying home is no longer the best option.
It is not supposed to contain everything you own.
And it shouldn’t weigh so much that you can barely get it from the bedroom to the car.
Wildfires, floods, hurricanes, earthquakes, chemical emergencies, extended power failures and other disasters can force people from their homes with little warning. In some emergencies you may leave by vehicle. In others, blocked roads, traffic, mechanical problems or changing conditions could require you to travel at least part of the way on foot.
That is why a good bug out bag needs to strike a balance between preparedness and portability.
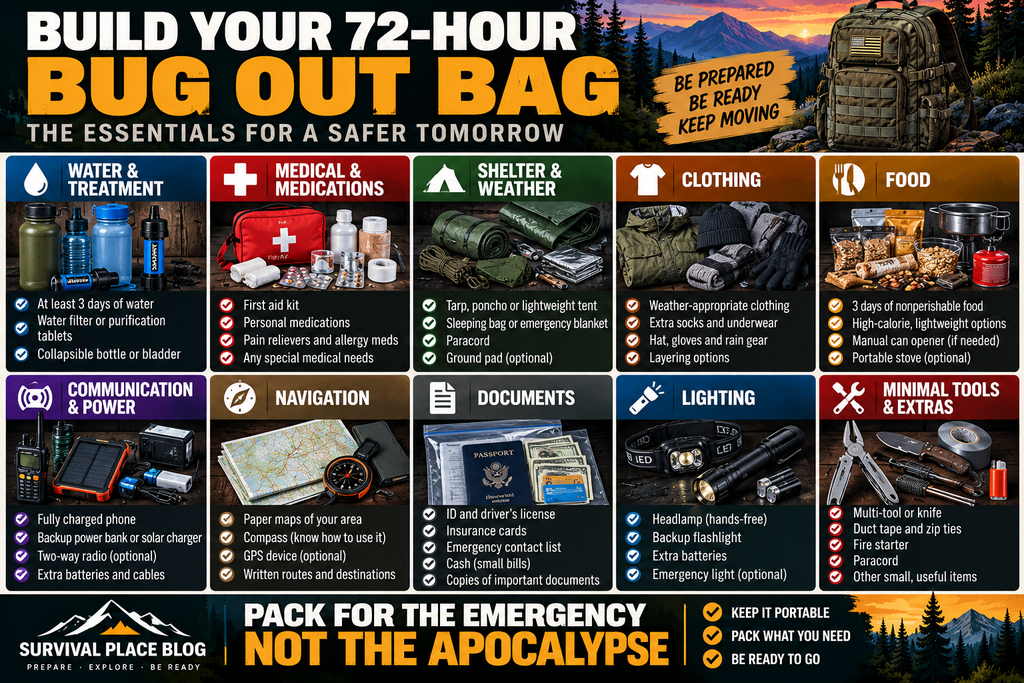
This guide will show you how to build a practical 72-hour evacuation kit around the things that matter most: water, food, medical needs, shelter, clothing, communication, navigation, documents, sanitation and the equipment needed to keep moving.
At the end you’ll also find a printable bug out bag checklist you can use to build or audit your own kit.
What Is a Bug Out Bag?
A bug out bag—sometimes called a go-bag, evacuation bag or 72-hour kit—is a portable collection of emergency supplies that you can grab when you need to leave home quickly.
The basic concept is simple:
You should be able to grab the bag and leave without spending the first critical minutes of an evacuation searching the house for medications, flashlights, chargers, food or other essentials.
The American Red Cross recommends having a go-kit with supplies that can be taken during an evacuation, including at least three days of water and nonperishable food along with medical supplies, lighting, communications, documents and other necessities.
But there is an important practical difference between having three days of emergency supplies available and trying to carry every gallon and every household item on your back.
A useful bug out bag has to work for you.
A Bug Out Bag Is Not an Apocalypse Bag
The term “bug out” sometimes gets associated with extreme survival scenarios.
That’s not what this guide is about.
There are plenty of ordinary emergencies that can require evacuation:
- Wildfire
- Hurricane
- Flood
- Earthquake damage
- Chemical spill
- Gas leak
- Dam or levee emergency
- Extended utility failure
- Localized civil emergency
- Unsafe building conditions
- Mandatory evacuation order
CDC guidance is straightforward: when authorities tell you to evacuate, don’t ignore the order. Take essential items, follow emergency routes and know where you’re going.
Your bag exists to make doing that easier.
The Most Important Rule: You Have to Be Able to Carry It
One of the easiest mistakes in bug out bag planning is adding equipment until the bag becomes a portable storage closet.
Every item seems useful individually.
Then you put the bag on.
Water is heavy. Food is heavy. Tools are heavy. Batteries are heavy. Extra clothing is bulky.
Before long, a supposedly portable emergency kit may weigh 50, 60 or even 70 pounds.
That may be manageable for some experienced hikers. For many people it isn’t.
There is no universal ideal bug out bag weight because age, fitness, body size, medical conditions, terrain, climate and travel distance all matter.
A better rule is:
Pack the lightest bag that still addresses your realistic emergency needs—and then actually test carrying it.
Walk around your neighborhood with it.
Climb stairs.
Put it in and take it out of your vehicle.
Wear it for an hour.
If the bag becomes miserable after ten minutes, you’ll learn that during practice instead of during an evacuation.
Start With the Evacuation Plan, Not the Gear
Before buying equipment, answer a more important question:
Where are you actually trying to go?
Possible destinations might include:
- Family or friends outside the affected area
- Hotel
- Emergency shelter
- Campground
- Secondary property
- Designated community evacuation location
Plan more than one route.
A wildfire, flood, bridge closure, traffic jam or damaged roadway can make your normal route unusable.
Keep a paper map in the bag even if you normally rely on your phone.
Also establish a family meeting point and an out-of-area contact. If household members are separated when an evacuation occurs, everyone should know what to do without relying entirely on a group text going through.
Choosing the Right Bug Out Bag
You don’t necessarily need a military-style tactical backpack.
You need a bag that is comfortable, durable and large enough for your essentials without encouraging you to pack everything you own.
Look for:
- Comfortable shoulder straps
- Adjustable sternum strap
- Hip belt on larger/heavier packs
- Durable zippers and stitching
- Multiple compartments
- Water-resistant material or rain cover
- External bottle pockets
- Easy access to frequently used items
- A size appropriate for the person carrying it
A brightly colored hiking pack may actually be preferable in some evacuation situations because visibility can help rescuers locate you.
A discreet everyday backpack may make more sense in others.
Function matters more than looking “tactical.”
Organize the Bag by Priority
Instead of throwing everything into one compartment, organize supplies by how quickly you might need them.
Immediate-access items might include:
- Flashlight/headlamp
- Phone
- Map
- Gloves
- Rain shell
- N95 masks
- First aid supplies
- Water
- Snacks
Secondary items can go deeper:
- Spare clothing
- Sleep system
- Backup food
- Hygiene supplies
- Repair items
Use lightweight pouches or resealable bags to group categories.
Organization matters when you’re standing in the dark, in the rain, trying to find one specific item.
Water: The Hardest Bug Out Bag Problem
Water is essential—and heavy.
One gallon weighs approximately 8.34 pounds.
Three gallons weighs roughly 25 pounds.
That’s before adding the backpack itself, food, shelter, first aid supplies, clothing or anything else.
This is why the household recommendation of one gallon per person per day shouldn’t automatically be interpreted as “put three gallons in your backpack.”
The Red Cross recommendation for emergency preparedness is one gallon per person per day, with a three-day supply for evacuation and a two-week supply at home.
For a bug out bag, you need to think in layers.
Layer 1: Carry Water
Start with safe drinking water you can immediately use.
That might be:
- Durable water bottle
- Hydration bladder
- Commercial bottled water
How much you carry depends on temperature, route, distance, vehicle access and your physical needs.
Layer 2: Carry Additional Capacity
A collapsible water container weighs very little when empty but gives you additional carrying capacity if you find a safe water source.
Layer 3: Carry Water Treatment
A compact filter or purifier can extend your options when your carried supply runs low.
But understand exactly what your filter is designed to remove.
Not every filter removes viruses.
Not every filter removes chemicals.
And no portable filter makes every contaminated water source safe.
What I Use: I keep Sawyer MINI water filters as part of my emergency gear. They’re compact, lightweight and easy to pack, which makes them a practical option for a bug out bag where space and weight matter.
Layer 4: Know Where Water May Be Available
Your evacuation plan should identify likely reliable water sources along your routes and at your destination.
Don’t wait until you’re thirsty to start figuring that out.
Food: Think Calories, Weight and Convenience
A 72-hour bag doesn’t need gourmet meals.
It needs food you will actually eat that provides useful calories without consuming half the backpack.
Good choices may include:
- Energy bars
- Protein bars
- Trail mix
- Nuts
- Nut-butter packets
- Dried fruit
- Jerky
- Tuna or chicken pouches
- Crackers
- Shelf-stable ready-to-eat foods
- Emergency ration bars
- Dehydrated meals where water and cooking capability are available
Prioritize foods that are:
Calorie-dense, compact, shelf-stable and easy to prepare.
Remember that dehydrated meals require water. If water is scarce, packing large quantities of food that must be rehydrated may work against you.
Include food you’ll actually tolerate eating under stress.
And if you have allergies, diabetes or another dietary requirement, build around that reality—not a generic internet checklist.
First Aid: Build for Realistic Problems
Your bug out bag should contain a useful first aid kit, but buying a pouch labeled “500-piece survival medical kit” doesn’t automatically make you prepared.
At minimum, consider supplies for common evacuation problems such as:
- Cuts and scrapes
- Blisters
- Minor burns
- Sprains
- Pain
- Allergic reactions
- Personal medical needs
A practical kit may include:
- Adhesive bandages
- Sterile gauze
- Medical tape
- Antiseptic wipes
- Antibiotic ointment
- Blister treatment
- Elastic wrap
- Tweezers
- Medical gloves
- Small trauma shears
- OTC medications you normally use
- Personal prescriptions
Training matters more than owning equipment you don’t know how to use.
For a ready-made option, the EVERLIT 250-Piece Survival First Aid Kit combines basic first-aid supplies with several additional emergency items in a portable organized bag.
Consider taking a recognized first aid/CPR course.
Prescription Medications and Medical Needs
Generic bug out bag lists often underestimate this category.
Your personal medications may be more important than another survival gadget.
CDC recommends building emergency kits around individual needs and considering prescription medications, medical supplies, communication aids, batteries or portable chargers for adaptive equipment, and important health documents. CDC’s disability preparedness guidance recommends considering at least a week’s supply of prescription medications when possible.
Include what applies to you:
- Prescription medications
- Medication list
- Dosage information
- Allergies
- Physician information
- Insurance information
- Spare glasses
- Contact-lens supplies
- Hearing-aid batteries
- Mobility aids
- Medical-device charging equipment
- Medical alert information
Some medications require temperature-controlled storage. Plan accordingly with your healthcare professional or pharmacist.
Shelter: Protection From the Environment Comes First
If you’re evacuating to a hotel or emergency shelter, you may never need wilderness shelter equipment.
But your route or circumstances could change.
A lightweight emergency shelter layer can still be useful.
Options include:
- Emergency bivy
- Lightweight tarp
- Compact tent
- Emergency blanket
- Poncho
- Contractor trash bags
Choose based on your climate and likely evacuation environment.
Don’t automatically strap a heavy four-person camping tent to a one-person bug out bag because a generic checklist says “tent.”
Sleep and Insulation
Cold ground can drain body heat quickly.
Depending on climate and season, consider:
- Lightweight sleeping bag or quilt
- Emergency bivy
- Compact sleeping pad
- Wool or synthetic blanket
- Warm hat
- Gloves
In warm climates, insulation needs may be lower while shade, ventilation and sun protection become more important.
Your kit should change with the seasons.
Clothing: Pack for Conditions, Not Fashion
At minimum, consider:
- Spare socks
- Underwear
- Base layer
- Weather-appropriate shirt
- Lightweight pants
- Rain protection
- Warm layer when appropriate
- Hat
Socks deserve special attention.
Wet feet, blisters and poor footwear can turn a manageable evacuation into a serious mobility problem.
The shoes you evacuate in matter as much as the clothes inside the bag.
If you normally spend the day in dress shoes, sandals or other footwear unsuitable for walking distance, consider keeping appropriate shoes with your kit.
Fire and Warmth
Whether you need fire-starting equipment depends heavily on where you’re evacuating.
Possible items include:
- Disposable lighter
- Waterproof matches
- Ferrocerium rod as backup
- Compact tinder
But fire isn’t always appropriate.
During wildfire conditions, burn bans, high winds or dry environments, starting a fire can create another emergency.
Follow local restrictions and conditions.
Lighting
Every bug out bag should have dependable lighting.
A headlamp is especially useful because it leaves both hands free.
Consider:
- LED headlamp
- Small backup flashlight
- Spare batteries or charging capability
Avoid relying entirely on your phone’s flashlight. Your phone battery is too valuable during an emergency.
Emergency Communication
During a disaster, information changes quickly.
You may need updates about:
- Evacuation routes
- Shelter locations
- Weather
- Road closures
- Wildfire movement
- Flooding
- Utility conditions
Your smartphone is usually the first communication tool, but networks can become overloaded or power may be unavailable.
A battery-powered or hand-crank emergency radio provides another information source.
The Red Cross recommends a battery-powered or hand-crank radio, preferably one capable of receiving NOAA Weather Radio.
Phone Power
A working phone can provide:
- Emergency alerts
- Maps
- Navigation
- Communication
- Weather information
- Flashlight
- Stored documents
- Medical information
Carry:
- Charging cable
- Wall charger
- Vehicle charging adapter
- Portable power bank
Download important maps before an emergency so navigation doesn’t depend entirely on cellular data.
Keep critical phone numbers written on paper as well.
Navigation: Don’t Depend on One System
GPS is excellent until the phone dies, the device breaks or data service becomes unreliable.
Keep:
- Local paper map
- Regional road map if appropriate
- Compass
- Offline maps downloaded to your phone
Most importantly, know how to use them.
Mark:
- Primary evacuation destination
- Backup destination
- Alternate routes
- Hospitals
- Emergency shelters when known
- Major water crossings
- Bridges
- Potential choke points
Drive your alternate routes before you need them.
Documents You Should Be Able to Grab Quickly
Important paperwork is easy to forget during an evacuation.
CDC recommends keeping important health information with you during an emergency, while Red Cross preparedness guidance includes copies of personal documents and emergency contact information.
Consider waterproof copies of:
- Driver’s license or other ID
- Insurance information
- Medication list
- Emergency contacts
- Medical information
- Proof of address
- Relevant birth certificates
- Passport information
- Pet records
- Important account/contact numbers
You may not want every original document permanently sitting in a backpack.
Copies plus encrypted digital backups can provide redundancy.
Protect sensitive information appropriately.
Cash Still Matters
Electronic payments depend on functioning communications and power.
Keep a reasonable amount of emergency cash in the bag, including smaller bills.
How much depends on your household and evacuation plan.
The goal isn’t to carry your life savings.
It’s to be able to pay for food, fuel or another immediate need if card processing isn’t available.
Keys
Keep track of:
- House keys
- Vehicle keys
- Secondary-property keys
- Lock keys
- Any other keys required by your evacuation plan
If practical, consider a securely stored spare set.
Leaving home successfully doesn’t help much if the vehicle you’re relying on can’t be started because someone grabbed the wrong key ring.
Hygiene and Sanitation
You don’t need your entire bathroom cabinet.
A compact hygiene kit might contain:
- Toothbrush
- Toothpaste
- Soap
- Hand sanitizer
- Toilet paper
- Wet wipes
- Menstrual supplies
- Small quick-dry towel
- Trash bags
- Zip-top bags
Trash bags are surprisingly useful for waste, wet clothing, waterproofing, cleanup and organization.
Respiratory Protection
Smoke, dust and airborne debris can become serious problems during wildfires, earthquakes, building damage and other emergencies.
Consider properly fitting N95 respirators for each capable household member.
An N95 is not protection against every airborne hazard, chemical gas or oxygen-deficient environment.
Use respiratory protection appropriate to the hazard and follow official instructions.
Gloves
A pair of durable work gloves can protect your hands while:
- Moving debris
- Handling damaged materials
- Changing a tire
- Setting up shelter
- Clearing obstacles
Hands are difficult to replace in an emergency.
Protect them.
Tools: Less Is Usually More
You probably don’t need a toolbox in your backpack.
A quality multi-tool can handle many common tasks while saving weight.
Depending on your plan, consider:
- Multi-tool
- Small roll of duct tape
- Cordage
- Zip ties
- Small repair kit
- Can opener if required by your food
Every tool should earn its weight.
Ask:
What realistic problem does this solve that another item doesn’t already solve?
If you can’t answer that question, consider leaving it out.
Personal Safety
Emergency preparedness should focus first on avoiding dangerous situations.
During an evacuation:
- Follow official instructions.
- Avoid unstable buildings.
- Don’t drive through floodwater.
- Stay away from downed power lines.
- Avoid unnecessary confrontation.
- Maintain awareness of your surroundings.
- Keep family members together when possible.
Your goal is to get from an unsafe location to a safer one—not to seek out danger.
Vehicle Evacuation vs. Evacuating on Foot
Most evacuations will begin with a vehicle if one is available.
That changes what you can realistically bring.
If You’re Leaving by Vehicle
Your vehicle can carry additional:
- Water
- Food
- Blankets
- Clothing
- Tools
- Fuel where safely/legalistically appropriate
- Pet supplies
- Larger first aid kit
- Seasonal gear
Your bug out bag then becomes the portable core of a larger evacuation system.
If the vehicle becomes unusable, you can grab the bag and continue with the essentials.
If You’re Leaving on Foot
Weight suddenly becomes much more important.
Prioritize:
- Water and treatment
- Medical needs
- Weather protection
- Navigation
- Communication
- Food
- Essential documents
- Lighting
- Minimal tools
Everything else has to justify being carried.
Don’t Forget the Vehicle Itself
An evacuation plan built around a vehicle requires the vehicle to work.
Try to avoid routinely running the fuel level extremely low.
Keep basic vehicle emergency supplies aboard.
Maintain tires, fluids and battery.
Know where your spare tire or repair kit is—and know how to use it.
Keep a charging cable and vehicle charger available.
A beautifully organized bug out bag won’t compensate for a neglected vehicle that won’t start.
Children Need Their Own Plan
Children aren’t simply smaller adults.
Depending on age, consider:
- Diapers
- Wipes
- Formula
- Bottles
- Appropriate food
- Medications
- Extra clothing
- Comfort item
- Identification/contact information
- Age-appropriate entertainment
Older children may be able to carry a small backpack, but don’t overload them.
Their bag should reduce the load on adults without becoming a burden that slows the evacuation.
Pets Need a Bug Out Plan Too
Don’t wait until an evacuation order to figure out how the dog, cat or other animal is leaving.
CDC recommends preparing pet emergency supplies including food, water, medications, veterinary records, identification information, leash/harness and an appropriate carrier.
Keep:
- Leash/harness
- Carrier if needed
- Food
- Water
- Bowl
- Medications
- Waste bags/litter supplies
- Vaccination/medical information
- Identification
- Recent photograph
Know which evacuation destinations accept pets.
CDC also recommends keeping a leash or carrier near the exit and knowing in advance where you can evacuate with your pet.
Older Adults, Disabilities and Access Needs
A generic bug out bag may not work for everyone.
CDC specifically recommends tailoring emergency kits around individual needs, including assistive equipment, medical supplies, communication aids, medications and backup power where needed.
Consider:
- Mobility equipment
- Hearing-aid batteries
- Communication devices
- Backup chargers
- Prescription information
- Medical supplies
- Caregiver contact information
- Service-animal supplies
- Accessible transportation arrangements
If someone depends on specialized transportation, plan ahead. CDC notes that normal accessible transportation may not necessarily be available during an emergency.
A 40-pound backpack isn’t a useful evacuation plan for someone who cannot safely carry it.
Adapt the system to the person.
Seasonal Bug Out Bag Changes
A bag built in July may be inadequate in January.
Review seasonal equipment.
Cold Weather
Consider:
- Insulating layer
- Warm hat
- Gloves
- Appropriate socks
- Rain/snow protection
- Emergency insulation
Hot Weather
Consider:
- Sun hat
- Sunscreen
- Additional water capacity
- Electrolyte replacement where appropriate
- Lightweight clothing
Wet Conditions
Consider:
- Rain shell
- Pack cover
- Waterproof document protection
- Dry socks
- Waterproof or quick-drying footwear appropriate to your route
Don’t carry four seasons of clothing year-round if rotating seasonal equipment keeps the bag lighter and more useful.
Regional Risks Matter
Your bag should reflect where you actually live and travel.
A Pacific Northwest kit might emphasize:
- Rain protection
- Cold/wet conditions
- Earthquake readiness
- Wildfire smoke
- Alternate routes around bridges and rivers
A Southwest kit might prioritize:
- Additional water capacity
- Heat protection
- Sun exposure
A Gulf Coast kit may need stronger consideration for:
- Hurricanes
- Flooding
- Heavy rain
Preparedness should reflect real hazards, not a generic gear list copied from someone living 2,000 miles away.
What Not to Put in Your Bug Out Bag
Overpacking can be as problematic as underpacking.
Think carefully before carrying:
Excessive Tools
You don’t need three knives, two hatchets and a folding shovel for most evacuation scenarios.
Too Much Water
Water is essential, but carrying your entire household supply isn’t realistic.
Too Much Food
Three days of calorie-dense food doesn’t require a grocery cart.
Heavy Cookware
If your food doesn’t require elaborate cooking, you don’t need a kitchen set.
Duplicate Gadgets
Redundancy matters for critical systems.
It doesn’t mean carrying three versions of everything.
Gear You Don’t Know How to Use
An unfamiliar compass, medical device or fire starter isn’t automatically useful because it appears on a survival checklist.
Learn first.
Pack second.
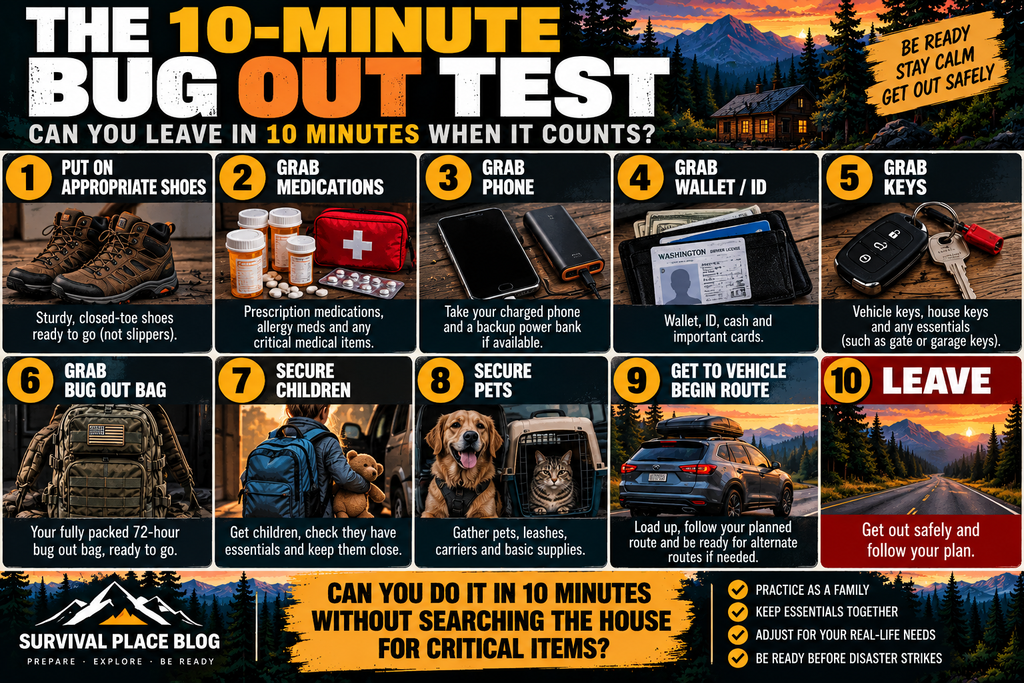
The 10-Minute Bug Out Test
Here’s a practical test that exposes weaknesses quickly.
Imagine authorities tell you:
You should leave within ten minutes.
Can you:
- Put on appropriate shoes?
- Grab your medications?
- Grab your phone?
- Grab your wallet/ID?
- Grab your keys?
- Grab the bug out bag?
- Secure children?
- Secure pets?
- Get into the vehicle or begin your planned route?
- Leave without searching the house for critical supplies?
If not, the problem may not be what’s inside the backpack.
It may be how your entire evacuation system is organized.
The One-Hour Carry Test
Once your bag is built, wear it for an hour.
Walk a realistic route.
Don’t just stand in the living room.
Pay attention to:
- Shoulder pressure
- Hip-belt fit
- Hot spots
- Footwear
- Bag movement
- Overall fatigue
- Items rattling or shifting
- Water accessibility
Then come home and remove anything that didn’t justify its weight.
A bag tested in the real world is more useful than one optimized entirely from an online checklist.
Maintain Your Bug Out Bag Every Six Months
Emergency supplies age.
CDC recommends checking emergency kits every six months to ensure contents remain current and functional.
Twice a year:
- Rotate food
- Check medications
- Inspect water
- Test flashlights
- Check batteries
- Recharge power banks
- Update documents
- Update contact information
- Replace children’s clothing
- Review pet supplies
- Change seasonal clothing
- Inspect backpack seams/zippers
- Check first aid supplies
- Review evacuation routes
Set a calendar reminder.
A bag you haven’t opened in five years is an unknown.
Printable Bug Out Bag Checklist
Use this master checklist to build or review your 72-hour evacuation kit.
Don’t assume you need every item. Customize it for your household, climate, route, medical needs and physical ability.
Backpack
☐ Comfortable backpack
☐ Rain cover or water-resistant protection
☐ Lightweight organization pouches
☐ Identification/contact information
Water
☐ Drinking water
☐ Durable water bottle
☐ Collapsible water container
☐ Water filter/purifier
☐ Backup water-treatment method
Food
☐ Three-day supply of practical food
☐ Energy/protein bars
☐ Trail mix/nuts
☐ Dried foods
☐ Ready-to-eat food
☐ Manual can opener if needed
☐ Food required for medical/dietary needs
First Aid & Medical
☐ First aid kit
☐ Prescription medications
☐ Medication list
☐ Pain reliever/regular OTC medications
☐ Medical gloves
☐ Blister treatment
☐ Personal medical supplies
☐ Spare glasses/contact supplies
☐ Medical information
Shelter & Weather Protection
☐ Emergency bivy/blanket
☐ Lightweight tarp or shelter if appropriate
☐ Rain protection
☐ Seasonal insulation
☐ Sleeping system if appropriate
Clothing
☐ Spare socks
☐ Underwear
☐ Base layer
☐ Weather-appropriate clothing
☐ Warm layer
☐ Hat
☐ Gloves
☐ Appropriate walking footwear
Lighting & Fire
☐ Headlamp
☐ Backup flashlight
☐ Batteries/charging method
☐ Lighter
☐ Backup fire-starting method where appropriate
Communication & Power
☐ Cell phone
☐ Charging cable
☐ Wall charger
☐ Vehicle charger
☐ Power bank
☐ Emergency radio
☐ Written emergency contacts
Navigation
☐ Local paper map
☐ Regional road map if needed
☐ Compass
☐ Offline phone maps
☐ Primary evacuation route
☐ Alternate routes
☐ Destination information
Documents & Money
☐ Identification copies
☐ Insurance information
☐ Medical information
☐ Emergency contacts
☐ Proof of address if needed
☐ Important document copies
☐ Emergency cash
☐ Spare keys if appropriate
Hygiene & Sanitation
☐ Toothbrush/toothpaste
☐ Soap
☐ Hand sanitizer
☐ Wet wipes
☐ Toilet paper
☐ Menstrual supplies if needed
☐ Trash bags
☐ Zip-top bags
☐ Small towel
Protection & Tools
☐ N95 respirators
☐ Work gloves
☐ Multi-tool
☐ Duct tape
☐ Cordage
☐ Zip ties
☐ Small repair supplies
Children
☐ Diapers/wipes
☐ Formula/bottles
☐ Child medications
☐ Extra clothing
☐ Comfort item
☐ Identification/contact information
☐ Age-appropriate activity
Pets
☐ Food
☐ Water
☐ Bowl
☐ Medications
☐ Leash/harness
☐ Carrier
☐ Waste bags/litter supplies
☐ Vaccination/medical records
☐ Identification/microchip information
☐ Recent photograph
Final Check
☐ Bag can actually be carried
☐ Household members know where it is
☐ Evacuation destination selected
☐ Backup destination selected
☐ Primary route known
☐ Alternate route known
☐ Vehicle maintained and fueled appropriately
☐ Bag tested on foot
☐ Contents reviewed within last six months
Don’t Build Your Bag All at Once if Money Is Tight
Preparedness doesn’t have to mean spending hundreds of dollars this weekend.
Start with things you already own.
A backpack.
Water bottle.
Flashlight.
Phone charger.
Basic first aid supplies.
Spare clothes.
Copies of documents.
Then add better equipment gradually.
The Red Cross currently recommends building preparedness supplies over time if necessary—adding an item or two during regular shopping trips rather than allowing cost to prevent preparation entirely.
A basic bag you actually have is better than a $1,000 dream kit that exists only in an online shopping cart.
Your Bug Out Bag Is Only One Part of Preparedness
A bug out bag solves one specific problem:
Leaving quickly with essential supplies.
It does not replace:
- Household water storage
- Long-term food storage
- Home emergency supplies
- Vehicle preparedness
- Family communication planning
- Backup power
- Home security
- Evacuation planning
Think of the bag as the portable layer of a larger preparedness system.
Final Thoughts
The best bug out bag isn’t the one with the most gear.
It’s the one you can grab quickly, carry safely and use confidently.
Start with the essentials:
Water. Food. Medical needs. Shelter. Clothing. Communication. Navigation. Documents. Light.
Then customize the bag for your household.
If you have children, build around them.
If you have pets, plan for them.
If you rely on medications or medical equipment, those needs come before another survival gadget.
If you live somewhere cold, wet, hot, wildfire-prone or earthquake-prone, adjust accordingly.
And once the bag is built, test it.
Put it on.
Walk with it.
Use the equipment.
Review it every six months.
Know where you’re going.
Because when an evacuation order comes, that isn’t the time to discover that your “ultimate” bug out bag weighs 65 pounds, your power bank is dead, your medications expired and nobody knows where the car keys are.
Build a bag for the emergency you’re realistically likely to face—and build one you can actually carry.