Affiliate Disclosure: This post contains affiliate links. If you purchase through these links, Survival Place Blog may earn a commission at no additional cost to you. As an Amazon Associate I earn from qualifying purchases.
A 72 hour go bag checklist should make emergency preparedness simpler—not turn it into a shopping obsession.
If you suddenly had to leave home because of a wildfire, flood, chemical emergency, extended power outage or another evacuation order, you wouldn’t have time to stand in the garage deciding what matters.
That’s the purpose of a go bag.
It gives you a portable set of essentials you can grab quickly and take with you.
This guide is the fast, practical version: what to pack, what to prioritize and what you can probably leave behind.
If you want the deeper explanation—including backpack selection, water planning, evacuation routes, children, pets, seasonal changes and carry testing—read our complete Ultimate Bug Out Bag Guide.
What Is a 72-Hour Go Bag?
A 72-hour go bag is a portable emergency kit designed to help you function during the first few days after leaving home.
It isn’t supposed to contain everything you could possibly need.
Think of it as a bridge between leaving home and reaching somewhere safer—a hotel, evacuation center, family member’s house, campground or another temporary location.
The American Red Cross recommends keeping emergency supplies in an easy-to-carry kit for evacuation and customizing those supplies for the needs of your household.
The key phrase is easy to carry.
A bag that contains every survival gadget you own but weighs so much that you can’t comfortably move with it is poorly designed.
Before You Pack Anything: Know Where You Might Go
The biggest mistake is building a bag without thinking about the evacuation itself.
Ask yourself:
- Where would I go if I had to leave home tonight?
- Could I drive there?
- What if the main highway were closed?
- Could I walk part of the route if necessary?
- Where would my family meet if we became separated?
- What would I need for children, pets or medical conditions?
- Does the season change what belongs in the bag?
Your go bag should support your evacuation plan, not somebody else’s gear list.
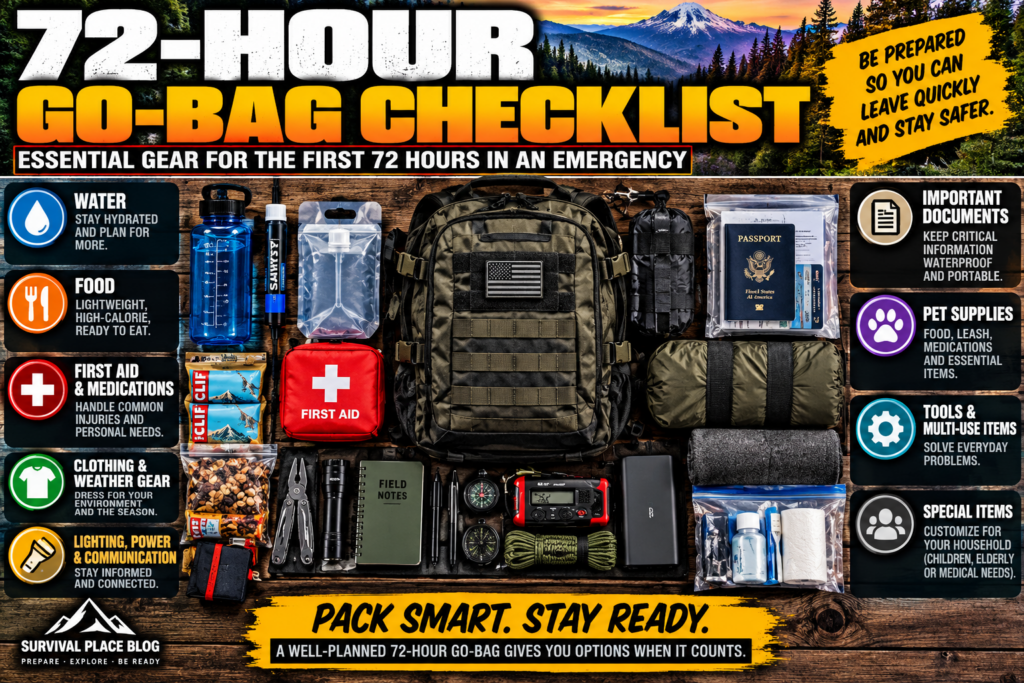
The 72-Hour Go Bag Checklist
Use the categories below as your starting point. Customize quantities for your household, climate, health needs and likely evacuation conditions.
1. Water
Water is one of the heaviest things you can carry, so this category requires some judgment.
For a mobile go bag, don’t automatically try to carry the same amount of water you would store at home. One gallon of water weighs roughly 8.3 pounds, so several gallons quickly make a backpack impractical.
Pack:
- Drinking water you can comfortably carry
- Durable water bottle
- Collapsible water container
- Compact water filter
- Backup water-treatment method
I keep Sawyer MINI water filters with my emergency gear because they’re small, lightweight and easy to pack.
The goal is to start with water while also having a realistic way to obtain and treat additional water if your evacuation lasts longer than expected.
For household storage quantities and safe water-storage practices, see our Home Water Storage System guide.
2. Food
A three-day evacuation isn’t the time to carry a miniature kitchen.
Prioritize foods that are:
- Ready to eat
- Calorie-dense
- Lightweight
- Shelf-stable
- Familiar to you
- Easy on your stomach
Pack:
- Protein or energy bars
- Trail mix or nuts
- Nut-butter packets
- Tuna or other shelf-stable protein pouches
- Dried fruit
- Jerky
- Electrolyte drink mix
- A few comfort snacks
Dehydrated food can also work, but only if you have the water, fuel and equipment necessary to prepare it.
For a deeper look at making and storing your own lightweight foods, see How to Dehydrate Food for Long-Term Storage.
3. First Aid and Medications
You don’t need to turn your go bag into a field hospital.
You do need supplies for the ordinary problems that become much more difficult during an evacuation: cuts, scrapes, blisters, headaches, minor burns and personal medical needs.
Pack:
- Adhesive bandages
- Sterile gauze
- Medical tape
- Antiseptic supplies
- Blister treatment
- Nitrile gloves
- Personally appropriate over-the-counter medications
- Prescription medications
- Copies of important prescription and medical information
For a ready-made option, the EVERLIT 250-Piece Survival First Aid Kit combines basic first-aid supplies with several additional emergency items in a portable organized bag that can be packed easily with your Go-Bag.
If anyone in your household relies on medications, mobility equipment or other medical supplies, those needs take priority over generic survival gear.
4. Shelter and Weather Protection
You may expect to sleep in a hotel or evacuation shelter and end up spending hours in a vehicle, parking lot or temporary staging area instead.
Weather protection matters.
Pack:
- Compact rain poncho
- Emergency blanket or compact bivy
- Lightweight tarp if appropriate
- Utility cord or paracord
- Season-appropriate insulation
Your shelter choices should match your climate. A summer evacuation in Arizona and a winter evacuation in the Pacific Northwest are completely different problems.
5. Clothing
You don’t need three complete outfits.
You do need clothing that keeps you dry and functional.
Pack:
- Extra socks
- Underwear
- Base-layer shirt
- Lightweight insulating layer
- Weather-resistant outer layer
- Hat
- Gloves when appropriate
Put clothing in a waterproof or water-resistant bag inside the backpack.
If you have room for only one clothing luxury, extra dry socks are difficult to beat.
6. Lighting and Basic Tools
This is where go bags often become unnecessarily heavy.
You don’t need six knives, an axe, a shovel and a hardware store.
Pack:
- Headlamp
- Spare batteries
- Small multi-tool
- Lighter
- Backup ignition source
- Small amount of duct tape
- Permanent marker
- Whistle
For lighting, a headlamp has a major advantage over a handheld flashlight: it leaves both hands free.
A simple AAA-battery headlamp also lets you carry replacement batteries rather than depending entirely on access to USB charging.
7. Communication and Phone Power
Your phone may become one of the most useful pieces of emergency equipment you own—but only while it has power and connectivity.
Pack:
- Phone charging cable
- Compact power bank
- Wall charger
- Written emergency contact numbers
- Emergency radio
I also like having a dedicated emergency weather radio available rather than relying entirely on a phone.
Before an emergency, enable emergency alerts on your phone and download offline maps for your area.
8. Documents, Cash and Keys
Gear gets attention. Documents often don’t.
But during a real evacuation, identification and access to money, transportation and important information can matter immediately.
Pack:
- Copy of identification
- Insurance information
- Emergency contact list
- Medical information
- Copies of essential records
- Cash in small bills
- Spare house key
- Spare vehicle key
Protect paper documents from water. You can also keep encrypted digital copies of important records, but don’t make electronics your only backup.
9. Hygiene and Sanitation
A few small hygiene items can make an evacuation considerably easier.
Pack:
- Toothbrush and travel toothpaste
- Hand sanitizer
- Soap
- Moist wipes
- Tissues or toilet paper
- Menstrual products as needed
- Lip balm
- Small trash or zip bags
These aren’t glamorous survival supplies. They’re simply useful.
10. Personal Items People Forget
Generic checklists can’t know everything about your household.
Consider whether you need:
- Eyeglasses or contact supplies
- Hearing-aid batteries
- Mobility-related supplies
- Baby supplies
- Children’s comfort items
- Pet food, leash, carrier or medications
- Chargers for medical equipment
- Copies of important phone numbers
- Seasonal medication
- Sunscreen or insect repellent
This category is why copying somebody else’s exact go bag rarely works.
The Budget Go Bag: Start With What You Already Own
You do not need to buy everything new.
Start with a backpack you already own and walk through your house.
You may already have:
- Spare clothing
- Flashlight
- Batteries
- First-aid supplies
- Toiletries
- Water bottles
- Phone charger
- Lighter
- Food
- Basic tools
Put those items together first.
Then identify the actual gaps.
That approach is usually cheaper—and much smarter—than buying a preassembled “survival backpack” filled with gear you’ve never used.
If you do need a dedicated pack, look for comfortable shoulder straps, a sternum strap, useful organization, water-bottle pockets and a supportive waist or hip belt.
The 40L hiking backpack we selected for our full Bug Out Bag Guide is one example of the type of pack that can work without moving into oversized expedition-bag territory.
What Should You Leave Out?
Weight adds up surprisingly fast.
Think carefully before packing:
- Multiple large knives
- Heavy cookware
- Oversized tools
- Large quantities of canned food
- Too many clothing changes
- Duplicate gadgets
- Gear you don’t know how to use
- Items included only because a survival checklist told you to buy them
Every item should earn its space.
Ask:
What realistic problem does this solve during an evacuation?
If you don’t have a good answer, reconsider carrying it.
Vehicle Go Bag vs. Walking Go Bag
Many evacuations begin in a vehicle.
That means your car can carry supplies that don’t necessarily belong on your back.
Vehicle supplies might include:
- Additional water
- More food
- Blankets
- Extra clothing
- Larger first-aid kit
- Additional power
- Road maps
- Seasonal vehicle gear
But keep the core backpack portable.
Traffic jams, road closures, mechanical failures or emergency instructions could force you to leave the vehicle behind.
The bag should still work if you have to carry it.
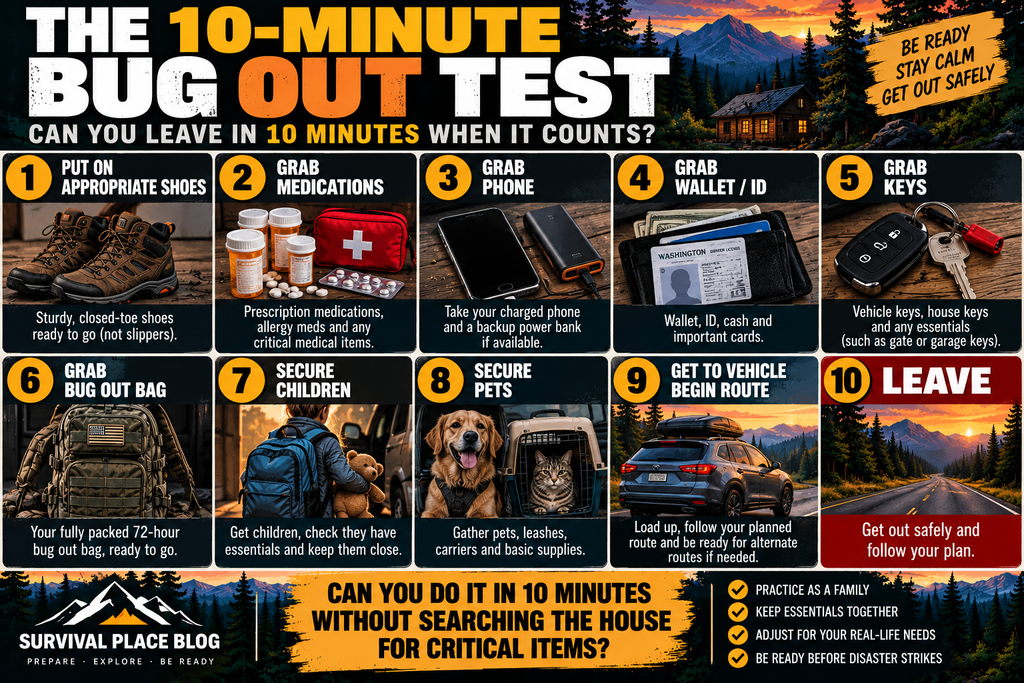
The 10-Minute Test
Here’s one of the easiest ways to find problems with your plan.
Imagine authorities tell you:
You need to leave in 10 minutes.
Could you:
- Grab the bag?
- Find your medications?
- Locate your keys?
- Load your pets?
- Grab critical documents?
- Contact family members?
- Leave without searching through drawers and closets?
If not, the problem may not be what’s inside the bag.
The problem may be organization.
The Carry Test
Once the bag is packed, put it on.
Don’t just walk around the living room.
Walk with it long enough to discover whether:
- The shoulder straps hurt
- The hip belt works
- The load shifts
- The bag is too heavy
- Something digs into your back
- You can still move comfortably
If the bag is miserable after a short walk, imagine carrying it when you’re tired, stressed or dealing with bad weather.
Remove unnecessary weight and test it again.
Check Your Go Bag Every Six Months
Emergency supplies aren’t “pack it once and forget it.”
Twice a year, check:
- Food expiration dates
- Medications
- Batteries
- Power banks
- Water and treatment supplies
- Clothing sizes
- Seasonal gear
- Documents
- Emergency contacts
- Children’s needs
- Pet supplies
Recharge electronics and replace anything that’s expired, damaged or no longer appropriate.
A good time to do this is around the seasonal clock changes or another date you’ll remember every year.
Quick 72 Hour Go Bag Checklist
If you want the shortest possible version, start here:
Water
- Carryable drinking water
- Bottle
- Compact filter
- Backup treatment
Food
- Ready-to-eat food
- Protein/energy snacks
- Electrolytes
Medical
- First aid
- Prescription medication
- Personal medical supplies
Shelter
- Rain protection
- Emergency blanket/bivy
- Seasonal insulation
Clothing
- Socks
- Underwear
- Base layer
- Warm/weather layer
Tools
- Headlamp
- Batteries
- Multi-tool
- Lighter
- Whistle
Communication
- Phone
- Charging cable
- Power bank
- Emergency radio
- Written contacts
Documents
- ID copies
- Insurance
- Medical information
- Cash
- Keys
Hygiene
- Toothbrush
- Soap/sanitizer
- Wipes
- Toilet paper/tissues
- Personal hygiene supplies
Household-Specific
- Children
- Pets
- Medical/accessibility needs
- Seasonal items
Want the Complete Bug Out Bag Checklist?
This quick guide is designed to get a practical 72-hour kit assembled without overthinking it.
Our Ultimate Bug Out Bag Guide goes much further into water strategy, backpack selection, evacuation planning, children, pets, vehicle evacuation, seasonal changes, regional risks and testing your completed bag.
It also includes our free printable 72-Hour Bug Out Bag Checklist.
Final Thoughts
A useful go bag isn’t the bag with the most equipment.
It’s the one you can grab quickly, carry comfortably and actually use.
Start with the essentials. Use what you already own. Add missing items gradually. Customize the kit around the people and animals who depend on you.
Then test it.
Preparedness becomes much more manageable when you stop trying to prepare for every imaginable disaster and start preparing for the simple question that matters:
If I had to leave home quickly, what would I actually need for the next few days?