Affiliate Disclosure: This post contains affiliate links. If you purchase through these links, Survival Place Blog may earn a commission at no additional cost to you. As an Amazon Associate I earn from qualifying purchases.
Prepping on a budget does not mean buying the cheapest survival gear you can find. It means figuring out what emergencies you’re actually preparing for, using what you already own, and spending money only where it fills an important gap.
You may already have more emergency supplies than you realize. Food in the pantry, blankets, flashlights, backpacks, work gloves, basic tools, a cooler, hygiene products, medications, phone chargers, batteries, and bottled water can all become part of your preparedness plan.
Before ordering another piece of survival gear, take inventory.
A good rule for beginning preparedness is simple:
Use what you have. Organize what you have. Fill the important gaps. Upgrade later.
That approach can get a household surprisingly far without spending a fortune.
If you’re completely new to preparedness, Start Here: Your 72-Hour Preparedness Plan walks through the basic supplies and planning needed to get through the first three days of an emergency.
What Does Prepping Actually Mean?
Prepping is simply preparing ahead of time for disruptions that could affect your household.
That might include:
- Power outages
- Severe storms
- Earthquakes
- Flooding
- Wildfire evacuations
- Water outages
- Winter storms
- Transportation disruptions
- Temporary supply shortages
- Being unable to reach a store for several days
You don’t need an underground bunker or a garage full of expensive equipment.
For most households, a better first goal is being able to safely handle several days without normal services.
Once you’ve accomplished that, you can gradually build toward longer disruptions.
Start With the Emergencies Most Likely to Affect You
One of the easiest ways to waste money on preparedness is buying equipment before deciding what you’re preparing for.
Start with the risks around you.
Ask yourself:
- What natural disasters occur where I live?
- How often does the power go out?
- Could flooding or wildfire force us to evacuate?
- What happens if roads are blocked?
- What if water service stops?
- What if stores are closed for several days?
- Does anyone in the household depend on medication or powered medical equipment?
- What would we need for our pets?
Preparing for realistic problems helps determine what you actually need.
For a government baseline of emergency supplies to consider for your household, review Ready.gov’s Build A Kit guidance, which covers water, food, communications, medical needs, documents, and other basic emergency items.
Someone living in earthquake country may prioritize securing furniture, emergency water, sturdy footwear, lighting, and first aid.
Someone dealing with hurricanes may prioritize evacuation planning, water storage, weather information, backup power, and storm supplies.
Someone living where winter storms routinely close roads may focus more heavily on heat, food, vehicle preparedness, and power outages.
Before You Buy Anything, Shop Your Own House
This may be the most important step in prepping on a budget.
Walk through your home and make a simple inventory.
Check Your Kitchen
You may already have:
- Canned vegetables
- Canned meat or fish
- Peanut butter
- Crackers
- Rice
- Pasta
- Oatmeal
- Shelf-stable milk
- Snacks
- Manual can opener
- Bottled water
- Foil
- Trash bags
Don’t immediately create a separate pantry filled with unfamiliar “survival food.”
Start by buying a little extra of foods your household already eats.
If you normally use six cans of soup in a month, buying eight instead of six gradually builds a reserve without wasting food or changing your normal grocery habits.
Check Your Closets
Look for:
- Blankets
- Warm clothing
- Rain gear
- Old backpacks
- Duffel bags
- Towels
- Work gloves
- Hats
- Sturdy shoes
An ordinary backpack that you already own can hold emergency supplies just as effectively as an expensive bag marketed specifically for survival.
Check Your Garage or Tool Area
You may already own:
- Flashlights
- Extension cords
- Pliers
- Screwdrivers
- Adjustable wrenches
- Utility knives
- Duct tape
- Tarps
- Rope or cord
- Jumper cables
- Coolers
- Buckets
- Battery chargers
Gathering these items into known locations may improve your preparedness without costing anything.
Check Your Bathroom and Medicine Cabinet
Look for usable supplies such as:
- Adhesive bandages
- Gauze
- Antiseptic
- Medical tape
- Disposable gloves
- Thermometer
- Pain relievers
- Personal hygiene products
- Soap
- Prescription medications
Check expiration dates and replace items that are expired, damaged, or depleted.
The point isn’t to convince yourself that you already have everything.
It’s to avoid buying a second version of something that already does the job.
Build Your First Emergency Kit for $0
Your first emergency kit doesn’t have to begin with a shopping trip.
Find a backpack, duffel bag, storage tote, or sturdy box you already own.
Then gather useful supplies from around the house.
A basic no-cost starter kit might include:
- Flashlight
- Spare batteries
- Phone charging cable
- Blanket
- Change of clothes
- Basic first-aid supplies
- Hygiene supplies
- Trash bags
- Manual can opener
- Copies of important contact information
- Shelf-stable food
- Bottled water already in the home
Don’t permanently raid items your family needs every day. Instead, use this exercise to identify what you have and what would need to be gathered quickly.
Now you have a starting point.
More importantly, you’ll know what’s missing.
Your First $25: Fix the Biggest Weakness
Don’t spend your first preparedness dollars on whatever survival product happens to be on sale.
Spend them on the biggest weakness you discovered during your inventory.
For many households, that may be water.
For others, it could be:
- Flashlights
- Batteries
- First-aid supplies
- Shelf-stable food
- A manual can opener
- Hygiene supplies
- Basic vehicle supplies
- Needed medications
- Pet supplies
Your priorities will not necessarily match someone else’s.
That’s okay.
Preparedness should solve your household’s problems, not duplicate somebody else’s gear collection.
Your First $50: Add Capability, Not Gadgets
Once the most obvious shortages are covered, start thinking in terms of capabilities.
Can you:
- Store enough drinking water?
- See safely during a blackout?
- Receive emergency information?
- Charge a phone?
- Treat minor injuries?
- Prepare food without normal utilities?
- Stay warm?
- Leave home quickly if necessary?
A useful preparedness purchase should answer one of those questions.
If it doesn’t solve a real problem, it probably isn’t a priority yet.
Water Comes Before Most Survival Gear
People can accumulate impressive emergency kits while overlooking something far more basic: water.
A commonly used emergency-planning baseline is at least one gallon of water per person per day for drinking and sanitation, with additional water needed in some circumstances.
Start with stored water before relying on filtration.
You may be able to build your supply gradually by adding commercially bottled water to your normal grocery shopping or filling appropriate food-grade water containers.
Rotate stored water as appropriate for the container and storage method you’re using.
Then think about backup treatment options.
A portable filter can be useful when dealing with appropriate freshwater sources, but no single filter removes every possible contaminant.
For an affordable backup filtration option, the Sawyer MINI Water Filtration System is compact, reusable, and easy to keep with household or evacuation supplies.
Chemical contamination, saltwater, viruses, and other hazards may require different treatment or an entirely different water source.
Build an Emergency Pantry With Food You Already Eat
Emergency food doesn’t need to arrive in expensive buckets.
Look at what your household already eats that stores reasonably well.
Good candidates may include:
- Canned beans
- Canned meat
- Tuna
- Soup
- Chili
- Peanut butter
- Oatmeal
- Rice
- Pasta
- Crackers
- Dried fruit
- Nuts
- Shelf-stable milk
- Familiar snacks
The easiest budget strategy is often buy one or two extras during normal grocery trips.
Instead of spending hundreds of dollars at once, slowly deepen your pantry.
Use the oldest food first and replace what you consume.
This creates a rotating emergency food supply instead of a forgotten stash that eventually gets thrown away.
Pay attention to cooking requirements as well. A 25-pound bag of rice may be inexpensive, but it isn’t especially useful during a short power outage if you have no safe way to cook it.
Include some foods that require little or no preparation.
When you’re ready to expand beyond a short-term pantry, use our 90-Day Emergency Preparedness Checklist: How to Prepare Your Home for Three Months to build deeper food, water, medical, sanitation, power, and household reserves gradually.
Build First Aid Supplies Gradually
You may already own many of the components of a useful first-aid kit.
Start by organizing what you have and checking expiration dates.
Then fill gaps over time.
Useful basics can include:
- Adhesive bandages
- Sterile gauze
- Medical tape
- Antiseptic
- Disposable gloves
- Tweezers
- Scissors
- Thermometer
- Common over-the-counter medications appropriate for your household
Emergency supplies don’t replace professional medical care. The goal is to handle minor injuries and have useful supplies available while seeking appropriate help when needed.
Also think beyond the first-aid box.
If you don’t already have a reasonably stocked first-aid kit, the EVERLIT 250-Piece Survival First Aid Kit provides an organized starting point rather than buying every basic item separately.
Eyeglasses, hearing-aid batteries, mobility needs, prescription medications, and other household-specific medical requirements may be much more important than another piece of survival equipment.
Don’t Overspend on Emergency Lighting
Lighting is another area where people can spend far more than necessary.
Start by finding every working flashlight in the house.
Test them.
Check the batteries.
Put flashlights where you can reach them without crossing a dark house.
If you already have several dependable flashlights, you may not need another one.
If your lighting is unreliable, however, a headlamp is a useful upgrade because it keeps both hands free while you move around the house, make repairs, prepare food, or handle other tasks.
If you need to fill that gap, the Energizer Universal LED Headlamp 2-Pack gives you hands-free emergency lighting while also providing a second light for another household member or backup location.
Avoid relying on candles as your primary emergency lighting. Battery-powered lighting eliminates the open-flame hazard and is generally easier to use during an outage.
Communication Is More Than Owning a Radio
Your smartphone will probably remain your primary communication tool during many emergencies, but it shouldn’t be your only plan.
Start with things that cost nothing:
Write important phone numbers on paper.
Choose an out-of-area contact.
Decide where household members will meet if they cannot return home.
Know how your local government distributes emergency alerts.
Keep phones charged when severe weather or another known hazard is approaching.
Text messages may sometimes get through when voice networks are congested, but cellular and internet service can also fail.
A weather/emergency radio becomes a useful additional layer when normal communications are disrupted.
If you don’t already own a weather radio, the Midland ER310 Emergency Crank Weather Radio provides NOAA weather alerts along with AM/FM radio and multiple backup-power options.
Keep Your Phone Powered Without Buying a Giant Power Station
A large portable power station can be useful, but beginners don’t necessarily need one.
Start smaller.
Keep your phone charged.
Use charging cables you already own.
Charge existing battery banks before storms.
Use the vehicle for charging when appropriate and safe.
If you discover that keeping phones and small electronics powered is a genuine weakness, a compact power bank may solve the problem for far less money than a large backup-power system.
The INIU 10,000mAh 45W Portable Charger is a compact option for adding backup phone and small-device charging without jumping immediately to the cost of a large portable power station.
Larger power stations can come later if your household has a genuine need for more capacity.
For a practical look at what becomes important as an outage continues, see 48 Hours Without Power: What Actually Happens When the Grid Goes Down, including lighting, refrigeration, communications, water, charging, and household safety.
Your Home Is Usually Your Most Important Piece of Survival Equipment
Preparedness marketing can make it seem as though survival begins outdoors.
For most everyday emergencies, your home is likely to be your primary shelter.
That means basic home maintenance is preparedness.
Check:
- Smoke alarms
- Carbon-monoxide alarms
- Door and window locks
- Fire extinguishers
- Plumbing shutoffs
- Electrical panel access
- Roof and gutters
- Heating and cooling systems
- Heavy furniture that could tip
- Trees and branches that could damage the home
Some of the best preparedness improvements aren’t exciting enough to appear in a survival catalog.
Fixing a leaking roof, replacing dead alarm batteries, learning where your water shutoff is, and trimming a dangerous branch can matter more than buying another gadget.
Build an Evacuation Plan Before Building an Expensive Bug-Out Bag
You should know where you would go if your home became unsafe.
Identify:
- A nearby meeting location
- An out-of-neighborhood meeting location
- At least two evacuation routes
- Family or friends you could stay with
- Local emergency shelter options
- A plan for pets
- Transportation alternatives
Then look at bags.
You may already have a backpack, school bag, hiking pack, suitcase, or duffel that can carry what you need.
Use it.
Upgrade only when your existing bag actually creates a problem.
Before spending heavily on evacuation gear, use our Bugging Out: How to Build an Emergency Evacuation Plan to work through destinations, routes, transportation, communication, supplies, and deciding when to leave.
Don’t Forget the Vehicle You Already Own
Your everyday vehicle is part of your emergency plan.
You don’t need a specialized survival vehicle to improve your readiness.
Start with maintenance.
Keep up with:
- Tires
- Oil
- Coolant
- Battery condition
- Wiper blades
- Lights
- Brakes
- Fuel
Then check what is already in the vehicle.
You may have a phone charger, jumper cables, flashlight, blanket, basic tools, bottled water, or first-aid supplies already available.
Organize them and fill the genuine gaps.
For a complete approach to turning the vehicle you already drive into a more capable evacuation and emergency platform, see Bug-Out Vehicle Guide: How to Prepare Your Vehicle for an Emergency.
Learn Skills Before Buying Equipment
One of the cheapest ways to become better prepared is to become more capable.
Skills don’t run out of batteries.
Start with practical things you’re likely to use even outside an emergency.
Learn how to:
- Shut off household water
- Safely reset a circuit breaker
- Change a tire
- Jump-start a vehicle
- Use a fire extinguisher
- Read a paper map
- Perform basic first aid
- Cook simple meals from shelf-stable foods
- Store water safely
- Maintain basic household tools
- Set up a tarp
- Use the emergency equipment you already own
Owning equipment without knowing how to use it can create a false sense of preparedness.
Practice matters.
Be Careful With Cheap Survival Gear
Budget-friendly doesn’t always mean buying the least expensive option.
Very cheap equipment can become expensive if it fails and has to be replaced.
Spend more carefully on equipment where reliability matters.
That doesn’t mean buying premium gear across the board.
Instead, ask:
What happens if this item fails when I actually need it?
A storage tote doesn’t need to be expedition grade.
A decorative organizer doesn’t need to be indestructible.
But critical lighting, water equipment, medical supplies, charging equipment, and other important tools should be dependable.
Look for value, not simply the lowest price.
Buy Used Where It Makes Sense
Used gear can stretch a preparedness budget significantly.
Good candidates may include:
- Backpacks
- Camping cookware
- Hand tools
- Storage shelves
- Coolers
- Camping furniture
- Some outdoor equipment
Thrift stores, garage sales, local marketplaces, and family hand-me-downs can all be useful.
Use more caution with equipment where age, contamination, hidden damage, expiration, or unknown history could affect safety.
Don’t Buy Something Just Because It Says “Survival”
Marketing can add a surprising premium to ordinary equipment.
A five-gallon bucket is still a bucket.
A tarp is still a tarp.
A wool blanket doesn’t become more useful because it was photographed beside a tactical backpack.
Compare ordinary hardware, camping, automotive, household, and grocery-store products with specialized survival products.
Sometimes the specialized product is worth it.
Sometimes you’re paying for the label.
Use a Small Monthly Preparedness Budget
Consistency can accomplish more than one big shopping spree.
Even a modest preparedness budget can gradually improve your household.
For example, one month might go toward extra water and pantry food.
The next might fill gaps in first-aid supplies.
Another might add batteries or a power bank.
Another might go toward vehicle maintenance.
The exact dollar amount matters less than having a plan.
If money is tight, preparedness should not compete with rent, utilities, medication, groceries, or other essential household expenses.
Build slowly.
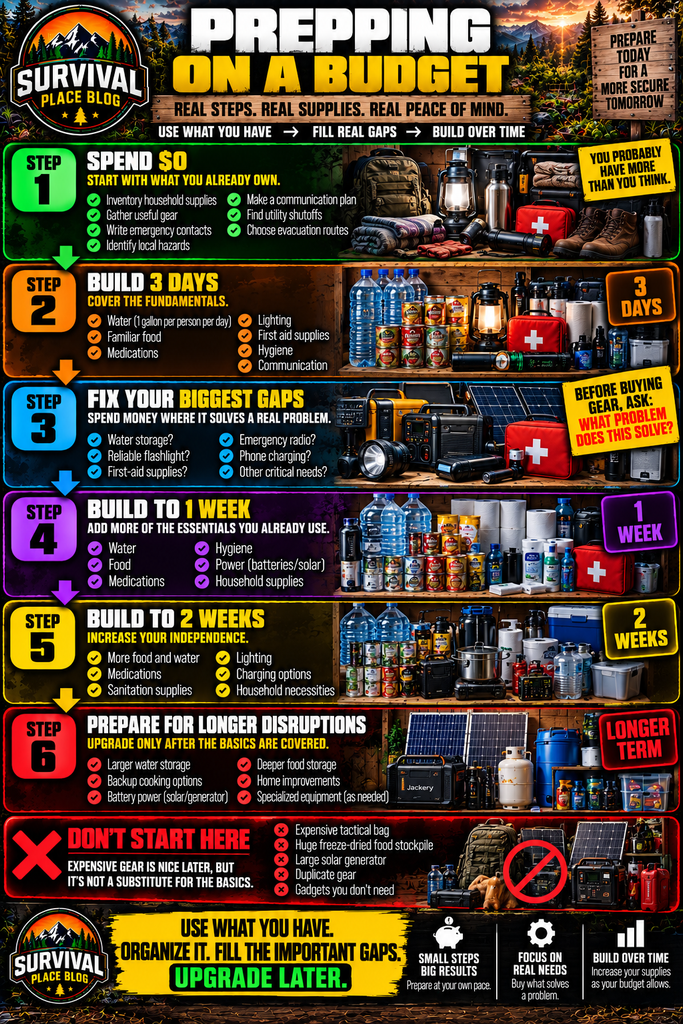
A Simple Budget Prepping Plan
If you’re starting from almost nothing, use this order.
Step 1 — Spend $0
Inventory what you already own.
Gather useful emergency supplies.
Write down important contacts.
Identify local hazards.
Make a household communication plan.
Find your utility shutoffs.
Choose evacuation destinations and routes.
Step 2 — Build Three Days of Basics
Concentrate on:
- Water
- Familiar shelf-stable food
- Necessary medications
- Lighting
- First aid
- Hygiene
- Communication
- Basic household needs
Don’t worry about having the perfect equipment.
Get the fundamentals covered.
Step 3 — Fill the Most Important Gaps
Now spend selectively.
Maybe you need a better water-storage solution.
Maybe you don’t own a reliable flashlight.
Maybe your first-aid supplies are nearly empty.
Maybe you need a backup way to receive emergency information.
Buy according to the weakness you’ve actually identified.
Step 4 — Extend From Three Days to One Week
Add more of the same essentials.
This is usually easier and cheaper than creating an entirely different emergency system.
Step 5 — Build Toward Two Weeks
Increase food, water, hygiene, medications where possible, lighting, power, and household necessities.
By this point you’ll have a much better understanding of what your family actually uses.
Step 6 — Prepare for Longer Disruptions
Only after the basics are covered should you seriously consider larger investments and deeper stockpiles.
That might eventually include:
- Larger water storage
- Backup cooking
- Larger battery power systems
- Additional food storage
- Home improvements
- Specialized tools
- Expanded medical supplies
- Longer-term sanitation
When you’re ready to move beyond short-term preparedness, use our 3-Month Survival Plan: What to Stock for 90 Days to identify the supplies worth adding gradually instead of trying to buy a three-month stockpile all at once.
What Not to Buy First
When you’re starting on a limited budget, some purchases can wait.
You probably don’t need to begin with:
- An expensive tactical backpack
- Huge quantities of freeze-dried food
- Multiple survival knives
- A large solar generator
- Specialized wilderness equipment
- Every gadget recommended in a survival video
- Duplicate equipment you already own
None of those things are automatically useless.
They’re simply not where most beginners need to start.
Water, food, medications, light, communication, household safety, and a workable emergency plan should come first.
Preparedness Is Also About Reducing Waste
A budget-conscious preparedness system should be usable in normal life.
Eat the food you store.
Rotate the water.
Use the batteries.
Carry the power bank.
Practice with the tools.
Take the camping gear camping.
Use stored hygiene products and replace them.
When emergency supplies become part of your normal household rotation, less money gets wasted on products that sit untouched until they expire.
Review Your Supplies Twice a Year
Preparedness isn’t something you finish once.
Pick two times each year to review your supplies.
Check:
- Food expiration and rotation
- Water storage
- Batteries
- Flashlights
- First-aid supplies
- Medications
- Clothing sizes
- Pet supplies
- Emergency contacts
- Vehicle supplies
- Evacuation routes
- Household needs that have changed
Seasonal clock changes, the beginning of storm season, or another recurring date can make useful reminders.
The Best Prep Is the One That Solves a Real Problem
You don’t need to become completely self-sufficient overnight.
You don’t need thousands of dollars in equipment.
And you don’t need to own everything another prepper owns.
Start with the most likely emergencies.
Look at what you already have.
Organize it.
Cover your basic needs.
Fill the most important gaps one at a time.
Then practice using what you’ve assembled.
A household with ordinary supplies, a realistic plan, useful skills, and equipment they understand may be far better prepared than someone who spent thousands of dollars on survival gear without ever developing a plan.
Preparedness isn’t about owning the most gear. It’s about being able to handle the problems most likely to come your way.