How to Practice With Your Camping Gear at Home Before Your First Trip
Affiliate Disclosure: This post contains affiliate links. If you purchase through these links, Survival Place Blog may earn a commission at no additional cost to you. As an Amazon Associate I earn from qualifying purchases.
Buying camping equipment is exciting, especially when you’re preparing for your first outdoor adventure. But there’s a big difference between owning camping gear and knowing how to use it.
Imagine arriving at a campground late in the afternoon, opening your new tent, and realizing you don’t understand how the poles connect. Maybe your headlamp batteries are dead, your sleeping pad won’t stay inflated, or your cooking equipment is buried somewhere in the back of your SUV.
These problems are frustrating at home. At a campground, especially with daylight fading or bad weather approaching, they can become much more serious.
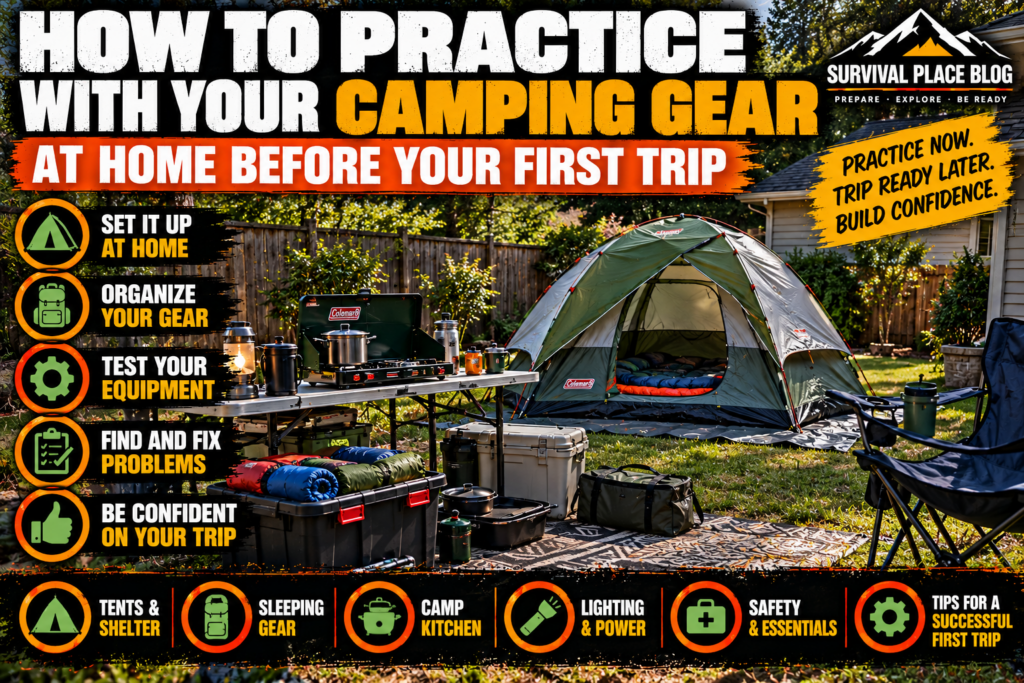
That’s why learning how to practice camping gear at home is one of the smartest things you can do before your first trip.
You don’t need a wilderness location or expensive equipment to get started. A backyard, driveway, garage floor, or another suitable practice area can help you learn how your equipment works, identify missing supplies, and become more comfortable with the camping process.
In this guide, we’ll walk through setting up a tent, testing sleeping equipment, checking lights, learning safe stove operation, using a water filter, organizing camping supplies, and packing your vehicle.
By the time you’re finished, you’ll have a better understanding of your equipment and a practical system for getting ready to camp.
If you’re still planning your first outdoor trip, start with our guide, Camping for Beginners: How to Plan Your First Camping Trip, for practical advice on choosing a campground, preparing supplies, and getting ready for your first experience.
1. Why You Should Practice With Your Camping Gear Before Your First Trip
Most camping equipment is relatively straightforward once you’ve used it a few times. The challenge is learning how everything works when you’re unfamiliar with it.
A tent that takes an experienced camper ten minutes to assemble might take a beginner much longer. A sleeping bag may look comfortable in its packaging but prove unsuitable for the temperatures expected on a trip.
Even simple equipment such as a lantern or water filter can have operating instructions that aren’t obvious.
Practicing at home gives you an opportunity to discover these issues before you’re depending on the equipment outdoors.
What practicing at home helps you accomplish
- Build familiarity: Learn how to assemble, operate, adjust, and pack your equipment.
- Identify missing components: Discover missing tent stakes, damaged poles, charging cables, or other essential parts.
- Improve efficiency: Reduce the time needed to establish your campsite.
- Recognize limitations: Understand what your equipment can and cannot do.
- Improve safety: Become familiar with equipment precautions and emergency procedures.
- Reduce unnecessary purchases: Identify what you actually need rather than buying equipment simply because it looks useful.
The objective isn’t to become an expert overnight.
It’s to develop enough familiarity that routine camping tasks don’t become unexpected problems.
Practice exercise: Choose three pieces of equipment you’ve never used. Read their instructions, identify their components, and practice their basic operation before moving on.
2. Gather, Inventory, and Inspect Your Camping Equipment
Before setting anything up, gather your camping equipment in one location.
A clean garage floor, spare room, covered patio, or dry section of the backyard works well.
Arrange equipment into categories so you can see what you have.
Organize your equipment by purpose
Shelter and sleeping
- Tent, rainfly, poles, stakes, and guylines.
- Sleeping bags and sleeping pads.
- Pillows and appropriate blankets.
Lighting and power
- Headlamps and flashlights.
- Camping lanterns.
- Batteries, charging cables, and power banks.
Cooking and food preparation
- Camping stove and appropriate fuel.
- Cookware, utensils, and food containers.
- Cooler and food-storage supplies.
- Cleaning and handwashing equipment.
Water and hydration
- Drinking-water containers.
- Water filter or treatment equipment.
- Backup drinking water.
Safety and personal equipment
- First-aid kit.
- Weather-appropriate clothing.
- Navigation and communication equipment.
- Personal medications and hygiene supplies.
Compare everything against a complete camping checklist.
To make sure you haven’t overlooked important supplies, review our Essential Camping Checklist: Everything You Need for a Safe and Comfortable Trip before inspecting and packing your equipment.
Inspect before you practice
Look for damage, missing components, unusual wear, and equipment that no longer functions properly.
Check tent poles for cracks, tent fabric for tears, sleeping pads for leaks, and electrical equipment for corrosion or damaged wiring.
Verify that fuel containers are appropriate for the stove and that all required components are present.
If equipment is damaged, don’t assume it will work well enough for one more trip.
Repair or replace it according to the manufacturer’s guidance.
Practice exercise: Make a simple inventory with three columns: Equipment, Condition, and Action Needed.
This becomes your starting point for the rest of the article.
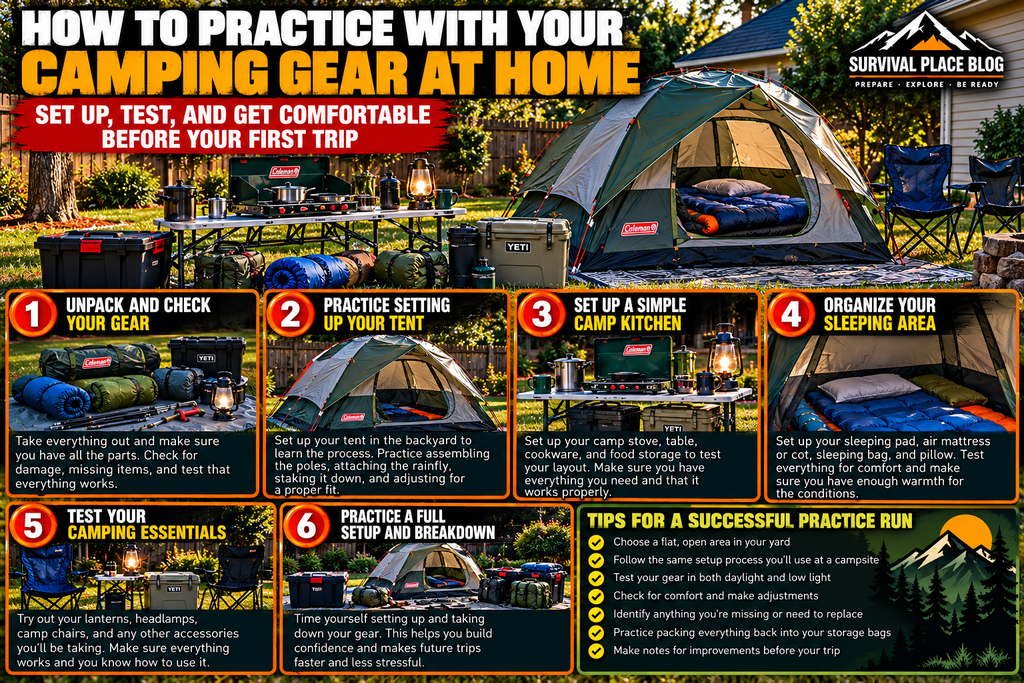
3. How to Set Up a Camping Tent: Step-by-Step Instructions
Your tent is one of the most important pieces of camping equipment to practice using.
Even if you plan to camp at a developed campground, you need to understand how to assemble your shelter, secure it properly, and protect it from expected weather conditions.
The following instructions describe a common freestanding dome-style tent. Instant tents, trekking-pole tents, tunnel tents, and other designs use different assembly methods.
Always follow the instructions supplied with your particular tent.
The National Park Service’s Ten Essentials guide emphasizes carrying appropriate shelter and essential outdoor equipment as part of responsible trip preparation
Step 1: Choose a suitable practice location
Find a relatively level area with enough room for the tent and guylines.
Remove sharp sticks, rocks, and other objects that could damage the floor.
Avoid overhead hazards, unstable branches, and areas where water collects.
For backyard practice, grass is often convenient because stakes can be installed more easily.
Step 2: Unpack and identify every component
Remove everything from the tent bag.
Most conventional dome tents include:
- Tent body.
- Tent poles.
- Rainfly.
- Stakes.
- Guylines.
- Carrying bag.
- Setup instructions.
Some tents also include a footprint, vestibule poles, or additional support components.
Lay the parts out where you can identify them.
Count the stakes and inspect the poles before beginning.
Step 3: Lay out and orient the tent body
Spread the tent on the ground with the floor facing downward.
Locate the entrance and decide which direction you want it to face.
For real camping, consider wind, drainage, surrounding hazards, and campsite layout rather than choosing the direction based only on the view.
If you use a footprint, position it according to the manufacturer’s instructions. A footprint should not extend beyond the tent floor where it could collect rainwater underneath.
Step 4: Assemble the tent poles
Many dome tents use segmented poles connected by internal shock cord.
Connect the segments carefully without forcing them.
Lay the assembled poles in the positions shown in the instructions.
Avoid sharply bending a pole or pulling on the shock cord unnecessarily.
Step 5: Raise the tent
Depending on the design, poles may slide through fabric sleeves or attach to clips.
Follow the manufacturer’s sequence to avoid overstressing the poles and fabric.
If the tent requires two people, practice with another person rather than forcing the setup alone.
Once the structure is standing, check that the poles are seated correctly and the tent body isn’t twisted.
Step 6: Install the rainfly
The rainfly provides important weather protection.
Identify its front, back, attachment points, and ventilation openings.
Position it correctly over the tent and secure it using the manufacturer’s attachment system.
Check that the rainfly is properly tensioned and doesn’t unnecessarily press against the inner tent.
Improper rainfly installation can allow water to enter or increase condensation problems.
Step 7: Secure the tent
Install stakes and guylines as required for the tent and expected conditions.
Even freestanding tents generally need to be secured against wind.
Use suitable stakes for the ground conditions and avoid excessive tension that could damage fabric or attachment points.
Keep guylines visible to reduce tripping hazards.
Step 8: Check the completed setup
Walk around the tent and inspect:
- Pole connections.
- Rainfly positioning.
- Door and zipper operation.
- Stake placement.
- Guyline tension.
- Ventilation openings.
- Floor condition.
Step inside and check whether the tent provides enough space for your sleeping equipment.
Step 9: Take down and repack the tent
Reverse the setup process according to the manufacturer’s instructions.
Remove stakes carefully, clean off dirt, and inspect each component.
When separating shock-corded pole sections, follow the manufacturer’s procedure to avoid overstretching the cord.
Fold or roll the tent as recommended and return the components to their storage bags.
If the tent is wet or damp, dry it thoroughly before long-term storage.
Common beginner tent mistakes
One of the most frequent mistakes is waiting until the first camping trip to open the tent package.
Other problems include:
- Forgetting the rainfly.
- Losing stakes.
- Misconnecting poles.
- Setting up on uneven ground.
- Failing to secure a freestanding tent.
- Blocking ventilation.
- Packing the tent while damp and leaving it stored.
Practice exercise: Set up the tent completely, inspect it, take it down, and repeat the process. The goal is to understand the procedure without constantly stopping to figure out the next step.
If you’re purchasing your first tent, the Coleman Sundome Camping Tent with Rainfly is one option to consider for conventional campground camping. Check the specific model’s size, weather limitations, and setup instructions before purchasing.
4. How to Set Up and Test Your Sleeping Equipment
A tent provides shelter, but your sleeping equipment has a major influence on how comfortable and warm you’ll be overnight.
A sleeping bag alone may not provide enough insulation from the ground.
That’s why it’s important to practice with your complete sleeping system.
Step 1: Inspect your sleeping bag
Remove the sleeping bag from its storage sack.
Check the zipper, seams, insulation, and fabric.
Look for dampness, odors, or damage.
Review the manufacturer’s temperature information and understand whether the rating refers to comfort, lower-limit performance, or another testing category.
Don’t assume a sleeping bag labeled for a particular temperature will keep every person comfortable at that temperature.
Step 2: Prepare your sleeping pad
If you have an inflatable pad, follow its inflation instructions.
Self-inflating pads may need additional air after they’ve expanded.
Foam pads can simply be unfolded or unrolled.
Inspect the pad for damage and check that valves close properly.
Remember that a sleeping pad provides cushioning and helps reduce heat loss to the ground. Its insulation rating matters in colder conditions.
Step 3: Arrange the sleeping system
Place the sleeping pad inside the tent.
Position your sleeping bag on top and check that you have enough room to lie down comfortably.
Try getting into and out of the bag.
Check whether the zipper operates smoothly and whether your pillow and other bedding fit.
Step 4: Test comfort and fit
Lie down for at least fifteen to twenty minutes.
Try your usual sleeping position.
Ask yourself:
- Is the pad long and wide enough?
- Can you move comfortably?
- Does the sleeping bag feel restrictive?
- Is the ground insulation suitable for expected temperatures?
- Is there enough space inside the tent for everyone?
A brief home test won’t reproduce every outdoor condition, but it can reveal obvious problems.
Step 5: Repack and store correctly
Practice returning the sleeping bag and pad to their travel bags.
For longer-term storage, follow the manufacturer’s recommendations. Many insulated sleeping bags should be stored loosely rather than kept compressed for extended periods.
The MalloMe Sleeping Bags for Adults Cold Weather & Warm are one option for general camping use, provided the particular model’s specifications match the expected conditions.
Practice exercise: Assemble the complete sleeping system inside your tent, lie down, then take everything apart and pack it again.
5. How to Test Camping Lights, Headlamps, and Batteries
Lighting is easy to overlook when you’re preparing for a camping trip during daylight.
But once darkness arrives, a dependable headlamp or lantern becomes essential for routine tasks.
You should be able to operate your lighting without searching through unfamiliar controls.
Step 1: Check the power source
Determine whether each light uses replaceable batteries or an internal rechargeable battery.
Install batteries correctly or fully charge the unit.
Inspect battery compartments and charging ports for damage.
Step 2: Test every lighting mode
Turn the light on and cycle through its available settings.
Learn how to switch between high, low, and any red-light or flashing modes.
Understand how the controls work so you don’t accidentally activate an unwanted mode.
Step 3: Practice wearing a headlamp
Adjust the headband so it stays secure without being uncomfortable.
Practice directing the beam toward the ground, a nearby object, and your hands while performing simple tasks.
A headlamp is especially useful because it leaves both hands free.
The Energizer Universal LED Headlamp is one practical option for campsite lighting.
Step 4: Position a lantern
Set a lantern on a stable surface or hang it using an approved attachment point.
Avoid placing it where someone could knock it over or trip on its cord.
Use only lighting equipment suitable for the intended environment.
A rechargeable lantern, such as the Glocusent LED Rechargeable Camping Lantern, can provide general illumination around a campsite.
Step 5: Prepare backup lighting
Carry an independent backup light rather than relying entirely on one device.
Check spare batteries and charging equipment.
Protect batteries from moisture and prevent loose batteries from contacting metal objects.
Practice exercise: After dark, use your headlamp to locate equipment, open your tent, and organize your sleeping area. Practice switching to your backup light.
6. How to Set Up and Safely Operate a Camping Stove
A portable camping stove makes meal preparation easier, but fuel-burning equipment requires careful handling.
This is one activity that should be practiced outdoors in a suitable location, not inside your home or garage.
Fuel-burning camping stoves can produce carbon monoxide and present fire and burn hazards.
The National Park Service provides additional guidance on safe outdoor cooking and preventing fires while camping.
For additional guidance on outdoor cooking and fire prevention, review the National Park Service’s recommendations for wildland fire safety before using your camping stove.
Never operate a fuel-burning stove inside a tent, vehicle, garage, enclosed porch, or other enclosed or poorly ventilated space.
Step 1: Read the stove instructions
Identify the stove’s fuel type, controls, ignition system, cooking surface, and required clearances.
Confirm which fuel containers are compatible with the stove.
Do not improvise adapters or use an incompatible fuel source.
Step 2: Choose a safe outdoor location
Place the stove on a stable, level, manufacturer-approved surface.
Keep it away from tent fabric, dry vegetation, loose paper, and other combustible materials.
Follow the manufacturer’s requirements for overhead, rear, and side clearances.
Keep children and pets away from the cooking area.
Step 3: Inspect the equipment
Check the stove for damage, blocked components, and missing parts.
Inspect fuel connections and hoses where applicable.
Do not use equipment that appears damaged or leaks fuel.
Follow the manufacturer’s leak-checking procedure when required. Never use a flame to check for gas leaks.
Step 4: Connect the fuel according to instructions
Use only the specified fuel and connection method.
Keep ignition sources away while making fuel connections.
If you smell gas or suspect a leak, stop, shut off the supply if safe, and follow the manufacturer’s emergency instructions.
Step 5: Learn the ignition and shutdown procedures
Follow the stove’s specific operating instructions.
Some models use built-in ignition systems, while others require a separate approved ignition method.
Do not repeatedly attempt to ignite a stove when unburned gas may be accumulating.
Once operating, remain with the stove and monitor the cooking area.
Step 6: Practice a simple cooking task
Start with something straightforward, such as heating water in suitable cookware.
Learn how the controls respond and how to safely handle hot cookware.
Keep a suitable means of responding to a cooking fire available and know when to move away and call emergency services.
Step 7: Shut down, cool, and repack
Turn off the stove and fuel supply according to the instructions.
Allow the equipment to cool completely.
Disconnect and store fuel only as directed by the manufacturer.
Do not place hot equipment into storage containers or your vehicle.
For vehicle-based camping, the Coleman Triton 2-Burner Propane Stove is an example of a portable cooking option.
Practice exercise: Outdoors, perform a complete stove setup, inspection, manufacturer-approved operation, shutdown, and packing sequence. If you’re unfamiliar with fuel-burning equipment, seek an experienced instructor’s help before attempting live operation.
7. How to Practice Using a Portable Water Filter
A portable water filter can be useful when camping in locations where drinking water isn’t readily available.
However, not every filter removes the same contaminants.
Some remove bacteria and protozoa but do not reliably remove viruses, chemicals, or dissolved contaminants.
Learning the capabilities and limitations of your particular filter is just as important as learning how to operate it.
Step 1: Identify the components
Unpack the filter and identify its inlet, outlet, collection equipment, cleaning accessories, and any required seals.
Read the manufacturer’s instructions before using it.
Step 2: Practice assembly
Connect the filter and any compatible bags, bottles, or hoses.
Check that everything fits properly.
Keep the clean-water outlet separate from potentially contaminated components.
Step 3: Practice filtration
For your first practice session, use clean tap water unless the manufacturer specifies otherwise.
Operate the filter according to its instructions.
Pay attention to flow rate, pressure requirements, and how the clean water is collected.
Don’t assume a successful test with tap water proves that the filter can make every natural water source safe.
Step 4: Understand treatment limitations
Learn which organisms and contaminants the filter is designed to address.
Depending on the water source and filter type, additional treatment may be necessary.
Avoid water suspected of chemical contamination, toxic algae, or other hazards that your equipment cannot reliably remove.
The Centers for Disease Control and Prevention (CDC) provides additional guidance on treating drinking water while hiking and camping, including the limitations of portable water filters.
For additional information about safe drinking water outdoors, the Centers for Disease Control and Prevention (CDC) explains how to treat water while hiking and camping, including the limitations of portable water filters
For a more complete explanation of finding and treating wilderness water, see our guide, Wilderness Water: How to Find, Filter and Purify Water Safely.
Step 5: Clean and store the filter
Follow the manufacturer’s approved cleaning and maintenance procedures.
Some hollow-fiber filters can be permanently damaged by freezing after they have become wet.
If freezing may have occurred, follow the manufacturer’s replacement or inspection guidance rather than assuming the filter remains safe.
The Sawyer MINI Water Filtration System is one compact option for learning portable filtration, provided its specifications suit your intended water sources.
Practice exercise: Assemble the filter, process an appropriate quantity of clean practice water, clean the equipment as directed, and repack it without referring to a demonstration video.
8. How to Organize Camping Gear Using Backpacks, Totes, and Storage Bags
Not everyone packs for camping the same way.
Backpackers need to carry their equipment, so weight, balance, and pack volume are major concerns.
But many beginners will drive to a developed campground with equipment stored in the back of a car, SUV, or pickup.
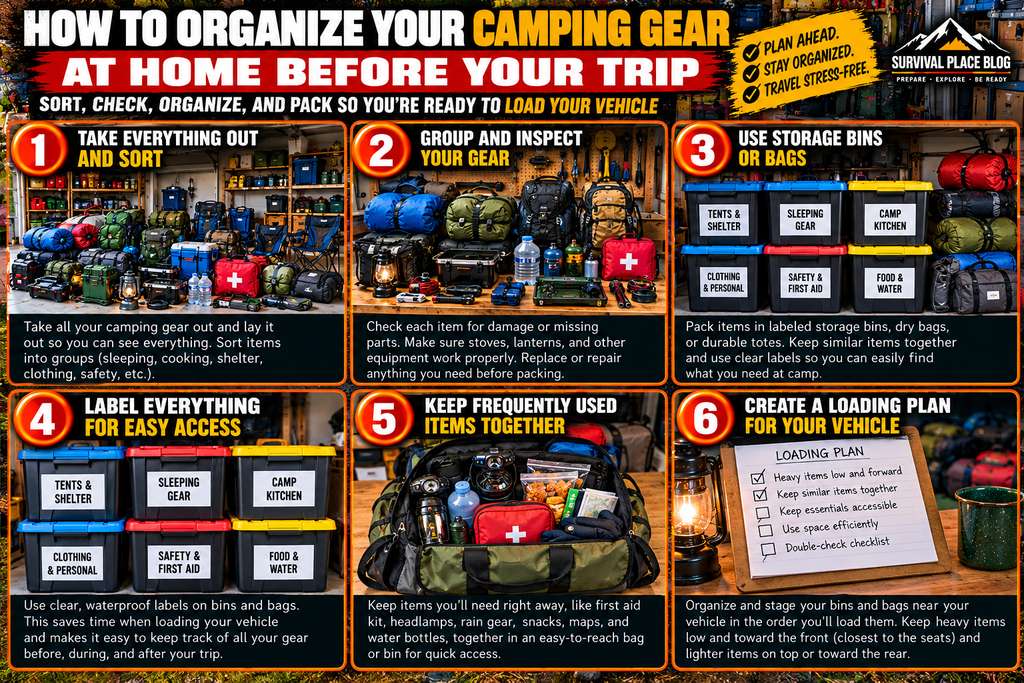
For these campers, storage totes and compartmentalized bags can make organizing equipment much easier.
Step 1: Separate gear into categories
Create groups for:
- Tent and shelter.
- Sleeping equipment.
- Cooking supplies.
- Food and cooler items.
- Lighting and power.
- Water equipment.
- Clothing and personal supplies.
- Safety and emergency equipment.
Keep related equipment together so you aren’t searching through several containers for one item.
Step 2: Choose suitable storage containers
Backpacks work well when equipment must be carried from the vehicle to a campsite or along a trail.
Plastic storage totes are practical for larger, durable supplies used during vehicle-based camping. Lidded containers can help keep equipment organized and protect it from ordinary dirt and splashes, though not all are waterproof.
Compartmentalized camping bags are particularly useful for smaller kitchen items, utensils, cleaning supplies, and miscellaneous equipment.
For example, the GRAOSO 38L Camping Storage Bag — 3-Piece Set provides a dedicated organization option for camp kitchen supplies.
Step 3: Pack by frequency of use
Think about what you’ll need first when you arrive.
Your tent, rainfly, stakes, and setup tools should be easy to access.
Lighting, drinking water, weather protection, and essential safety supplies should also remain accessible.
Items needed only after camp is established can be packed farther back.
Step 4: Protect sensitive equipment
Keep batteries, electronics, medications, and other moisture-sensitive supplies appropriately protected.
Separate food from fuel and potentially contaminating chemicals.
Avoid placing sharp tools or heavy objects where they could damage tent fabric or sleeping equipment.
Step 5: Label your containers
Simple labels such as Kitchen, Lighting, Tent Equipment, and Personal Supplies make unpacking much easier.
You can also keep a small inventory inside each container.
Step 6: Practice unpacking and repacking
Load your equipment into its assigned containers.
Then unpack the supplies required to establish a campsite.
Notice which items are difficult to locate or awkward to access.
Adjust your packing system before the actual trip.
Practice exercise: Have someone name five camping items at random. Try locating each item without opening every storage container.
The goal is a packing system that makes sense to you, not one that looks impressive in photographs.
9. How to Set Up a Practical Camp Kitchen
A well-organized camp kitchen makes cooking, cleaning, and food storage more manageable.
You don’t need an elaborate setup, but having a stable preparation surface and a designated place for supplies can be useful.
Step 1: Choose a suitable outdoor kitchen location
At a real campground, follow the site’s rules and use designated cooking areas where required.
Keep cooking equipment away from tents, dry vegetation, and other hazards.
Account for wind, uneven ground, pedestrian traffic, and manufacturer-required clearances.
Step 2: Practice setting up a folding utility table
A basic folding table can provide a convenient surface for organizing equipment, preparing food, and keeping supplies off the ground.
To practice:
- Place the folded table on a clear, level area.
- Open it according to the manufacturer’s instructions.
- Extend or position the legs.
- Engage all locking mechanisms.
- Check that the table is stable.
- Confirm its weight capacity before adding equipment.
- Practice folding it safely after use.
A 4-Foot Folding Utility Table is one option for campers who want a general-purpose work surface.
Important: A general-purpose plastic folding table should not automatically be used as a stove stand. Heat can damage some surfaces, and the stove may require a different support or specific clearances.
Step 3: Consider a dedicated portable camp kitchen
A folding camp kitchen can provide separate areas for cooking equipment, food preparation, and storage.
The GCI OUTDOOR Slim-Fold Cook Station is one example designed around campground kitchen organization.
When practicing with a camp kitchen:
- Unfold the frame according to the instructions.
- Lock the supports into position.
- Check that the station sits securely on the ground.
- Arrange cookware and utensils.
- Confirm the intended stove is compatible with the designated cooking surface.
- Follow stove and station clearance, heat, and weight requirements.
- Practice cleaning and folding the station after use.
A dedicated cooking station can be convenient, but it doesn’t eliminate the need for safe stove operation.
Step 4: Organize food preparation and cleanup
Keep utensils, cutting surfaces, food containers, and cleaning supplies organized.
Use safe food-handling practices and keep raw foods separate from ready-to-eat foods.
Provide an appropriate handwashing arrangement and follow campground rules for wastewater disposal.
Keep food secured against wildlife and other animals according to local requirements.
Practice exercise: Set up your complete camp kitchen outdoors without cooking. Arrange the equipment, identify the safest cooking position, practice accessing supplies, and pack everything away.
10. How to Load and Organize Your Car or SUV for Camping
Once your equipment is organized, practice loading it into the vehicle you’ll use for your trip.
This is especially helpful if you’re bringing several storage totes, a cooler, a folding table, a tent, and multiple sleeping bags.
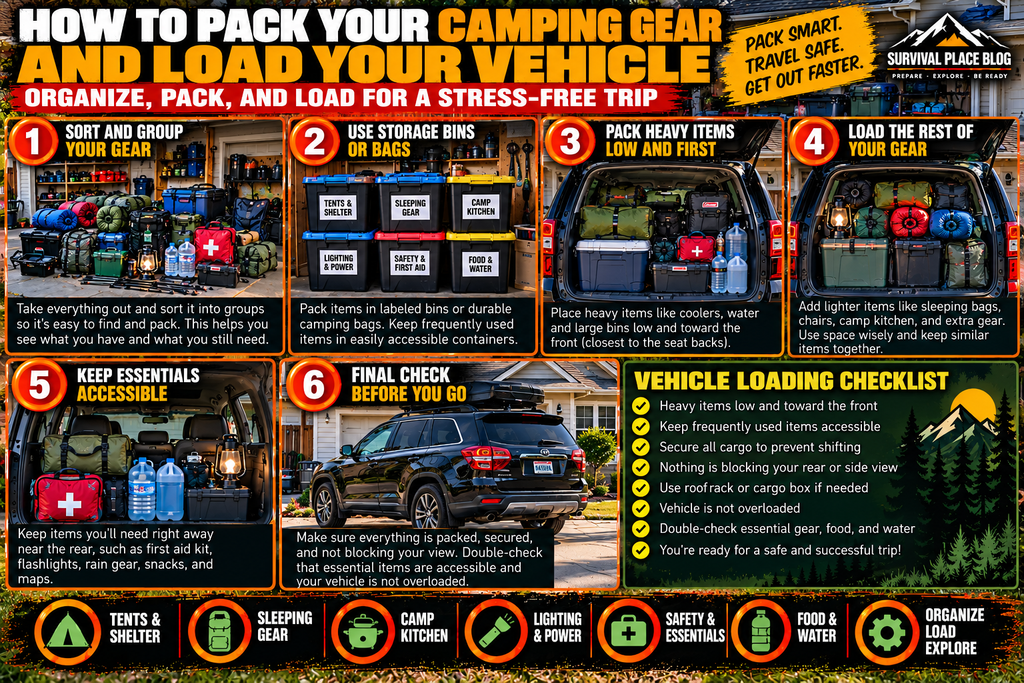
Step 1: Plan your cargo space
Measure or estimate the available cargo area.
Check that your equipment fits without blocking the driver’s view or interfering with passengers and safety equipment.
Follow the vehicle manufacturer’s cargo-weight and load limits.
Step 2: Position heavier equipment low
Place heavier items low in the cargo area and secure them against movement.
Avoid stacking heavy equipment where it could fall onto passengers or fragile supplies.
Use appropriate cargo restraints and attachment points.
Step 3: Keep frequently needed items accessible
Consider keeping the following easy to reach:
- First-aid kit.
- Drinking water.
- Flashlights or headlamps.
- Rain jackets.
- Maps and navigation equipment.
- Tent and basic setup supplies.
Don’t bury important emergency equipment underneath the entire load.
Step 4: Protect fuel and hazardous materials
Transport camping fuel according to the manufacturer’s instructions and applicable rules.
Keep containers secured, upright where required, protected from excessive heat, and away from ignition sources.
Never leave fuel in conditions that violate its storage or transportation instructions.
Step 5: Practice the unloading sequence
Imagine you’ve just arrived at the campground.
Which items will you need first?
Usually, shelter and weather protection take priority over setting up chairs or unpacking recreational supplies.
Organize your vehicle accordingly.
Practice exercise: Load your vehicle with the equipment you intend to bring, secure the load, then practice locating and unloading your shelter equipment.
11. Common Camping Gear Problems and How to Fix Them
Even carefully selected camping equipment can develop problems.
The advantage of practicing at home is discovering these issues before they affect a trip.
Missing tent stakes or damaged poles
Count all tent components before leaving.
Use compatible replacement parts recommended for your tent.
Don’t force damaged poles into position or assume improvised repairs will provide adequate structural support.
Rainfly doesn’t fit correctly
Check its orientation and attachment points.
Review the manufacturer’s instructions and make sure the tent poles and body are assembled correctly.
Sleeping pad loses air
Check the valve and inspect the pad for damage.
Use the manufacturer’s recommended leak-detection and repair methods.
A pad that repeatedly loses air may need repair or replacement before a trip.
Headlamp won’t turn on
Check battery orientation, charging status, lockout modes, and visible damage.
Test the backup light rather than relying on a questionable primary light.
Camping stove won’t ignite
Stop and follow the manufacturer’s troubleshooting procedure.
Do not repeatedly release fuel while attempting ignition.
If you suspect a leak or damaged fuel connection, do not operate the stove.
Water filter has poor flow
Check the manufacturer’s cleaning instructions.
Some filters require approved backflushing or other maintenance.
Never force excessive pressure through a filter or assume that cleaning can correct freeze damage.
Equipment doesn’t fit in the vehicle
Reconsider how items are packed.
Remove unnecessary equipment, choose more efficient storage containers, or adjust the load while maintaining safe weight distribution and cargo security.
Don’t compromise passenger safety to fit additional camping supplies.
Too much equipment to manage
Beginners sometimes bring far more than they need.
A practical approach is to identify essential equipment first, then add convenience items only when space and conditions allow.
The best camping setup isn’t necessarily the largest or most expensive.
It’s the one you understand and can manage safely.
12. Complete a Full Campsite Setup Practice
After testing individual pieces of equipment, it’s time to put everything together.
This exercise simulates arriving at a campground and establishing your campsite.
Choose a day with suitable weather and enough daylight to complete the activity safely.
Your practice campsite exercise
Step 1: Unload your equipment
Use the packing system you’ve developed.
Locate the tent, sleeping equipment, lighting, kitchen supplies, and other essentials.
Step 2: Establish your shelter
Set up the tent, secure it properly, and inspect the rainfly.
Step 3: Prepare your sleeping area
Arrange sleeping pads, sleeping bags, and pillows.
Check that the sleeping system fits comfortably.
Step 4: Organize your lighting
Position the lantern and place headlamps where they can be found easily.
Step 5: Assemble your camp kitchen
Choose a safe outdoor location and set up your table or cooking station.
For this combined exercise, you can practice arranging equipment without operating a fuel-burning stove.
Step 6: Organize water and personal supplies
Identify where drinking water, hygiene supplies, clothing, and first-aid equipment will be kept.
Step 7: Practice an evening routine
After dark, practice using your lighting to move safely around the setup, locate equipment, and enter the tent.
Avoid creating unnecessary trip hazards.
Step 8: Break down and repack
Inspect everything as you take it apart.
Clean and dry equipment as needed.
Return items to their designated containers.
Evaluate your practice session
Ask yourself:
- Could I find everything when I needed it?
- Did I understand how to set up the tent?
- Was my sleeping equipment comfortable?
- Did all my lights work?
- Was my kitchen organization practical?
- Did I discover anything missing or damaged?
- Could I pack everything back into the vehicle safely?
Write down any changes you want to make.
This exercise helps turn individual equipment skills into a practical camping routine.
13. Your Pre-Trip Camping Gear Inspection Checklist
Before leaving for your first camping trip, complete one final inspection.
Tent and shelter
- Tent body inspected.
- Poles, stakes, and guylines accounted for.
- Rainfly checked.
- Tent successfully assembled and repacked.
- All components clean and dry.
Sleeping equipment
- Sleeping bag inspected.
- Sleeping pad tested.
- Insulation suitable for expected conditions.
- Pillows and bedding packed.
- Sleeping system fits inside the tent.
Lighting and power
- Headlamps tested.
- Lantern tested.
- Batteries charged or replaced.
- Backup lighting available.
- Charging equipment packed.
Cooking and kitchen equipment
- Stove inspected.
- Correct fuel identified and safely packed.
- Cookware and utensils organized.
- Folding table or kitchen station tested.
- Food-storage and cleaning supplies packed.
- Cooking and food-storage rules checked.
Water equipment
- Drinking-water containers clean.
- Water filter assembled and tested.
- Filter maintenance completed.
- Water treatment limitations understood.
- Reliable drinking-water plan established.
Storage and transportation
- Equipment organized into bags or totes.
- Containers labeled.
- Vehicle load limits checked.
- Cargo secured.
- Emergency equipment accessible.
- Fuel transported appropriately.
Personal safety
- First-aid kit inspected.
- Appropriate clothing packed.
- Weather forecast reviewed.
- Navigation and communication plans prepared.
- Trip details shared with a trusted person.
- Campsite rules and restrictions reviewed.
A printable version of this checklist can make future trip preparation faster and easier.
14. Ready for the Next Step? Try a Backyard Overnight
Once you’re comfortable setting up and packing your equipment, the next step is using it for a longer period.
A backyard camping overnight can provide a controlled introduction to sleeping outdoors.
It allows you to discover things that a short equipment test might not reveal.
For example:
- Does your sleeping pad remain comfortable through the night?
- Can you find your headlamp easily in the dark?
- Does the tent develop condensation?
- Are you comfortable with nighttime temperatures?
- Can you organize your morning routine?
- Did you bring equipment you never used?
- Was something important missing?
Choose safe weather conditions, keep appropriate access to your home, and supervise children.
The purpose isn’t to create an artificial survival emergency.
It’s to become familiar with the experience of camping before traveling farther from home.
Once you’re comfortable setting up, testing, and organizing your camping equipment at home, the next step is spending an entire night outdoors. Our guide, Backyard Camping for Beginners: Your First Overnight Outdoor Experience, walks you through your first backyard overnight, including sleeping comfortably, managing nighttime routines, and practicing basic camping safety before visiting a campground.
15. Final Thoughts: Practice at Home, Camp With Confidence
Your first camping trip should be an opportunity to enjoy the outdoors, not an unexpected equipment troubleshooting session.
Taking time to practice with your camping gear at home can help you avoid many common beginner problems.
Learn how to set up your tent. Test your sleeping equipment. Check your lighting. Understand your stove’s safety requirements. Practice using your water filter. Organize your supplies so you can find them when needed.
If you’re traveling by car or SUV, take advantage of practical storage solutions such as labeled totes, kitchen organizers, and suitable folding equipment.
Most importantly, don’t assume that owning a piece of equipment means you’re ready to depend on it.
Practice using your equipment, learn its limitations, and make adjustments while you’re still at home.
The confidence you build through these simple exercises can make your first camping trip safer, more organized, and much more enjoyable.