
Primitive Fire-Starting Methods
Affiliate Disclosure: This post contains affiliate links. If you purchase through these links, Survival Place Blog may earn a commission at no additional cost to you. As an Amazon Associate I earn from qualifying purchases.
Fire Safety Notice: Outdoor fires can become dangerous quickly, especially during dry, windy or restricted conditions. Always follow current local fire regulations and land-management rules. Never start a fire when open burning is prohibited, and make sure any permitted fire is completely extinguished before leaving the area
Primitive fire making takes us into a very different category.
Primitive fire-starting methods such as the bow drill and hand drill are valuable skills to learn. They are also considerably more difficult than they can appear in demonstrations. Wood selection, moisture, technique, tinder preparation and weather all affect whether they work.
In a real emergency, the goal isn’t to prove how primitive you can be. The goal is to safely produce fire when you genuinely need it.
These methods can be extremely rewarding to learn. They develop an understanding of friction, wood selection, tinder preparation, ember handling and the amount of work required to produce fire without modern ignition tools.
But watching someone experienced create a bow-drill ember in a few minutes can give beginners the wrong impression.
Before building a fire, check the National Park Service’s Wildland Fire Safety for Park Visitors guidance for additional information about wildfire conditions, fire restrictions and responsible outdoor fire use.
Success may depend on:
- Wood species
- Dryness
- Spindle dimensions
- Fireboard preparation
- Cordage
- Body position
- Downward pressure
- Speed
- Tinder quality
- Experience
Primitive fire isn’t something you should assume you’ll figure out because you’ve read the instructions once.
Practice is the difference.
For the bigger picture of what to prioritize when a wilderness emergency begins, see our guide, Outdoor Survival Basics: The Rule of Threes and What to Prioritize First.
Method 1: Bow Drill
The bow drill is one of the best-known friction-fire methods.
Compared with a hand drill, the bow allows the spindle to rotate rapidly without requiring you to continuously roll it between your palms.
A typical bow-drill set includes:
- Bow
- Cord
- Spindle
- Fireboard or hearth board
- Bearing block
- Prepared tinder bundle
Step 1: Prepare the Fireboard
Create a shallow depression where the spindle will rotate.
After establishing the spindle’s position, a properly prepared notch allows the hot wood dust generated by friction to collect in one area.
The goal isn’t simply to make smoke.
The goal is to produce enough hot material for that dust to form a persistent glowing coal.
Step 2: Prepare the Bow and Spindle
The bow should be comfortable to move back and forth while maintaining control of the spindle.
Wrap the cord around the spindle so moving the bow rotates it.
The cord needs enough tension to grip without preventing the spindle from rotating properly.
Step 3: Stabilize Your Position
Good body mechanics make an enormous difference.
Use the bearing block to apply controlled downward pressure from above while keeping the spindle as stable and vertical as possible.
Your bowing motion should be controlled rather than frantic.
Step 4: Build Heat
Move the bow back and forth, rotating the spindle against the fireboard.
As friction increases, you should begin producing dark wood dust and smoke.
Maintain the combination of speed and pressure necessary to generate heat.
Step 5: Develop the Coal
Seeing smoke doesn’t mean you’re finished.
Continue until the accumulated wood dust supports a coal that continues glowing after you stop drilling.
This is one of the places practice matters most. Beginners frequently stop as soon as they see smoke and discover that they haven’t actually produced a sustainable ember.
Step 6: Transfer the Coal
Carefully move the coal into your prepared tinder bundle.
Fold the tinder around it without crushing or smothering it. Provide oxygen gradually until the ember spreads through the tinder.
Once the bundle ignites, place it into your prepared kindling structure and begin feeding the fire.
If you’re practicing the bow-drill method, TECEUM 550 Paracord Type III can provide durable cordage for experimenting with bow-drill setups while also serving other general camp and emergency uses.
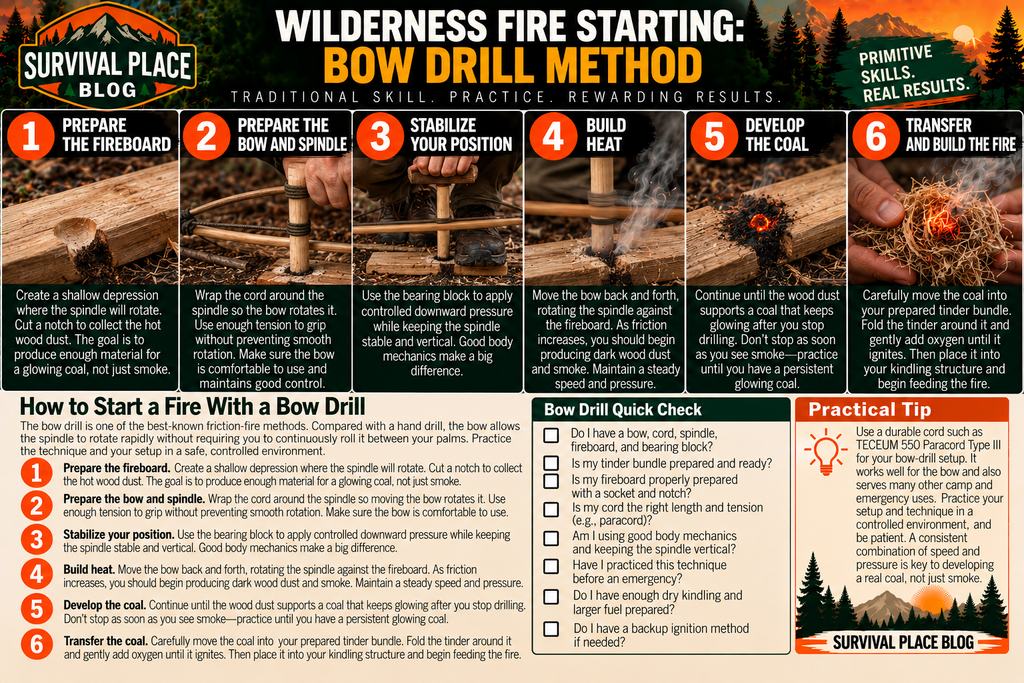
How to Start a Fire With a Bow Drill
The bow drill is one of the best-known friction-fire methods. Compared with a hand drill, the bow allows the spindle to rotate rapidly without requiring you to continuously roll it between your palms.
A typical bow-drill set includes a bow, cord, spindle, fireboard or hearth board, bearing block, and prepared tinder bundle.
Practice Before You Rely on It: The bow drill is a primitive fire-starting method that requires practice to develop the technique, body mechanics, tinder preparation, and patience needed to produce a reliable coal. It should not be considered a dependable emergency fire-starting method if you have never successfully used one before. Practice this technique in a safe, controlled environment and learn to consistently produce a coal before considering it a practical wilderness skill. When heading into the field, carry a reliable ignition source rather than depending on an unpracticed primitive method.
- Prepare the fireboard. Create a shallow depression where the spindle will rotate. After establishing the spindle’s position, prepare a notch that allows the hot wood dust generated by friction to collect in one area. The goal is to produce enough hot material for that dust to form a persistent glowing coal—not simply smoke.
- Prepare the bow and spindle. Wrap the cord around the spindle so moving the bow rotates it. The cord needs enough tension to grip the spindle without preventing smooth rotation. Make sure the bow is comfortable to move back and forth while maintaining control.
- Stabilize your position. Use the bearing block to apply controlled downward pressure from above while keeping the spindle as stable and vertical as possible. Good body mechanics make a significant difference.
- Build heat. Move the bow back and forth, rotating the spindle against the fireboard. As friction increases, you should begin producing dark wood dust and smoke. Maintain a controlled combination of speed and pressure.
- Develop the coal. Continue until the accumulated wood dust supports a coal that continues glowing after you stop drilling. Seeing smoke doesn’t mean you’re finished. Practice until you can consistently produce a sustainable ember.
- Transfer the coal. Carefully move the coal into your prepared tinder bundle. Fold the tinder around it without crushing or smothering it. Gently provide oxygen until the ember spreads through the tinder. Once the bundle ignites, place it into your prepared kindling structure and begin feeding the fire.
Bow Drill Quick Check
□ Do I have a bow, cord, spindle, fireboard, and bearing block?
□ Is my tinder bundle prepared and ready?
□ Is the fireboard properly prepared?
□ Is my cord properly tensioned?
□ Can I maintain a stable position and controlled motion?
□ Have I practiced the technique before an emergency?
□ Do I have enough kindling and larger fuel prepared?
□ Do I have a backup ignition method if needed?
Practical tip: Don’t stop just because you see smoke. The goal is a persistent glowing coal. Maintain controlled speed and pressure, and once the coal is transferred to the tinder and begins to flame, gently add oxygen to help it grow. Have your kindling prepared before you start.
Method 2: Hand Drill
The hand drill removes the bow and cordage from the process.
That sounds simpler.
In practice, it can be considerably harder.
The spindle is rotated directly between the palms while downward pressure is maintained against the fireboard. Your hands naturally travel down the spindle as you work, requiring you to reposition them repeatedly.
The basic sequence is:
- Prepare a suitable dry spindle and fireboard
- Create and burn in the spindle depression
- Prepare the notch for collecting hot wood dust
- Position the spindle vertically
- Rotate it rapidly between your palms while applying downward pressure
- Build sufficient heat and dust to develop a coal
- Transfer the coal into prepared tinder
Material selection and technique are critical.
Humidity, wood properties, hand technique and physical endurance can all affect the outcome. Even someone who understands the concept may struggle to produce a coal without substantial practice.
That’s precisely why the hand drill is valuable to learn before an emergency rather than during one.
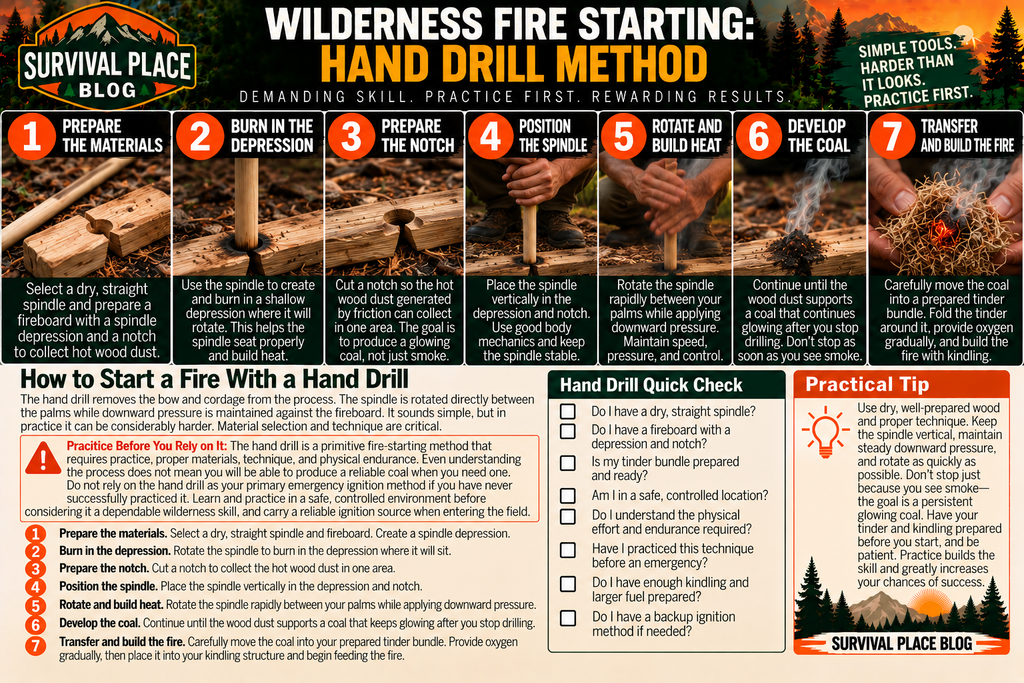
How to Start a Fire With a Hand Drill
The hand drill removes the bow and cordage from the process. That sounds simpler, but in practice it can be considerably harder. The spindle is rotated directly between your palms while downward pressure is maintained against the fireboard, requiring you to repeatedly reposition your hands as they travel down the spindle.
Practice Before You Rely on It
The hand drill is a primitive fire-starting method that requires practice to develop the technique, body mechanics, physical endurance, and tinder preparation needed to produce a reliable coal. Even understanding the process does not mean you will be able to successfully produce an ember when you need one. Do not rely on the hand drill as your primary emergency ignition method if you have never successfully practiced it. Learn and practice the technique in a safe, controlled environment before considering it a dependable wilderness skill, and carry a reliable ignition source when entering the field.
- Prepare the materials. Select a suitable dry spindle and fireboard. The materials need to be properly prepared before you begin.
- Burn in the depression. Use the spindle to create and burn in a shallow depression in the fireboard where the spindle will rotate. This helps establish a proper working surface.
- Prepare the notch. Cut a notch beside the spindle depression so the hot wood dust created by friction can collect in one area. This material is what will eventually support the glowing coal.
- Position the spindle. Place the spindle vertically in the depression and notch. Maintain a stable position and prepare to apply controlled downward pressure.
- Rotate and build heat. Rotate the spindle rapidly between your palms while applying downward pressure against the fireboard. As friction increases, you should begin producing dark wood dust and smoke. Maintain controlled speed and pressure rather than rushing the movement.
- Develop the coal. Continue working until the accumulated wood dust supports a coal that continues glowing after you stop drilling. Smoke alone does not mean you have successfully produced an ember.
- Transfer and build the fire. Carefully move the glowing coal into your prepared tinder bundle. Fold the tinder around it without crushing or smothering the ember. Provide oxygen gradually until the tinder begins to flame, then gently blow on the flame to help it grow. Transfer the burning tinder into your prepared kindling structure and gradually build the fire.
Hand Drill Quick Check
□ Do I have a dry, straight spindle?
□ Do I have a properly prepared fireboard?
□ Is the spindle depression and notch ready?
□ Is my tinder bundle prepared and ready?
□ Am I in a safe, controlled location?
□ Have I practiced the technique before an emergency?
□ Do I have enough kindling and larger fuel prepared?
□ Do I have a reliable backup ignition method?
Practical tip: Use dry, well-prepared wood and focus on consistent technique rather than simply trying to move as fast as possible. Keep the spindle vertical, maintain steady downward pressure, and rotate as quickly as you can while maintaining control. Don’t stop just because you see smoke—the goal is a persistent glowing coal. Once the tinder starts to flame, gently blow on it to add oxygen and help it grow.
Method 3: Fire Plough
The fire plough uses friction in a different way.
Instead of rotating a spindle, a harder stick or wooden edge is driven repeatedly along a groove in a softer piece of wood.
The movement creates friction and pushes heated wood fibers toward the end of the groove.
With appropriate materials and enough speed, pressure and repetition, those fibers may develop into an ember.
The general process is:
- Select compatible, dry materials
- Prepare a groove in the fireboard
- Drive the plough rapidly along the groove
- Maintain pressure and speed
- Allow hot wood material to accumulate
- Develop the material into a sustainable ember
- Transfer the ember to prepared tinder
Like the hand drill, this method can require considerable effort and proper material selection.
It is worth exploring as a primitive skill, but it should not be treated as a guaranteed emergency solution.
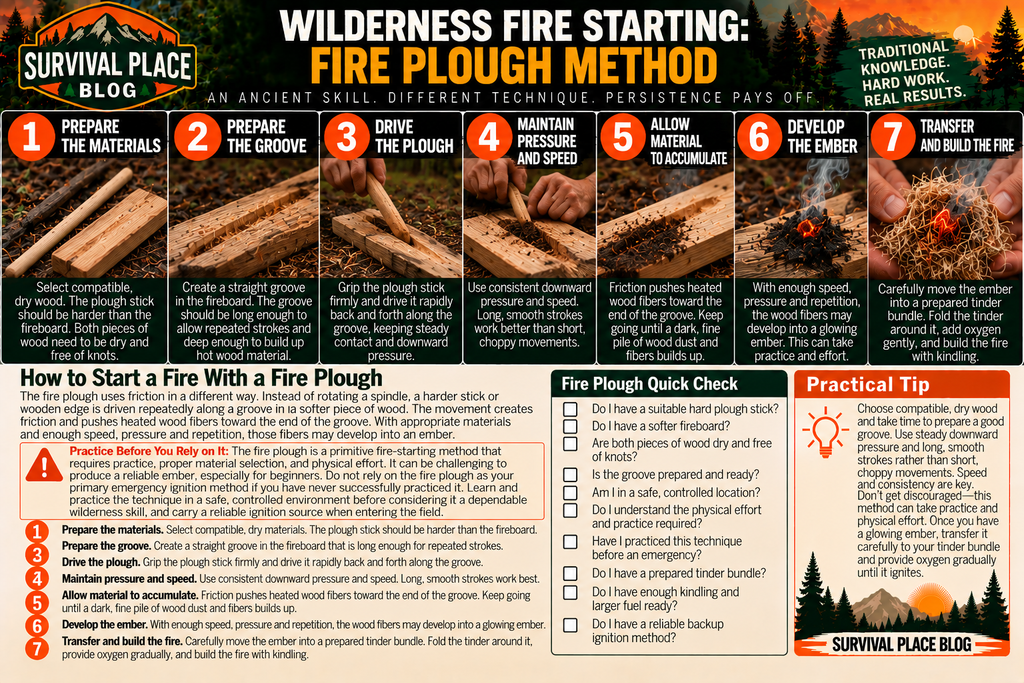
How to Start a Fire With a Fire Plough
The fire plough uses friction in a different way from a bow drill or hand drill. Instead of rotating a spindle, a harder stick or wooden edge is driven repeatedly along a groove in a softer piece of wood. The movement creates friction and pushes heated wood fibers toward the end of the groove.
With appropriate materials and enough speed, pressure, and repetition, those fibers may develop into an ember.
Practice Before You Rely on It
The fire plough is a primitive fire-starting method that can require considerable effort, proper material selection, and practice. Success depends on factors such as wood selection, dryness, technique, pressure, speed, and physical endurance. Do not rely on this method as your primary emergency ignition source if you have never successfully practiced it. Learn and practice the technique in a safe, controlled environment before considering it a dependable wilderness skill, and carry a reliable ignition source when entering the field.
- Select compatible materials. Choose dry wood with a harder stick or wooden edge for the plough and a softer piece of wood for the fireboard. Have your tinder and kindling prepared before you begin.
- Prepare the groove. Create a suitable groove in the fireboard. It should provide enough length and depth for repeated strokes and allow heated wood material to collect toward one end.
- Drive the plough. Grip the plough firmly and drive it repeatedly along the groove. Keep the movement controlled and maintain contact with the fireboard.
- Maintain pressure and speed. Use consistent downward pressure and speed. Controlled, repeated strokes are more useful than simply trying to move as fast as possible.
- Allow material to accumulate. Friction pushes heated wood fibers toward the end of the groove. Continue working until a dark, fine pile of wood dust and fibers begins accumulating.
- Develop the ember. Continue with sufficient speed, pressure, and repetition until the accumulated material develops into a glowing ember. Smoke alone does not mean you’ve produced a sustainable coal.
- Transfer and build the fire. Carefully move the glowing ember into your prepared tinder bundle. Fold the tinder around it without crushing or smothering the ember. Provide oxygen gradually until the tinder begins to flame, then gently blow on the flame to help it grow. Transfer the burning tinder to your prepared kindling and build the fire gradually.
Fire Plough Quick Check
□ Do I have compatible dry wood?
□ Is the plough stick harder than the fireboard?
□ Is the groove prepared and ready?
□ Is my tinder bundle prepared?
□ Am I in a safe, controlled location?
□ Have I practiced this technique before an emergency?
□ Do I have enough kindling and larger fuel prepared?
□ Do I have a reliable backup ignition method?
Practical tip: Take the time to prepare a good groove and use steady, controlled strokes rather than short, choppy movements. Speed, pressure, and consistency work together to generate heat. Don’t get discouraged if it takes practice and physical effort. Once you have a glowing ember, transfer it carefully to your tinder bundle and provide oxygen gradually until it ignites.
Why Primitive Fire Starting Often Fails
Primitive methods usually don’t fail because friction fire is impossible.
They fail because one or more conditions aren’t right.
The Wood Is Too Damp
Moisture absorbs heat and makes it difficult to reach the temperature needed to develop a coal.
Wood that feels relatively dry on the outside can still contain enough moisture to make friction fire difficult.
The Materials Don’t Work Well Together
Not every random stick and board makes a good friction-fire set.
People who become proficient at primitive fire learn which locally available materials work well and how to recognize them.
The Tinder Isn’t Ready
Producing an ember is only half the job.
If your tinder can’t accept and expand that ember, all the work required to produce it can be wasted.
Poor Technique
Too little pressure may not generate sufficient heat. Too much pressure at the wrong stage can make rotation difficult.
Poor body position wastes energy.
Inconsistent motion reduces efficiency.
These are physical skills developed through repetition.
Stopping Too Soon
Smoke is encouraging, but smoke is not the same as a sustainable coal.
This is particularly important with bow drills.
Learning to recognize when the accumulated material has actually formed a viable coal comes from experience.
Turning an Ember Into Flame
Primitive fire-starting methods often produce an ember rather than an immediate flame.
That changes the process.
Your tinder bundle should already be prepared before attempting to create the ember.
Once you have a viable coal, carefully place it into the tinder and gently close the material around it.
Introduce oxygen gradually.
As the ember spreads, smoke should increase. Continue supplying controlled airflow until the tinder reaches ignition.
Be prepared for the transition to happen quickly.
Once the tinder flames, move it immediately into the prepared kindling and allow the smallest material to ignite before adding progressively larger pieces.
Don’t crush a new fire under oversized fuel.
Final Thoughts
The ability to create fire from natural materials is one of the most fascinating traditional outdoor skills you can practice. Successfully producing a bow-drill coal or catching a traditional flint-and-steel spark gives you a much deeper appreciation for what fire actually requires.
But the biggest lesson shouldn’t be that modern tools are unnecessary.
It should be the opposite.
Once you’ve struggled to make fire using friction, wet tinder or marginal materials, carrying a lighter, backup matches, ferro rod and dry tinder makes even more sense.
Learn the primitive methods because they’re valuable skills.
Practice them because skills deteriorate when they’re never used.
But when you head into the wilderness, prepare so that your safety doesn’t depend on everything going perfectly.