
Affiliate Disclosure: This post contains affiliate links. If you purchase through these links, Survival Place Blog may earn a commission at no additional cost to you. As an Amazon Associate I earn from qualifying purchases.
Dehydrating food for long-term storage is one of the simplest ways to turn fresh food into a lightweight, compact supply that can be used months later.
For preparedness, it has another advantage: dried food doesn’t depend on a freezer staying powered.
That makes home dehydration useful for emergency food storage, camping, backpacking, garden harvests, bulk purchases and reducing food waste.
But successful dehydration involves more than putting sliced food into a dehydrator and waiting. Different foods require different preparation, drying and storage methods. Moisture left inside food can lead to mold and spoilage, while improper preparation of meat can create a genuine food-safety risk.
This guide explains how to dehydrate food for long-term storage safely, how to tell when it is dry enough, how to package it and what shelf-life expectations are realistic.
Why Dehydrate Food for Long-Term Storage?
Humans have dried food for thousands of years because removing moisture slows the processes that cause food to spoil.
Modern electric dehydrators make the process far more controlled than traditional sun drying.
For a preparedness pantry, dehydration offers several practical advantages:
- Less dependence on refrigeration. Properly dried foods don’t require refrigerator or freezer space.
- Smaller storage footprint. Removing water dramatically reduces the weight and volume of many foods.
- Less food waste. Extra garden produce and bulk purchases can be preserved instead of discarded.
- Portable emergency food. Dried foods work well in camping supplies, vehicle kits and evacuation bags.
- Easy meal ingredients. Dried vegetables can go directly into many soups, stews and other cooked meals.
- Better pantry rotation. Foods you already eat can become part of your emergency supply instead of sitting untouched for years.
Dehydration isn’t a magic method for making every food last decades. Think of it as one component of a diversified food-storage plan.
Dehydrated Food vs. Freeze-Dried Food
These terms are sometimes used interchangeably, but the processes are very different.
A conventional dehydrator uses warm moving air to remove moisture from food.
Freeze-drying freezes food and then removes frozen water under a vacuum through sublimation. The equipment and process are considerably different.
Freeze-dried foods can achieve very low moisture levels and, when professionally processed and properly packaged, some products are designed for very long storage periods.
Home-dehydrated food should not automatically be given the same shelf-life expectations.
For most households, a dehydrator is considerably less expensive and easier to use. It’s excellent for fruits, vegetables, herbs, fruit leather and properly prepared jerky.
What Equipment Do You Need?
You don’t need a commercial kitchen to start dehydrating food.
A few basic tools make the process much easier.
Food Dehydrator
For regular use, an electric food dehydrator is the most practical option.
Look for:
- Adjustable thermostat
- Fan or blower for air circulation
- Enclosed heating element
- Removable, washable trays
- Temperature range appropriate for the foods you intend to dry
- Enough tray capacity for the amount of food you’ll normally process
An adjustable thermostat is particularly useful because different foods may require different preparation and drying procedures.
Oven
Some foods can be dried in an oven if the oven can maintain a sufficiently low, stable temperature and provide adequate airflow.
The problem is that many household ovens don’t operate well at dehydration temperatures. They may cycle too hot, use considerably more energy or provide poor airflow.
If you’re planning to preserve food regularly, a dedicated dehydrator usually provides better control.
Food Thermometer
A reliable food thermometer is especially important when preparing meat or poultry for jerky.
Don’t rely on appearance to determine whether raw meat has reached a safe temperature.
Sharp Knife or Food Slicer
Uniform pieces dry more evenly.
A sharp knife works fine for small batches. A mandoline or food slicer can make consistent slices easier when processing larger quantities.
Storage Containers
Depending on how quickly you’ll use the food, storage options can include:
- Clean, dry canning jars
- Airtight food-storage containers
- Freezer-quality storage bags
- Vacuum-sealed bags
The best container won’t compensate for food that wasn’t dried adequately in the first place.
Start With Good-Quality Food
Dehydration preserves food; it doesn’t improve poor-quality ingredients.
Choose fresh fruits and vegetables without mold or decay. Wash produce thoroughly and remove damaged areas.
For meat, begin with fresh, properly refrigerated meat and follow safe handling practices throughout preparation.
Wash your hands, utensils, cutting boards and work surfaces before and after handling food, particularly raw meat.
Uniform Slices Matter
One of the easiest ways to improve dehydration results is to cut food into pieces of similar thickness.
If one apple slice is twice as thick as another, they won’t finish drying at the same time.
That creates two problems:
The thinner piece may become excessively dry while the thicker piece can retain enough moisture to cause storage problems.
Uniform pieces make drying times more predictable and make it easier to judge when the entire batch is finished.
How to Prepare Fruit for Dehydration
Fruit is one of the easiest places for beginners to start.
Apples, pears, peaches, apricots, bananas, berries and many other fruits can be dried successfully, although preparation differs by fruit.
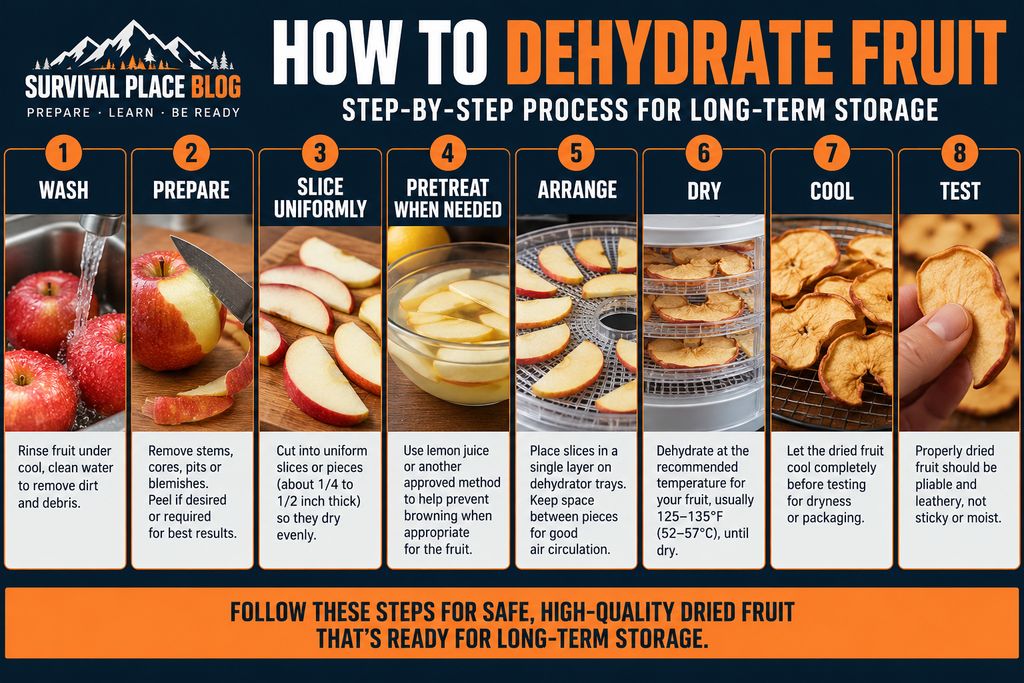
Basic preparation generally involves:
- Wash the fruit.
- Remove stems, pits or cores as appropriate.
- Peel when desired or recommended for the particular fruit.
- Cut into uniform pieces.
- Apply an appropriate pretreatment when needed.
- Arrange pieces in a single layer on dehydrator trays.
Some light-colored fruits darken after cutting. Pretreatments such as an ascorbic-acid solution can help reduce browning.
Lemon juice is commonly used at home for color preservation, but follow a tested dehydration recipe for the specific fruit you’re processing rather than assuming one treatment works equally well for everything.
How to Tell When Fruit Is Dry
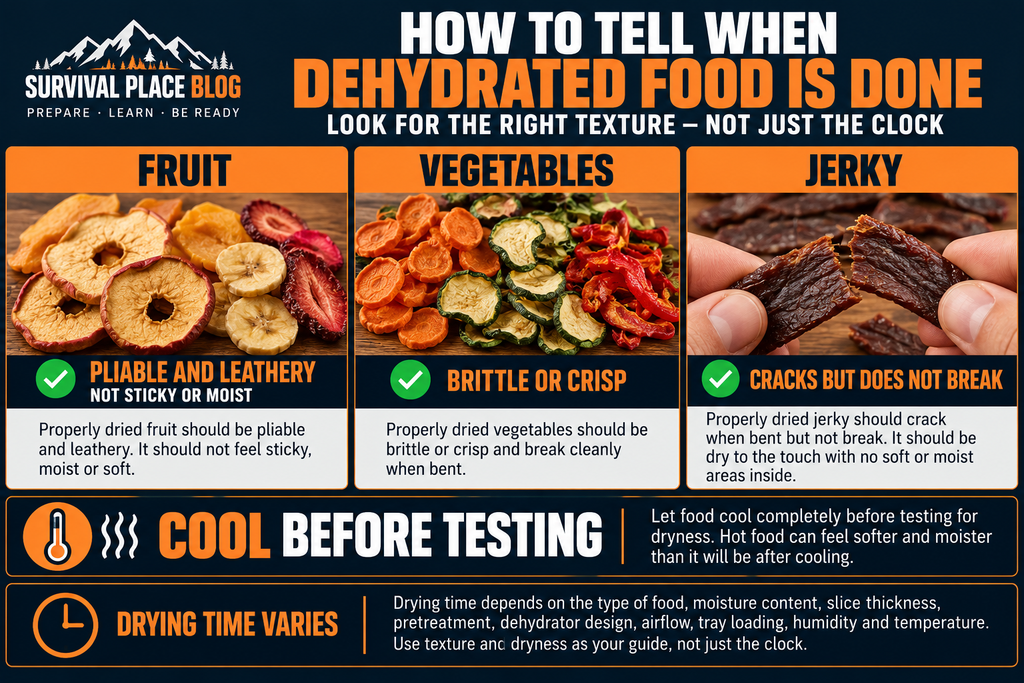
Dry fruit shouldn’t have visible moisture when cut or squeezed.
Depending on the fruit, properly dried pieces may be pliable and leathery rather than brittle.
Don’t judge the food while it is still hot.
Remove a piece, allow it to cool and then test it. Warm food can feel softer and moister than it will after cooling.
Different fruits contain different amounts of water and sugar, so drying times vary considerably.
Thickness, humidity, dehydrator design and how heavily trays are loaded also affect drying time.
For that reason, use drying times as estimates—not as the sole test for doneness.
Conditioning Dried Fruit
This is an important step that the original version of this guide mentioned, but it deserves clarification:
Conditioning primarily applies to dried fruit.
Pieces in the same batch may finish with slightly different moisture levels. Conditioning allows the remaining moisture to equalize throughout the batch and gives you an opportunity to detect excess moisture before long-term packaging.
After the fruit has completely cooled:
- Place it loosely in clean, dry glass or plastic containers.
- Seal the containers.
- Let them stand for 7 to 10 days.
- Shake the containers daily to separate the pieces.
- Watch carefully for condensation.
If condensation appears, the fruit needs additional drying.
If you see mold, discard the affected food rather than trying to save it.
The National Center for Home Food Preservation recommends this conditioning process for home-dried fruit.
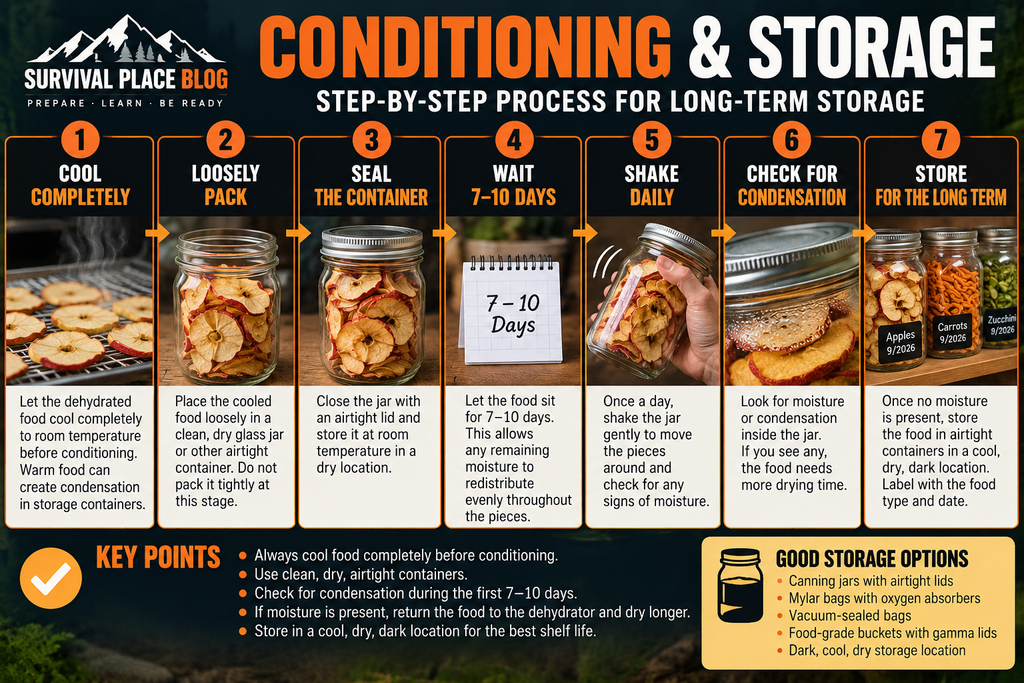
Step-by-step conditioning and storage process for properly dried fruit, including cooling, moisture checks, packaging, and long-term storage.How to Prepare Vegetables for Dehydration
Vegetables require a little more preparation than many fruits.
Start by washing them thoroughly and removing bruised, damaged, fibrous or woody portions.
Cut the vegetables into uniform pieces.
Many vegetables should be blanched before drying.
Blanching uses heat to stop enzyme activity that can otherwise affect color, flavor and quality during storage. It can also help vegetables dry and later rehydrate more effectively.
Follow tested instructions for the particular vegetable because blanching methods and times vary.
After blanching, drain the vegetables and arrange them in a single layer on dehydrator trays.
How to Tell When Vegetables Are Dry
Unlike most dried fruits, properly dried vegetables should generally be brittle or crisp.
The National Center for Home Food Preservation notes that vegetables are dried to roughly 10% moisture and are sufficiently dry that they don’t require the fruit-conditioning step.
Again, allow a test piece to cool before deciding whether it is finished.
If pieces still feel soft or moist where they should be crisp, continue drying.
Drying Herbs
Herbs are another useful food to preserve.
Homegrown parsley, basil, oregano, thyme, rosemary and similar herbs can be dried for later cooking.
Harvest healthy herbs, remove damaged material and rinse when necessary. Remove excess surface moisture before drying.
Because leaves are thin, herbs generally dry much faster than thick fruits or vegetables.
Once thoroughly dry, store them in airtight containers away from heat and light. For best flavor, keep leaves as whole as practical and crush them when you’re ready to use them.
Making Jerky Safely
This is where we need to be especially careful.
The old version of this article suggested simply dehydrating meat at 145–155°F. We’re replacing that advice because current USDA guidance calls for an additional safety step.
USDA recommends heating meat to 160°F and poultry to 165°F before dehydration. After that safety heating step, USDA says the meat can be dried in a dehydrator that maintains approximately 130–140°F.
Why?
A dehydrator operating at relatively low temperatures can remove moisture before raw meat gets hot enough to destroy harmful bacteria. As the meat dries, surviving bacteria can become more heat resistant.
Basic Jerky Safety Rules
- Start with lean meat and trim visible fat.
- Keep raw meat refrigerated during preparation.
- Thaw frozen meat in the refrigerator, not on the counter.
- Marinate meat in the refrigerator.
- Don’t reuse marinade that has contacted raw meat.
- Heat meat to 160°F and poultry to 165°F before dehydrating.
- Verify temperature with a food thermometer.
- Use a dehydrator capable of maintaining the appropriate drying temperature.
USDA describes properly dried jerky as cracking but not breaking when a test piece is bent.
Jerky is not the place to improvise temperatures or rely on “that’s how we’ve always done it.” Use tested food-safety guidance.
Foods That Aren’t Good Candidates for Simple Home Dehydration
Not everything in the refrigerator belongs in a dehydrator.
Foods with high fat content can become rancid, and some prepared foods don’t dry uniformly enough for dependable storage.
Use tested recipes and instructions for the specific food you intend to preserve.
Be particularly cautious about experimenting with:
- Fatty meats
- High-fat foods
- Dairy-heavy foods
- Eggs or egg-based mixtures
- Complete meals containing ingredients with very different moisture and fat levels
A dehydrator is a preservation tool, not a guarantee that any food placed inside becomes shelf stable.
How Long Does Food Take to Dehydrate?
There’s no single reliable chart that can tell you exactly when every batch will finish.
Drying time changes with:
- Food type
- Starting moisture
- Slice thickness
- Pretreatment
- Dehydrator design
- Air circulation
- Tray loading
- Room humidity
- Drying temperature
Two batches of apples can take different amounts of time even when they’re prepared similarly.
That’s why texture and dryness are more important than the clock.
Follow a tested recipe for the food and begin checking it as the expected drying window approaches.
Cool Food Completely Before Packaging
Don’t take hot food directly from the dehydrator and immediately seal it for long-term storage.
Allow it to cool first.
Warm food sealed inside a container can create condensation. That puts moisture right back into the environment you worked to dry.
Once the food is completely cool—and fruit has been conditioned when appropriate—it can be packaged.
Packaging Dehydrated Food
Your goal after drying is simple:
Keep moisture, air, insects and light from degrading the food.
The National Center for Home Food Preservation recommends clean, dry, insect-proof containers and notes that vacuum packaging is also an option.
Useful choices include:
Mason Jars
Glass jars are convenient for foods you use regularly.
One advantage is visibility: you can see condensation or other changes inside the container.
Airtight Containers
Food-safe containers with tight-fitting lids work well for foods that will be used relatively soon.
Vacuum-Sealed Bags
Vacuum sealing can reduce air exposure and create compact packages.
However, vacuum sealing is not a substitute for adequate drying.
Food must already be properly dried before it is packaged.
Mylar Bags and Oxygen Absorbers
Mylar bags and oxygen absorbers are popular in preparedness circles, but don’t treat them as a magic way to turn incompletely dried food into safe long-term storage.
Reduced-oxygen packaging changes the storage environment; it doesn’t correct an unsafe moisture level.
Use packaging methods appropriate to the particular food and follow tested preservation guidance.
For home-dehydrated foods, we’re going to prioritize proper drying, appropriate packaging, cool storage and regular rotation rather than promising extreme shelf lives.
Store Dehydrated Food in a Cool, Dry, Dark Place
Heat, moisture and light work against long-term food quality.
Store packaged dehydrated foods somewhere:
- Cool
- Dry
- Dark
- Protected from insects and rodents
- Away from major temperature swings
The National Center for Home Food Preservation recommends cool, dry, dark storage and gives a general recommended storage range for dried foods of approximately 4 months to 1 year, depending on the food and conditions. It notes that many dried fruits can retain quality for about one year at 60°F but only around six months at 80°F, while vegetables generally have shorter storage lives.
That’s much more realistic than assuming every home-dehydrated food will remain high quality for “several years.”
Why Storage Temperature Matters
A preparedness pantry in a hot garage isn’t equivalent to one in a cool interior room.
Higher storage temperatures accelerate quality loss.
If possible, select the coolest practical location in your home that remains dry and doesn’t freeze or experience large temperature swings.
This is another reason to rotate emergency food instead of sealing it away and forgetting about it.
The best preparedness food is food your household already eats and replaces routinely.
Label Everything
Every package should at least include:
- Food name
- Date dehydrated
- Any relevant preparation information
You can also add:
- Quantity
- Expected use
- Rehydration instructions
A package of dried food isn’t very useful two years later if nobody remembers what it is or when it was prepared.
Inspect Stored Food Regularly
Food storage isn’t “pack it and forget it.”
Periodically inspect your dehydrated foods.
Look for:
- Condensation
- Moisture inside containers
- Mold
- Unusual odors
- Insect activity
- Damaged packaging
If dried food has absorbed moisture but shows no signs of spoilage, authoritative preservation guidance may allow it to be redried and repackaged. Moldy food should be discarded.
When in doubt about the safety of stored food, don’t gamble with it.
How to Rehydrate Dehydrated Food
Many dried foods can be rehydrated with water before cooking.
Others can go directly into dishes containing enough liquid.
Dried vegetables are particularly convenient in:
- Soups
- Stews
- Chili
- Sauces
- Rice dishes
The National Center for Home Food Preservation notes that dried vegetables can be soaked for roughly 1–2 hours to reconstitute them and recommends using the soaking water in cooking to retain nutrients.
The exact amount of water and rehydration time depends on the food.
Experiment with foods you’re storing before an emergency.
You don’t want the first time you prepare your emergency meals to be during a five-day blackout.
Building an Emergency Pantry With Dehydrated Foods
Don’t try to dehydrate a year’s worth of food in one weekend.
Build gradually.
Start with foods your household already uses.
For example:
Month 1: Learn apples, bananas or another simple fruit.
Month 2: Add a vegetable you regularly cook with.
Month 3: Build several soup or stew ingredients.
Month 4: Learn a tested jerky method if your household eats meat.
As your skills improve, rotate your dried foods into normal meals and replace what you use.
That gives you experience with the food while steadily increasing your emergency supply.
Dehydrated Food for Bug-Out Bags and Camping
Removing water makes food lighter, which is why dehydration is useful beyond the home pantry.
Dried fruits, properly prepared jerky and other appropriate dried foods can work well for camping, hiking and evacuation kits.
But remember the tradeoff:
The water removed during dehydration eventually has to come from somewhere.
If your emergency plan depends heavily on dehydrated meals, your water plan has to account for drinking, cooking and rehydration.
That matters even more if you’re traveling on foot.
Common Food-Dehydration Mistakes
Cutting Pieces Too Thick
Thick or uneven pieces can remain moist inside even when the outside feels dry.
Overloading Trays
Air needs to circulate around the food. Don’t pile pieces on top of one another unless the specific dehydrator instructions permit it.
Packaging Food While Warm
Warm food can create condensation after sealing.
Cool it completely first.
Skipping Fruit Conditioning
A batch of fruit may contain pieces with different residual moisture levels.
Conditioning helps equalize that moisture and reveals condensation before final storage.
Assuming Vegetables Need Fruit Conditioning
Properly dried vegetables are generally brittle enough that the fruit-conditioning process isn’t necessary.
Using Dehydration Time as the Only Test
Humidity, slice thickness and equipment vary.
Check the actual food for dryness.
Assuming Vacuum Sealing Makes Moist Food Safe
It doesn’t.
Dry first. Package second.
Treating Home-Dehydrated Food Like 25-Year Freeze-Dried Food
They’re different preservation methods with different storage expectations.
Drying Raw Meat Without a Verified Safety Step
Follow USDA guidance for heating meat and poultry before dehydration rather than assuming the dehydrator alone will make raw meat safe.
Dehydrating Food for Long-Term Storage Checklist
Before starting a batch:
- Choose fresh, good-quality food.
- Find tested instructions for the specific food.
- Wash hands and sanitize appropriate work surfaces.
- Wash produce.
- Cut pieces uniformly.
- Pretreat fruit when appropriate.
- Blanch vegetables when recommended.
- Follow USDA safety guidance when making jerky.
During drying:
- Arrange pieces for adequate airflow.
- Use the appropriate temperature for the tested method.
- Rotate trays if your dehydrator requires it.
- Check food as it approaches the expected drying time.
- Test cooled pieces for dryness.
After drying:
- Cool food completely.
- Condition dried fruit for 7–10 days when appropriate.
- Watch for condensation.
- Package food in clean, dry containers.
- Label the food and date.
- Store it somewhere cool, dry and dark.
- Inspect stored food periodically.
- Rotate it into normal meals.
Dehydration Should Be Part of a Larger Food-Storage Plan
A resilient pantry doesn’t depend on one preservation method.
Dehydrated foods can work alongside:
- Canned foods
- Dry staples such as rice, beans and oats
- Commercial shelf-stable foods
- Freeze-dried foods
- Garden produce
- Foods kept in normal pantry rotation
Each method has strengths and limitations.
Dehydration is particularly valuable because the equipment is relatively accessible, the finished food is compact and lightweight, and the process can preserve foods your family already uses.
Final Thoughts
Learning how to dehydrate food for long-term storage is less about creating a bunker full of food that never expires and more about building a practical preservation skill.
Start small.
Learn how properly dried food should look and feel. Follow tested procedures. Package it correctly. Store it under good conditions. Rotate it through normal meals.
Then expand.
A few trays of apples can become dried vegetables, soup ingredients, jerky and eventually a useful portion of your emergency pantry.
And unlike emergency supplies you never touch, food dehydration is a preparedness skill you can use year-round—whether you’re preserving a garden harvest, preparing for a power outage or simply trying to waste less food.