
Affiliate Disclosure: This post contains affiliate links. If you purchase through these links, Survival Place Blog may earn a commission at no additional cost to you. As an Amazon Associate I earn from qualifying purchases.
When an evacuation order comes, having an RV sitting in the driveway can look like a major advantage.
In many situations, it is.
An RV combines transportation, shelter, storage, cooking capability, electrical power, water storage and sleeping space into one vehicle. For families, older adults, pet owners and anyone who may need to evacuate for more than a night, those advantages can be significant.
But an RV also introduces problems that a passenger car doesn’t.
It needs more fuel.
It requires more room.
It may not fit every evacuation route.
It can become difficult to maneuver in heavy traffic.
Water and waste systems require management.
Mechanical problems can strand both your transportation and your shelter at the same time.
And perhaps most importantly, an RV only provides an evacuation advantage if you can get it moving before conditions deteriorate.
That’s the central idea behind effective RV emergency evacuation:
The RV is an evacuation tool—not a guarantee.
Your plan should answer four questions before an emergency occurs:
When will we leave?
Where will we go?
How will we get there?
What will we do if the RV can’t make the trip?
This guide walks through those decisions step by step.
An RV gives you more carrying capacity, but you should still have essential supplies that can leave the vehicle with you if the RV breaks down or has to be abandoned. Our Ultimate Bug Out Bag Guide explains how to build a practical 72-hour emergency kit that stays portable.
When Does Evacuating by RV Make Sense?
Not every emergency requires evacuation.
And not every evacuation is appropriate for an RV.
An RV can be particularly useful when you have enough warning to prepare and leave before roads become severely congested.
Possible situations include:
- Wildfire evacuation
- Hurricane evacuation
- Flood threat
- Severe storm
- Extended utility outage
- Extreme heat or cold
- Local hazardous-material incident
- Temporary displacement from your home
The key factor is usually time.
If authorities tell you to evacuate immediately, that is not the time to spend two hours loading an RV, filling tanks and organizing storage compartments.
You should already be close to ready.
The Biggest Advantage: Shelter Travels With You
One of the biggest problems during a large evacuation is lodging.
Hotels may fill quickly.
Shelters may be crowded.
Pet-friendly accommodations can become difficult to find.
Friends or relatives may live hundreds of miles away.
An RV gives you another option because your shelter travels with you.
Depending on the RV, you may have:
- Beds
- Refrigerator
- Stove
- Toilet
- Shower
- Heating
- Air conditioning
- Battery power
- Fresh-water tank
- Food storage
That can make displacement substantially easier.
But those systems only help when they’re maintained and supplied.
A refrigerator doesn’t help if the propane is empty.
A fresh-water tank doesn’t help if it was never filled.
A generator doesn’t help if it won’t start.
Preparedness turns RV features into emergency resources.
The Biggest Disadvantage: You Need to Leave Early
This is where many theoretical RV bug-out plans fall apart.
A large motorhome or travel trailer doesn’t move through evacuation traffic like a compact car.
Consider:
- Congested highways
- Narrow secondary roads
- Low-clearance bridges
- Fallen trees
- Road closures
- Construction
- Flooded roads
- Steep grades
- Limited fuel availability
- Crowded gas stations
Waiting until everyone else is leaving can erase many of the RV’s advantages.
Whenever circumstances allow, the RV owner should think in terms of early evacuation rather than last-minute escape.
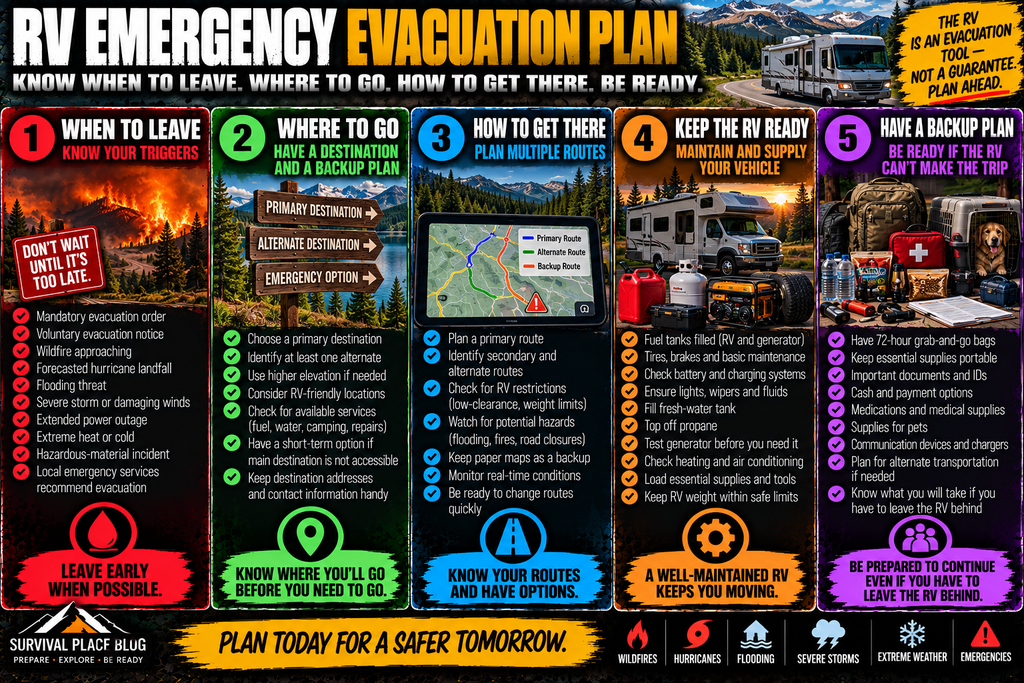
Step 1: Establish Your Evacuation Triggers
Don’t wait until an emergency to decide what would make you leave.
Discuss that beforehand.
Your triggers might include:
- Mandatory evacuation order
- Voluntary evacuation notice
- Wildfire approaching your area
- Forecasted hurricane landfall
- Flooding that could isolate your property
- Extended outage during dangerous temperatures
- Local emergency services recommending evacuation
Some households may decide to leave before an official order when circumstances clearly indicate conditions are deteriorating.
Others may have medical, mobility, age or transportation factors that make early departure particularly important.
The point is to avoid having the same debate while everyone is stressed and conditions are changing rapidly.
Step 2: Know Where You’re Going
“Get out of town” isn’t a destination.
Your evacuation plan should include several possible locations.
Destination A: Primary Location
This might be:
- Relative’s property
- Friend’s property
- RV park
- Campground
- Second property
- Designated evacuation area
Know approximately how far it is and whether your RV can realistically stay there.
Destination B: Alternate Location
Your primary destination may become unavailable.
The road could close.
The campground could evacuate.
The emergency could affect a larger region than expected.
Have another option in a different direction if possible.
Destination C: Immediate Safe Area
Sometimes you don’t need to travel hundreds of miles.
You simply need to get outside the affected zone.
Identify places relatively nearby where you could temporarily regroup and reassess.
FEMA recommends knowing your evacuation routes, having a family communication plan, keeping emergency supplies ready, and following instructions from local officials when an evacuation is ordered. Ready.gov provides additional guidance for building an evacuation plan before an emergency occurs.
Step 3: Plan More Than One Route
Your normal highway may not be usable.
Every RV evacuation plan should include:
- Primary route
- Secondary route
- At least one major alternate direction
Paper maps still have value here.
Phones are incredibly useful, but cellular networks can become congested and batteries eventually die.
Keep an appropriate road atlas or regional map in the RV.
Check RV Restrictions
A route that works perfectly in a car may not work for your RV.
Know your:
- Overall height
- Length
- Width
- Weight
- Turning limitations
Pay attention to:
- Bridge clearances
- Weight restrictions
- Narrow roads
- Steep grades
- Seasonal closures
Never blindly follow navigation software onto a road unsuitable for your vehicle.
Step 4: Fuel Is Your Evacuation Range
Fuel may be the single biggest weakness in an RV evacuation plan.
Motorhomes and tow vehicles can consume fuel quickly.
During a regional evacuation, gas stations may experience:
- Long lines
- Fuel shortages
- Power outages
- Closed pumps
- Traffic congestion
Don’t build your evacuation strategy around the assumption that you’ll simply fill up after the emergency begins.
Maintain a Fuel Buffer
A practical rule is to avoid routinely storing the RV or tow vehicle nearly empty.
Exactly how much fuel you maintain depends on:
- Vehicle
- Storage practices
- Fuel type
- Driving frequency
- Evacuation distance
But more fuel in the vehicle generally means more options when departure becomes necessary.
Know Your Real Range
Don’t rely solely on manufacturer estimates.
Know approximately how far your actual RV setup travels under normal conditions.
Towing, terrain, wind, speed and generator use can all affect fuel consumption.
Build a margin into your plan.
Step 5: Keep the RV Mechanically Ready
An RV that hasn’t moved in eight months shouldn’t automatically be considered evacuation-ready.
Mechanical readiness matters.
Before emergency season in your area, inspect or service:
- Engine oil
- Coolant
- Transmission
- Belts
- Hoses
- Brakes
- Tires
- Battery
- Lights
- Wipers
- Generator
- Hitch equipment
- Trailer brakes
- Wheel bearings where applicable
Follow your vehicle and component manufacturers’ maintenance schedules.
Tires Deserve Special Attention
RV tires can age even when tread looks good.
Inspect:
- Pressure
- Cracking
- Sidewalls
- Damage
- Valve stems
Check pressure when appropriate for the tire and manufacturer’s guidance.
Know where your tire-changing equipment is and whether you can realistically use it.
Step 6: Build an RV Tool and Repair Kit
You don’t need to become an RV technician.
But basic tools can solve minor problems that would otherwise stop the trip.
Depending on your RV, consider:
- Basic hand tools
- Screwdrivers
- Pliers
- Adjustable wrench
- Tire-pressure gauge
- Flashlight or headlamp
- Work gloves
- Spare fuses
- Electrical tape
- Duct tape
- Zip ties
- Manufacturer-specific spare items
- Jumper or portable jump-start capability
Carry the tools appropriate to your actual vehicle.
Don’t haul hundreds of pounds of equipment you don’t know how to use.
A portable jump starter can be especially useful when an RV or tow vehicle has been sitting for an extended period. The NOCO Boost gives you a way to address a weak starting battery without depending on another vehicle being available.
Step 7: Water Comes Before Comfort
An RV’s fresh-water tank is one of its greatest emergency advantages.
But water is heavy.
One gallon weighs a little over eight pounds.
A 50-gallon tank therefore represents more than 400 pounds of water.
That means water planning has to account for both emergency needs and the RV’s cargo capacity.
Know Your Fresh-Water Capacity
Know:
- Tank capacity
- Where the fill is located
- How the pump works
- Whether the system requires electricity
- How you will obtain water if the tank runs low
If evacuation risk is increasing, filling the fresh-water tank before departure may make sense, provided doing so keeps the RV within its safe weight limits.
Carry Drinking Water Separately
Don’t make the built-in tank your only water source.
Keep some drinking water accessible even if the RV water system develops a problem.
The same principles that apply to emergency water at home apply on the road: store safe drinking water, protect it from contamination, and maintain more than one way to obtain usable water. Our Home Water Storage System guide explains how much water to plan for, safe storage options, treatment and rotation.
Carry a Backup Treatment Method
Water conditions at your destination may be uncertain.
A portable water filter can provide another layer of preparedness.
It doesn’t replace safe water storage, and no single filter removes every possible contaminant.
Know what your filtration or treatment method is designed to handle.
One compact option I personally keep in my preparedness gear is the Sawyer MINI Water Filtration System. Its small size makes it easy to keep in an RV or go-bag as a backup filtration option when you’re away from your normal water supply.
Step 8: Stock Food You Will Actually Eat
An evacuation is not the time to experiment with survival food nobody in the family likes.
Keep practical food available.
Examples include:
- Canned meals
- Soup
- Tuna or chicken
- Peanut butter
- Crackers
- Oatmeal
- Granola
- Shelf-stable milk
- Dried fruit
- Nuts
- Energy bars
- Pasta
- Rice
- Familiar snacks
Account for:
- Children
- Allergies
- Dietary restrictions
- Diabetes or other dietary needs
- Pets
Rotate supplies periodically.
Don’t Depend Entirely on Refrigeration
RV refrigerators are useful, but equipment fails.
Maintain enough shelf-stable food that losing refrigeration doesn’t immediately become a crisis.
Dehydrated foods can also be useful for RV emergency supplies because they’re lightweight, shelf-stable and don’t depend on refrigeration. If you want to prepare your own, our complete guide explains how to safely dehydrate, package and store food for emergencies.
Step 9: Understand Your RV’s Electrical System
RV electrical systems vary widely.
Your RV might include:
- Shore power
- House batteries
- Generator
- Solar
- Inverter
- Propane appliances
Know what each system can and cannot operate.
For example, don’t assume your battery bank will run air conditioning for an extended period.
Test systems before you need them.
Know How Long Your Batteries Last
Run a realistic test.
Use the lights, water pump, refrigerator controls and other normal loads.
Learn approximately how long your setup functions without shore power.
If you have solar, understand how weather and shade affect charging.
Step 10: Generator Safety Matters
Generators are extremely useful during emergencies.
They can also produce deadly carbon monoxide.
Never operate a portable generator inside:
- RV
- Garage
- Enclosed trailer
- Tent
- Other enclosed or partially enclosed living area
Follow manufacturer instructions and established carbon-monoxide safety guidance.
Make sure the RV has working carbon-monoxide alarms where appropriate.
Carbon monoxide is colorless and odorless, and generators, engines and other fuel-burning equipment can produce dangerous levels without warning. The CDC provides additional guidance on preventing carbon monoxide poisoning during power outages and emergencies.
Step 11: Manage Propane Carefully
Many RVs use propane for:
- Cooking
- Refrigeration
- Heating
- Water heating
Know:
- Tank level
- Shutoff location
- Appliance procedures
- Leak-detector status
Follow your RV and appliance manufacturers’ instructions.
If you smell propane or suspect a leak, treat it seriously.
Step 12: Sanitation Can Become the Limiting Factor
An RV bathroom is a major advantage.
But tanks eventually fill.
Know the approximate capacity of your:
- Fresh tank
- Gray tank
- Black tank
Understand how quickly your household fills them.
During an extended evacuation, waste capacity may become as important as fresh water.
Carry:
- RV-safe toilet supplies
- Hand soap
- Sanitizer
- Trash bags
- Cleaning supplies
- Disposable gloves
Know where legal dump facilities are likely to be available along your route or near potential destinations.
Step 13: Pack an RV Emergency Medical Kit
Your RV should carry more than a handful of adhesive bandages.
Build a practical first-aid kit appropriate to your household.
Consider:
- Bandages
- Gauze
- Medical tape
- Antiseptic supplies
- Gloves
- Basic OTC medications
- Thermometer
- Personal medications
- Prescription information
- Medical-contact information
Household members with critical prescriptions should have an evacuation plan for those medications.
First-aid and CPR training can be more valuable than simply buying a larger medical kit.
Step 14: Keep Essential Documents Ready
An evacuation can become a longer displacement than expected.
Keep important information accessible.
That may include copies of:
- Identification
- Insurance information
- Vehicle registration
- RV insurance
- Medical information
- Emergency contacts
- Pet vaccination records
- Prescription information
Protect sensitive documents appropriately.
Consider maintaining both secure digital copies and necessary physical copies.
Step 15: Carry Some Emergency Cash
Electronic payment systems normally work extremely well.
But regional power or communications failures can temporarily affect card processing.
Keeping a reasonable amount of emergency cash in small denominations can provide another option.
There’s no need to turn your RV into a rolling bank vault.
The goal is simply having another payment method if electronic systems are temporarily unavailable.
Step 16: Plan for Pets Before You Leave
One of the biggest advantages of an RV evacuation may be the ability to keep pets with you.
But pets require their own evacuation supplies.
Pack:
- Food
- Water
- Bowls
- Medications
- Leashes
- Harnesses
- Carrier when appropriate
- Waste supplies
- Vaccination records
- Identification information
Make sure microchip and contact information is current when applicable.
Also identify pet-friendly destinations before an emergency.
Step 17: Communications and Emergency Information
Your phone will probably remain your primary communication tool.
Keep it charged.
But don’t make it your only way to receive information.
An RV emergency communications setup may include:
- Phones
- Charging cables
- Power banks
- Weather radio
- Vehicle radio
- Two-way radios where useful
During an evacuation, reliable information can affect route and destination decisions.
Monitor official emergency-management, transportation and weather information rather than relying solely on social-media rumors.
A dedicated emergency radio gives you another way to receive weather alerts and emergency information when cellular service or internet access is unreliable. The Midland ER310 Emergency Crank Weather Radio is a practical option for keeping in an RV because it provides multiple charging options and access to NOAA weather alerts.
Step 18: Keep Paper Maps
Digital navigation is excellent.
Use it.
But keep paper maps too.
A regional road atlas can help you understand the larger road network when:
- Cellular service disappears
- Phone battery dies
- Navigation app fails
- Road closure requires major rerouting
Mark:
- Primary destination
- Alternate destination
- Major highways
- Secondary highways
- Potential fuel stops
The point isn’t rejecting technology.
It’s having redundancy.
Step 19: Weather Can Change the Entire Plan
An RV provides shelter, but it is still vulnerable to weather.
Consider:
- Extreme heat
- Freezing temperatures
- High winds
- Heavy snow
- Ice
- Flooding
- Wildfire smoke
Never assume the RV is automatically safer than another shelter.
During severe weather, follow official safety guidance.
An RV is particularly vulnerable to high winds and tornadoes.
Know where a more substantial shelter is located if severe weather threatens.
Step 20: Wildfire Evacuation by RV
Wildfire is one of the situations where early departure matters most.
Conditions can change quickly.
Roads can close.
Smoke can reduce visibility.
Evacuation traffic can become severe.
If wildfire risk is increasing:
- Monitor official alerts
- Keep fuel levels up
- Connect the trailer if appropriate
- Secure loose items
- Load essential supplies
- Prepare pets
- Know multiple routes
- Be prepared to leave early
Don’t wait for flames to become visible from your property before preparing to move.
If officials order evacuation, follow their instructions.
Step 21: Flooding and RV Evacuation
Floodwater creates different problems.
Never drive an RV through flooded roads when depth and road condition are uncertain.
Water can:
- Hide washed-out pavement
- Move vehicles
- Damage engines
- Create electrical hazards
A large vehicle is not automatically safe in floodwater.
Turn around rather than gambling on an unknown flooded roadway.
Step 22: Hurricane Evacuation
RVs can be extremely useful when leaving a hurricane-threatened area early.
They can be poor places to remain during the storm itself.
High winds can overturn or severely damage RVs.
The plan should be to move away from dangerous conditions and reach an appropriate destination—not simply park nearby and ride out a major hurricane inside the RV.
Early departure also improves your chances of finding:
- Fuel
- Campsites
- Parking
- Supplies
- Less congested routes
Step 23: Security While Traveling
Emergency evacuations can place you in unfamiliar locations.
Basic travel-security habits still apply.
Lock the RV when unattended.
Keep valuables out of obvious view.
Choose legitimate, appropriate places to stop overnight.
Maintain awareness at:
- Fuel stations
- Rest areas
- Parking areas
- Campgrounds
Avoid turning ordinary travel precautions into fear.
Most evacuation security comes down to awareness, locks, lighting, communication and choosing sensible places to stop.
An evacuation can also leave you far from home and dealing with unfamiliar locations, disrupted transportation or unexpected overnight stops. Our Emergency Travel Survival Guide covers practical planning for communication, documents, water, lodging and getting home safely when normal travel plans fall apart.
Step 24: Don’t Overload the RV
The storage space inside an RV can create a dangerous temptation:
Pack everything.
Don’t.
Every RV has weight limitations.
Know your vehicle’s ratings and stay within them.
Too much weight can affect:
- Braking
- Handling
- Tires
- Suspension
- Stability
Prioritize essentials.
Preparedness isn’t measured by how much equipment you can cram into storage compartments.
Step 25: Practice Driving the RV Before an Emergency
If you rarely drive your RV, emergency evacuation is not the ideal refresher course.
Practice:
- Highway driving
- Backing
- Parking
- Fuel stops
- Tight turns
- Hills
- Hooking and unhooking
- Night driving if appropriate
If multiple adults can safely and legally operate the RV or tow vehicle, that creates additional flexibility.
Fatigue matters during long evacuations.
Step 26: Conduct a Practice Evacuation
One of the best ways to test the plan is simple:
Take the RV out.
Pretend you’re evacuating for three days.
Use what you’ve packed.
You’ll quickly discover things such as:
- Missing charging cable
- Empty propane bottle
- Broken water hose
- Dead flashlight
- Missing medication
- Bad tire-pressure gauge
- Food nobody wants
- Storage compartments packed poorly
A practice trip exposes weaknesses without the pressure of a real emergency.
Step 27: Have an Abandon-the-RV Plan
This may be the most overlooked part of RV evacuation planning.
Your RV is equipment.
It is not worth risking your life to save.
Situations can occur where you need to leave it behind.
Examples might include:
- Mechanical failure
- Fire
- Dangerous road conditions
- Rapidly changing evacuation conditions
- Medical emergency
- Location becoming unsafe
Everyone should know which supplies leave the RV with you.
That’s where a properly prepared go-bag becomes important.
Keep a portable 72-hour kit ready in case you have to continue without the RV. Our 72-Hour Go-Bag Checklist covers the essential water, food, first aid, shelter, clothing, documents and emergency gear you can keep packed and ready to move.
Your RV Should Contain Grab-and-Go Bags
Don’t scatter every critical item throughout 30 cabinets.
Maintain bags that can leave the RV quickly.
They should contain essential items such as:
- Water
- Basic food
- Necessary medications
- First-aid supplies
- Flashlight
- Phone charging
- Important information
- Weather-appropriate clothing
- Basic hygiene items
The exact contents depend on your household.
But the principle is simple:
If you have to leave the RV in five minutes, you shouldn’t have to repack your entire emergency kit.
Step 28: Prepare the Tow Vehicle Too
Travel-trailer and fifth-wheel owners have an advantage motorhome owners may not:
The tow vehicle can separate from the RV.
But that vehicle needs its own emergency readiness.
Keep up with:
- Tires
- Battery
- Fluids
- Fuel
- Brakes
- Lighting
And keep at least some essential supplies in the tow vehicle rather than putting everything inside the trailer.
If access to the trailer is lost, you still want basic emergency gear with you.
Step 29: Build a Departure Checklist
Emergency stress makes people forget obvious things.
A departure checklist solves that.
Depending on your RV, it may include:
- Disconnect shore power
- Disconnect water
- Retract awning
- Retract slides
- Raise stabilizers
- Secure cabinets
- Close vents as appropriate
- Secure exterior compartments
- Check hitch
- Check safety chains
- Check electrical connection
- Check trailer brakes
- Check lights
- Check tires
- Secure pets
- Confirm passengers
- Confirm route
- Confirm destination
Your checklist should match your specific RV.
Keep it somewhere obvious.
Step 30: Keep an RV Evacuation Load List
Some supplies can remain in the RV year-round.
Others need to be loaded when an evacuation becomes possible.
Keep in the RV
Examples:
- Basic tools
- First-aid supplies
- Flashlights
- Paper maps
- Hygiene supplies
- Basic shelf-stable food
- Cooking equipment
- Water-treatment backup
- Charging cables
- Work gloves
Load Before Departure
Examples:
- Prescription medications
- Phones
- Wallets
- Current documents
- Refrigerated medications
- Pet supplies
- Additional clothing
- Fresh food
- Drinking water
- Personal electronics
Having the list prevents repeated trips through the house asking:
“What are we forgetting?”
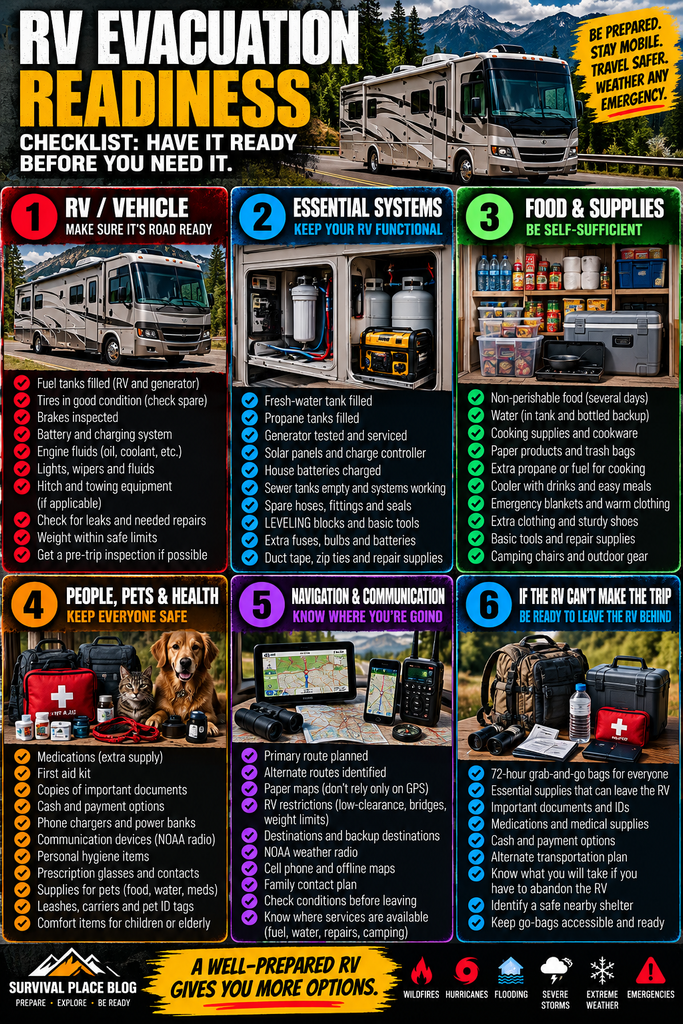
RV Emergency Evacuation Checklist
Before considering the RV ready, verify the following.
Vehicle
- Fuel
- Tires
- Battery
- Fluids
- Brakes
- Lights
- Wipers
- Hitch equipment
- Generator
Water
- Fresh-water supply
- Drinking water
- Water hose
- Backup filtration or treatment
Food
- Shelf-stable meals
- Snacks
- Special dietary food
- Pet food
- Manual can opener
Power
- House batteries
- Generator
- Fuel as appropriate
- Charging cables
- Power banks
- Flashlights
- Headlamps
Medical
- First-aid kit
- Prescription medications
- OTC medications
- Medical information
Navigation
- Phone navigation
- Paper maps
- Primary route
- Alternate routes
- Destination information
Communication
- Phones
- Chargers
- Emergency radio
- Contact list
Sanitation
- Toilet supplies
- Soap
- Hand sanitizer
- Trash bags
- Cleaning supplies
- Disposable gloves
Pets
- Food
- Water
- Leashes
- Carriers
- Medications
- Records
Documents
- Identification
- Insurance
- Registration
- Emergency contacts
- Medical information
Want a checklist you can keep in the RV? Download the free RV Emergency Evacuation Checklist and use it to check your vehicle, water, food, power, medical supplies, navigation, communications, sanitation, pet supplies and important documents before you need to leave.
Common RV Evacuation Mistakes
A good plan also accounts for what commonly goes wrong.
Mistake 1: Waiting Too Long
The larger the RV, the more important early departure becomes.
Mistake 2: Assuming Fuel Will Be Available
Regional evacuations can overwhelm fuel stations.
Maintain reasonable readiness beforehand.
Mistake 3: Depending on One Route
Road closures can destroy a single-route plan.
Know alternatives.
Mistake 4: Packing Too Much
Overloading can create a vehicle-safety problem.
Stay within your RV’s ratings.
Mistake 5: Ignoring Maintenance
A neglected RV is not an emergency evacuation vehicle.
Mistake 6: Depending Entirely on the RV
Always maintain a secondary plan.
The RV can break down, become inaccessible, or become unsafe.
Mistake 7: Never Practicing
A plan that has never been tested is mostly a theory.
Take practice trips.
Learn your systems.
Fix problems before an emergency.
A Simple 24-Hour RV Readiness Routine
If conditions suggest an evacuation may become necessary within the next day, don’t wait until the final hour.
Start preparing.
Check the Vehicle
Fuel it.
Check tires.
Check fluids.
Verify the battery.
Test lights.
Check the RV Systems
Test:
- Refrigerator
- Water pump
- Batteries
- Generator
- Propane
- Interior lights
- Carbon-monoxide alarm
Load Essentials
Add:
- Medications
- Documents
- Clothing
- Pet supplies
- Fresh food
- Drinking water
- Electronics
Monitor Conditions
Watch:
- Official emergency alerts
- Weather
- Transportation agencies
- Local emergency management
Make the Departure Decision
If your predetermined evacuation trigger is reached, go.
Don’t keep delaying simply because leaving is inconvenient.
What If You Don’t Own an RV?
You do not need an RV to have a strong evacuation plan.
A reliable passenger vehicle with:
- Fuel
- Go-bags
- Water
- Food
- Maps
- Emergency supplies
- Alternate routes
- Planned destinations
may be a better evacuation tool for many households.
An RV adds comfort and capability.
It also adds complexity.
The best evacuation vehicle is the one that is reliable, ready and appropriate for the situation.
Final Thoughts: The RV Is a Tool, Not the Plan
An RV can be an excellent emergency evacuation resource.
It provides shelter.
It carries supplies.
It gives families more room.
It can accommodate pets.
It can provide water, cooking, sanitation and electrical power.
But none of those advantages matter if the RV:
- Won’t start
- Has bad tires
- Is empty of fuel
- Is overloaded
- Can’t reach your destination
- Gets trapped in evacuation traffic
- Isn’t stocked
- Hasn’t been maintained
The strongest RV emergency evacuation plan combines the vehicle with preparation.
Know when you’ll leave.
Know where you’ll go.
Know multiple ways to get there.
Maintain the RV.
Keep essential supplies ready.
Practice using the systems.
And always have a backup plan if the RV becomes unusable.
Your RV can carry your emergency shelter—but your planning is what gets you to safety.